Telegram ChatBot Instruction
1. Installation
Install this module according to the us_messenger documentation
2. Configuration
In Telegram
Send the message /start, then /newbot to @BotFather and follow the further instructions to create a bot and obtain its token
 In Odoo
- Enable developer mode
- Open the menu [[ Settings ]] >> Technical >> Parameters >> System Parameters
- Make sure that the web.base.url parameter is set correctly and is accessible over the internet (it should not be localhost). Additionally, telegram only accepts https addresses (i.e., not http). If you can only use localhost, use ngrok
- Open the menu [[ Messengers ]] >> Messengers
- Select the Kanban card with the Telegram icon and name the project 'Enter_bot_name'
- Enter the token from @BotFather in the token field
- Enter the bot name and select the operators with whom the user will contact
- Unzip the project
- Click the [Run Now] button in the top left corner
3. Usage
Discussion in the Discussion menu
In Telegram
- start a conversation with the created bot
- optionally enter contact details (email, phone number)
- press the button Connect with operator
In Odoo:
- open the menu [ Discuss ]
- RESULT: Two contact records will be created - child and parent. Later, other children from different messengers can join the parent record
- RESULT: a channel with the name Telegram:
has been created (the prefix can be set in the project parameter PARTNER_NAME_PREFIX). If you do not see it, refresh the current page - Open the channel and reply to the message
In Telegram:
- RESULT: message delivered via bot
You can continue the conversation in this way
Conversation in any document where there is a chat
In Odoo:
- Make sure that in the section [[Messengers]] >> Messengers >> <Your bot's name> >> DUPLICATE_MESSAGE_BY_ANSWER settings you have written "yes".
- Add subscribers to the chat by clicking the "Add Subscribers" button. Select only parent contacts (without the bot's name)
- Click the "Send Message" button. Choose who and in which messenger to send the message. Write the message and send it. Note: the message will be sent not only to the selected messenger but also to the email. To disable email sending, you can click the Subscribers button, select a subscriber, click "Edit Subscription", and also disable "Discussions" and enable "Notes".
- In the [[ Discussion ]] menu, you will see a message from the document with a signature indicating from which document it was written
In Telegram:
- RESULT: A new message will appear
- Reply to this message. Note: You can reply to the message by clicking the appropriate button
In Odoo:
- RESULT: you will see messages from Telegram in the chat document
Sending and receiving files
The operator has the ability to send not only text messages but also messages with attachments.
API Telegram Bot has a limit on files sent through the bot:
- The operator cannot send more than 10 MB for photos and 50 MB for other files to a Telegram user.
- Also, the operator cannot receive files from a Telegram user that exceed 20 MB in size.
Telegram ChatBot Instruction by Kitworks
1. Introduction
Module "Chatbot Telegram" - a virtual manager, a convenient tool for business communication with the audience.
Using the module you can:
- Provide automatic responses to standard, most common support service requests.
- Through the Telegram bot, create new contacts, inquiries, orders, CRM Leads, tasks, and work with other functionality in Odoo.
- View and update any information from Odoo.
- Send automatic notifications to clients about changes in orders, inquiries.
- Send automatic notifications to managers about the creation of new tasks, inquiries, orders. About the assignment of tasks and other scheduled events. About adding new comments and making other changes to existing records. Send reminders about the execution of mandatory tasks according to the schedule.
- Send mass messages to your subscribers.
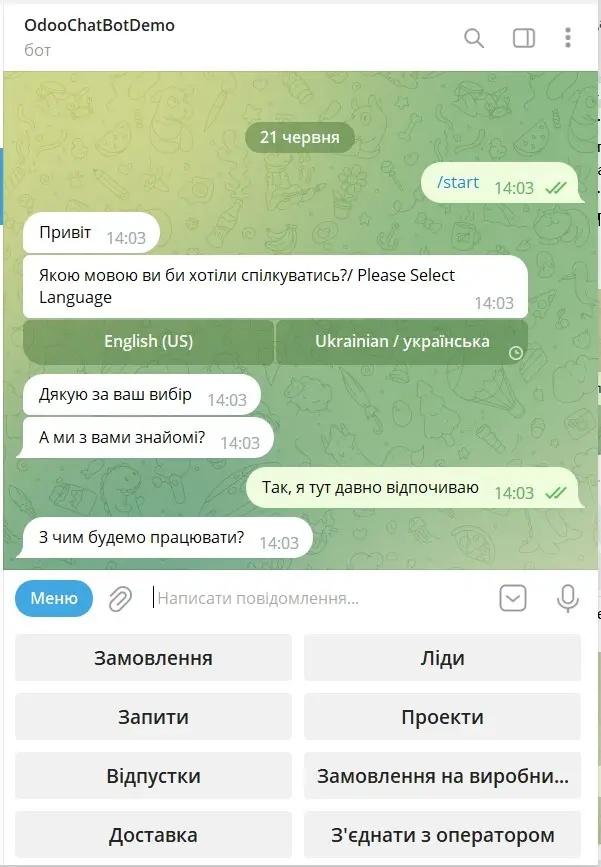
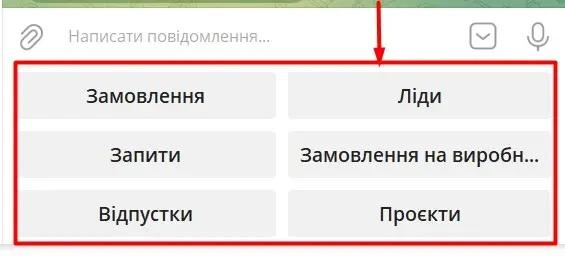
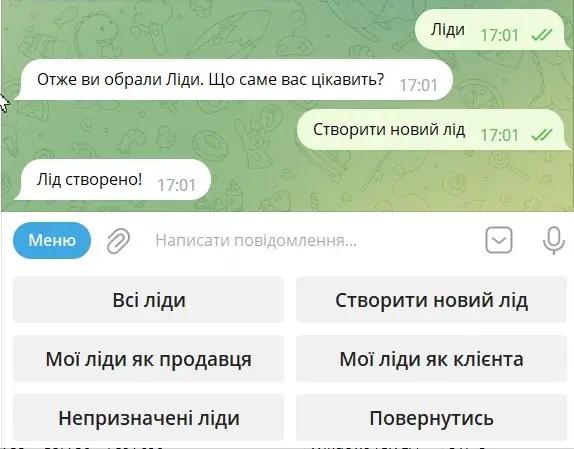
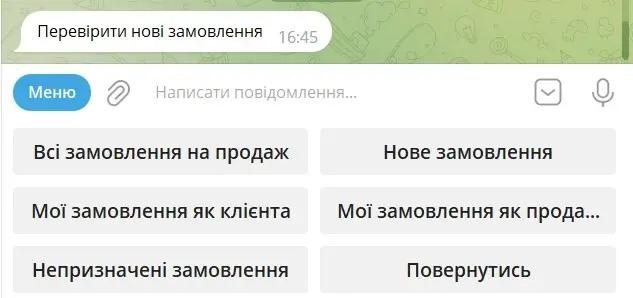
For example, a client chatbot may look like this and address the most common client questions:
Or build more complex branches to simplify the work of managers and provide sales management capabilities directly from the chatbot:
1.1. List of modules for working with Telegram bot.
|
Module name |
Technical name |
Latest version |
Description |
|
Chatbot Telegram |
kw_chatbot_telegram |
15.0.1.0.7 |
Allows communication with clients through the Telegram bot. |
|
Chatbot telegram builder |
kw_chatbot_builder_telegram |
15.0.1.0.16 |
Step constructor for automated dialogues for Telegram bot. |
|
Chatbot Odoo Survey |
kw_chatbot_survey |
15.0.1.0.0 |
Universal base module for a chatbot that allows creating surveys. |
|
Chatbot Telegram Survey |
kw_chatbot_survey_telegram |
15.0.1.0.6 |
Additional functionality for setting up surveys for Telegram bot. |
|
Chatbot builder sale |
kw_chatbot_builder_sale |
15.0.1.0.0 |
Universal base module for a chatbot that allows creating orders. |
|
Chatbot builder sale |
kw_chatbot_builder_telegram_sale |
15.0.1.0.0 |
Additional functionality for setting up orders for Telegram bot. |
|
ChatBot login in system |
kw_chatbot_login_in_system |
15.0.1.0.1 |
Allows adding a user messenger authorization step in the Odoo system. |
|
Chatbot Generic Request |
kw_chatbot_generic_request |
15.0.1.0.1 |
Allows adding the entire history of correspondence with clients and attachments from the dialogue to requests. It depends on the Generic Request module from the Center of Research and Development. |
2. Installing Telegram chatbot.
The first installation of the chatbot module is detailed and described in the instruction for installing the main chatbot module Instruction Setup Generally Chatbot Odoo Kitworks.docx.
If you already have a chatbot configured for other messengers in your system, you need to install an additional Telegram messenger using one of the methods described below.
2.1. Method 1. Installing Telegram through the 'Application' menu.
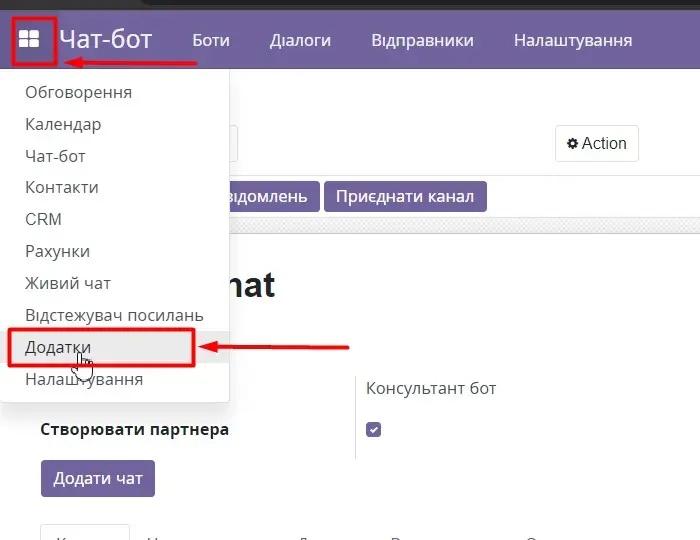
Go to the main menu and select the section "Apps":
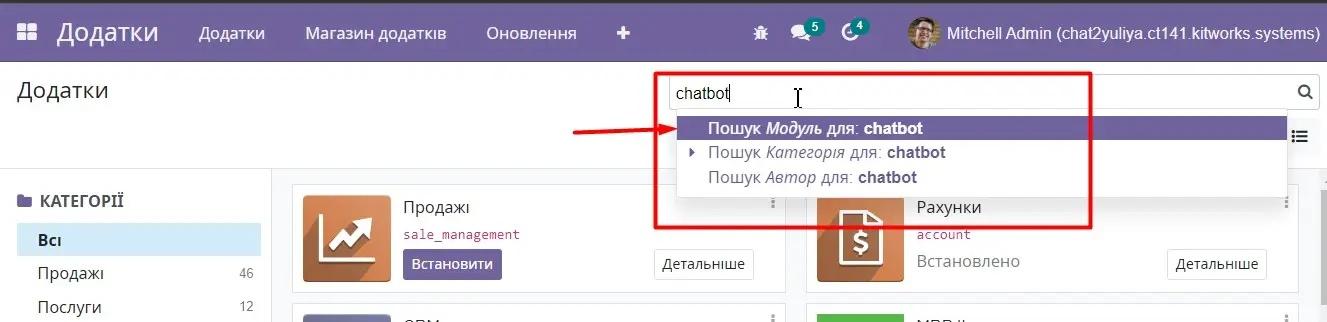
We remove the "Applications" filter from the search bar and enter the value "chatbot" and press on the keyboard "Enter» or select «Search: Module for: chatbot from the dropdown list of hints:
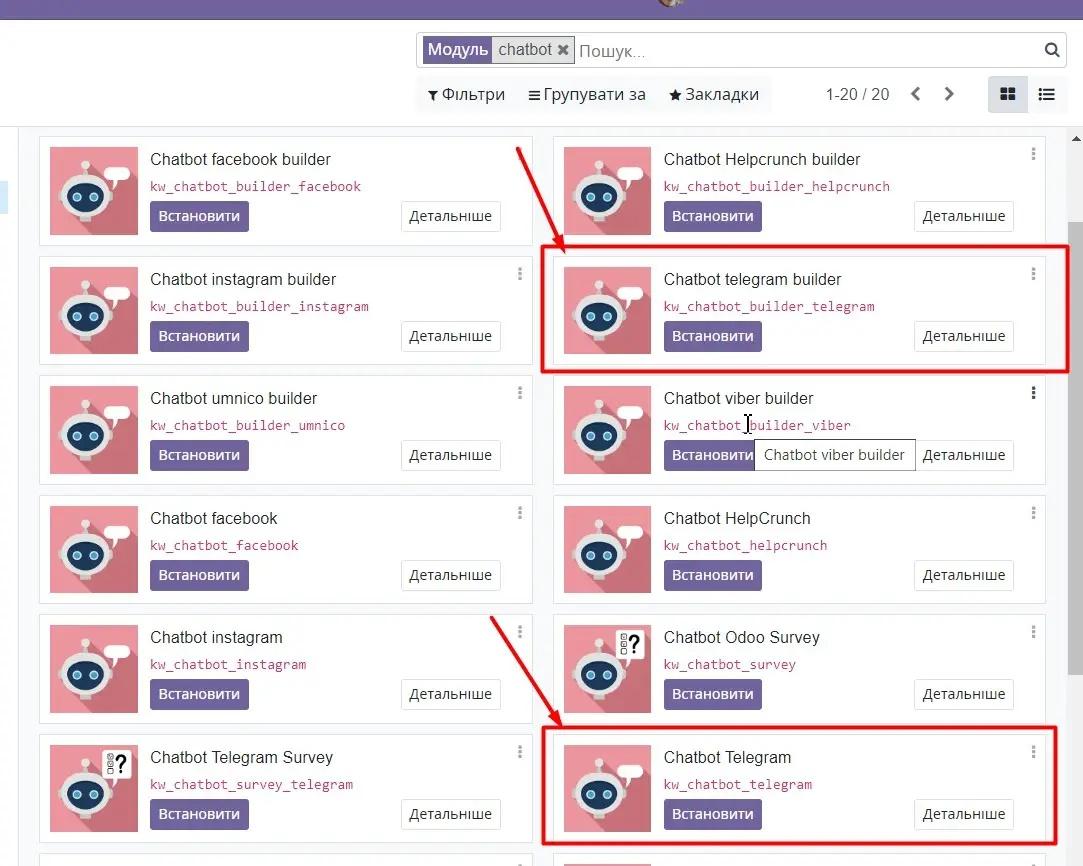
In the list of applications, we find 'Chatbot Telegram' and 'Chatbot telegram builder'. It is enough to install 'Chatbot telegram builder', 'Chatbot Telegram' will be installed automatically. Click the button Install to Chatbot telegram builder.
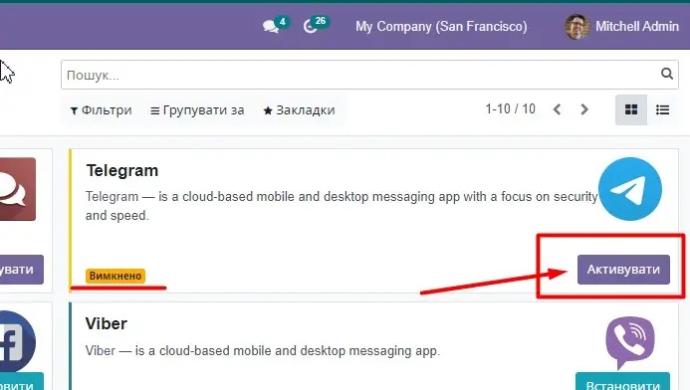
After completing the module installation, proceed to the application Chatbot - Settings - Messengers.
We find our communication channel in the list. By default, it is disabled and needs to be activated by clicking the button "Activate".

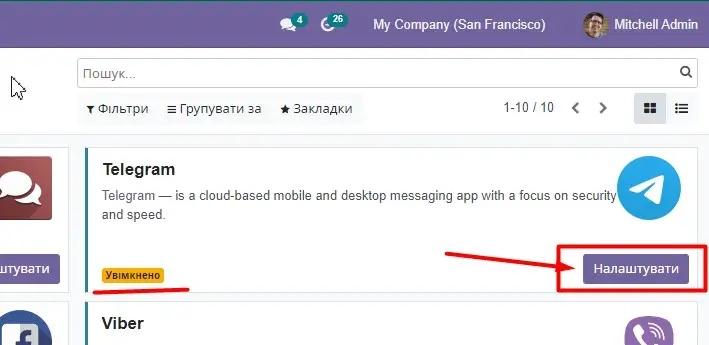
The status of the communication channel will change to Enabled and the button to go to the messenger settings will appear.
2.2. Method 2. Installation through chat-bot settings.
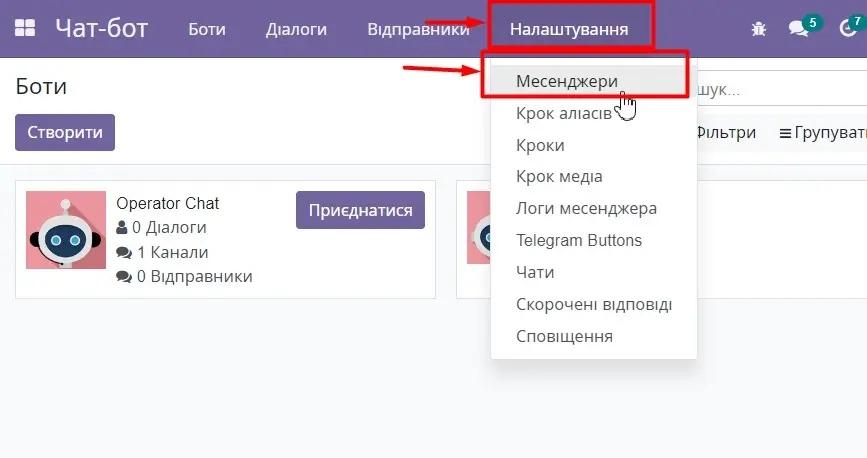
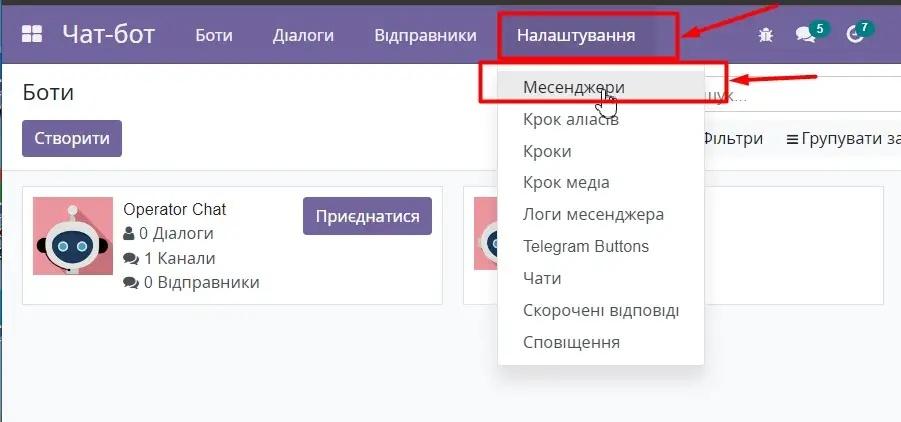
Follow the path Chatbot - Settings – Messengers.
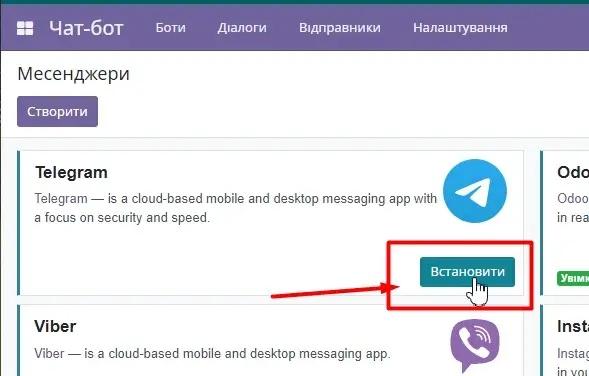
For example, we choose Telegram and press the button "Install".
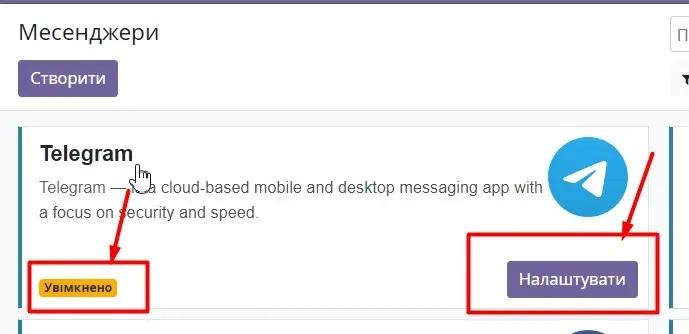
We find our communication channel in the list. By default, it is disabled and needs to be activated by clicking the button "Activate".
The status of the communication channel will change to Enabled and the button to go to the messenger settings will appear "Configure".
 After activating the messenger, you need to go to the list of applications and check that the "Chatbot telegram builder" module is installed. If the module is not installed, you need to install it additionally to be able to use the automatic dialogue builder:
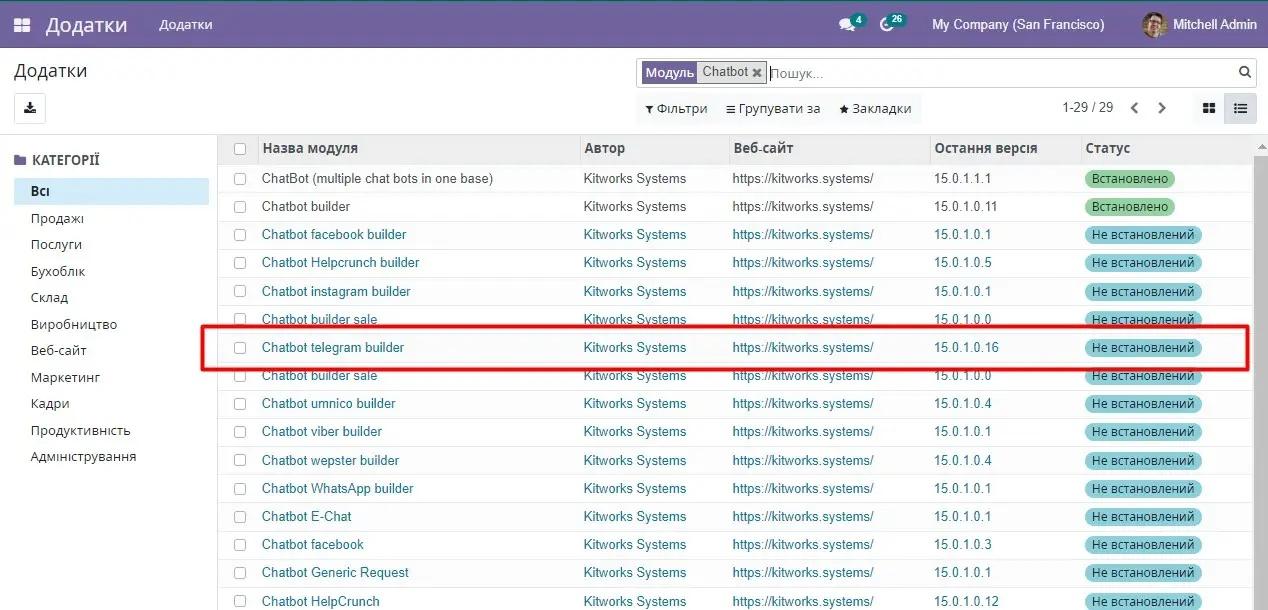
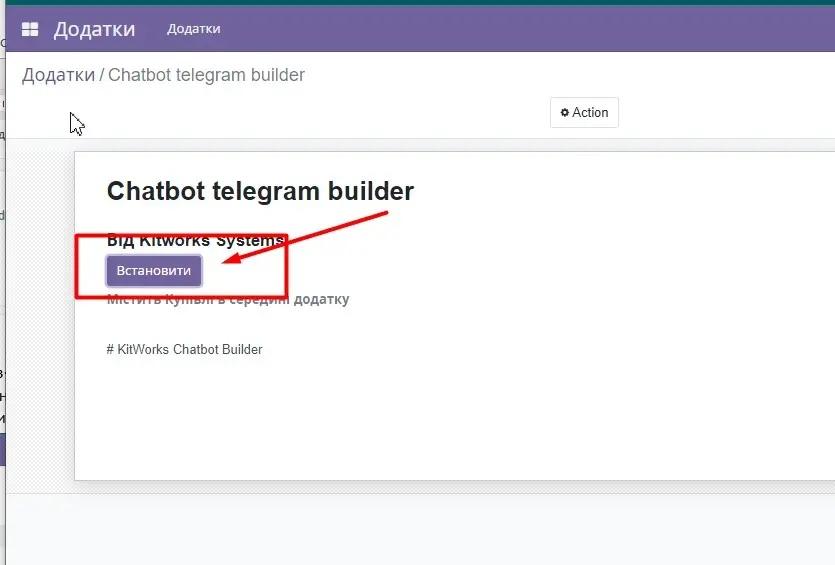
We click on the line with the module name. We go to the module itself and click the "Install" button:
3. Messenger setup.
Before starting to work with the chatbot, it is necessary to create a Telegram bot and configure the messenger communication channels in Odoo.
Let's take a closer look at the step of creating a Telegram bot, connecting it through the menu "Settings –Messengers" or directly through the client chat for further use in the system.
3.1. Creating a bot in Telegram.
To create a new bot in Telegram, we will use the bot BotFathet We find it in Telegram using the search bar and join:
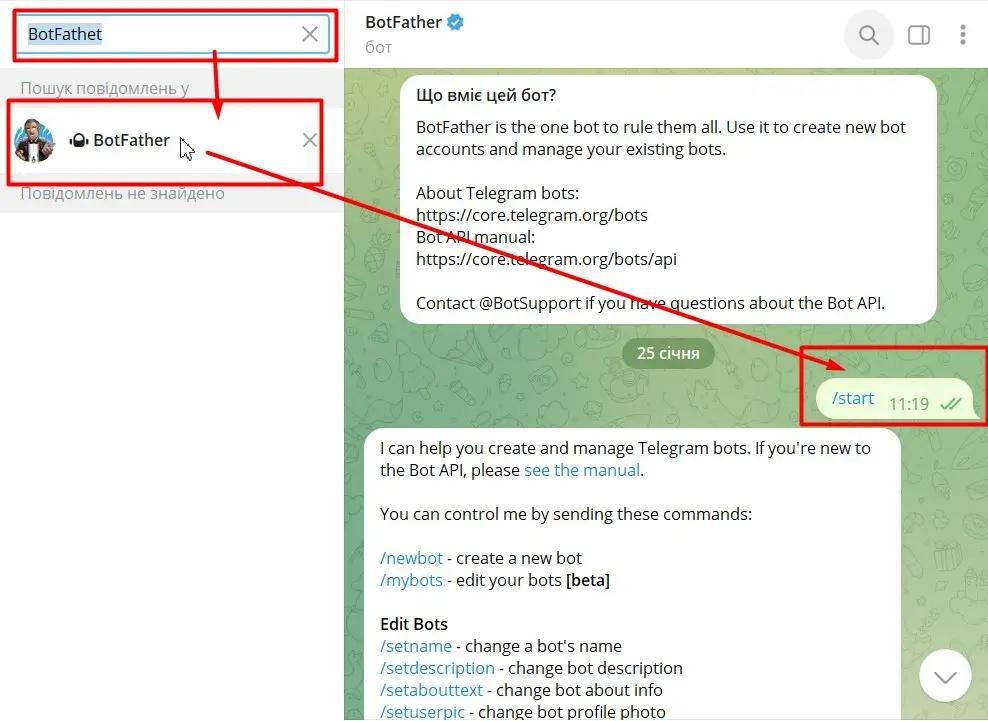
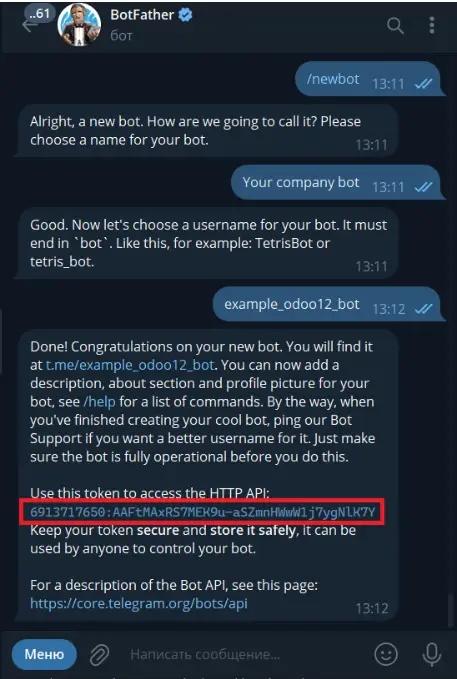
Choose function /newbot and according to the BotFather bot instructions, create your own as shown in the image below.
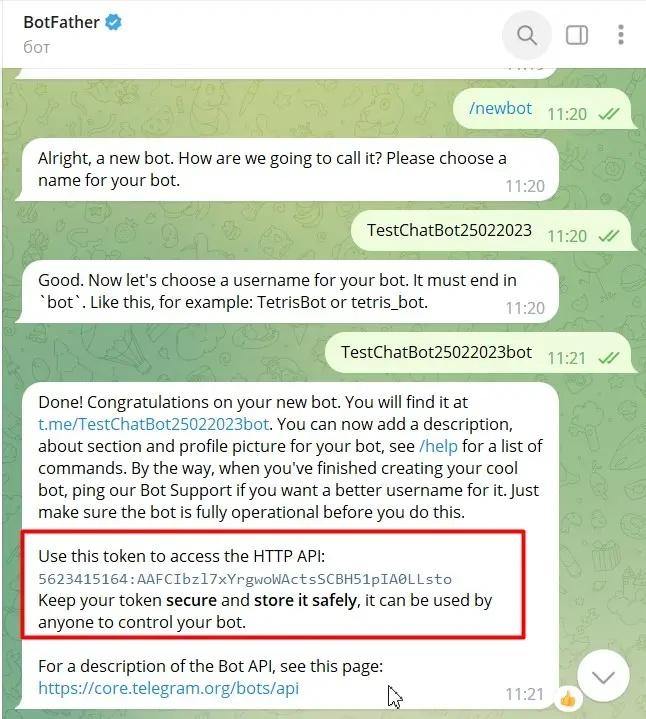
For further work, we will need the token HTTP API token Copy it: 5623415164:AAFCIbzl7xYrgwoWActsSCBH51pIA0LLsto.
3.2. Channel setup via "Messenger".
After copying the token, proceed Settings – Messenger – Telegram. Press the button "Edit", then "Add chat":
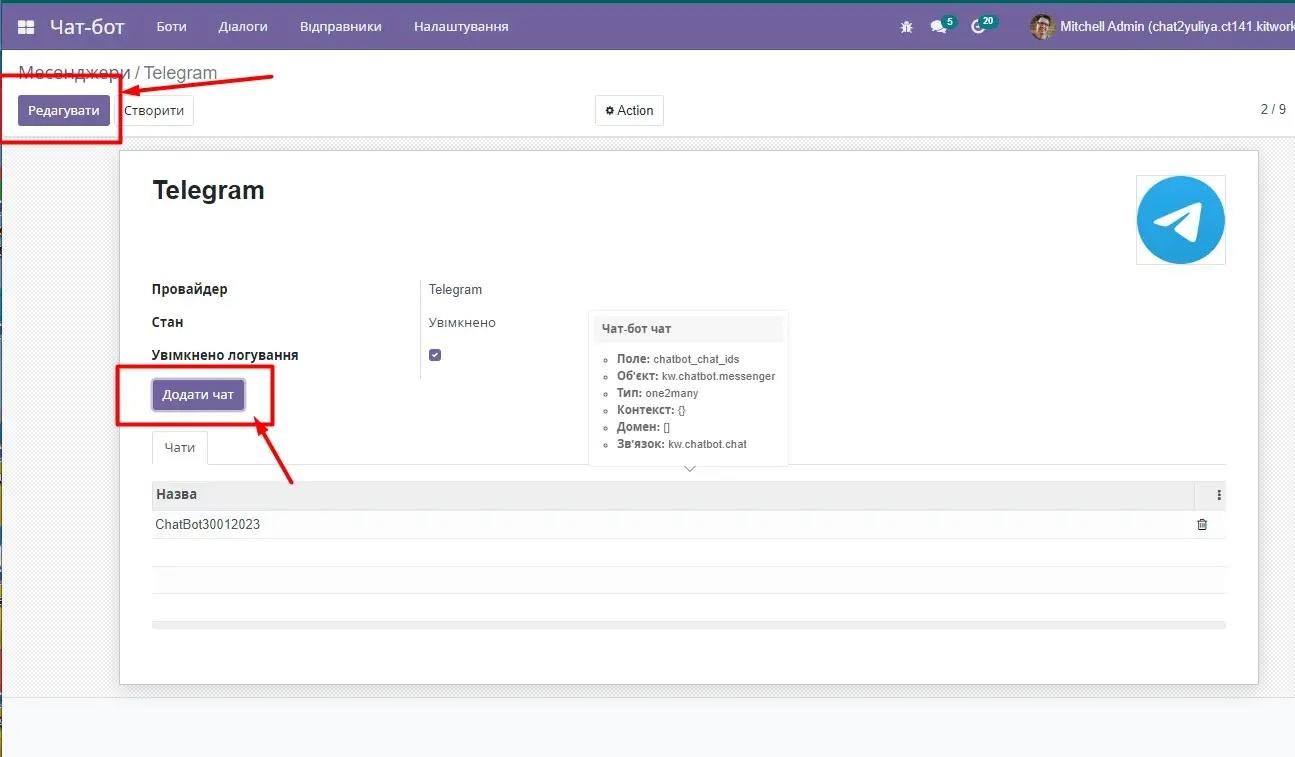
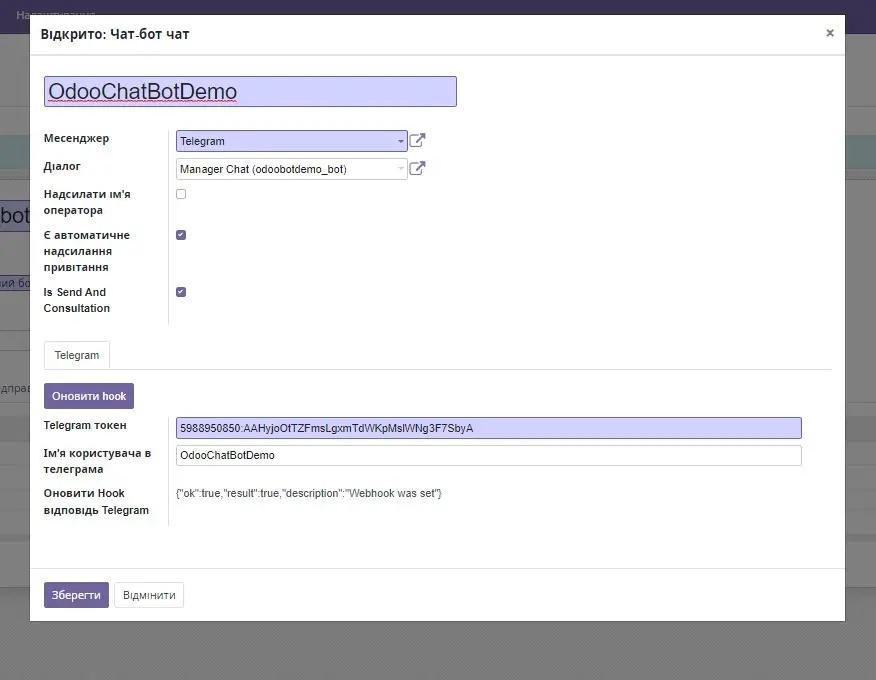
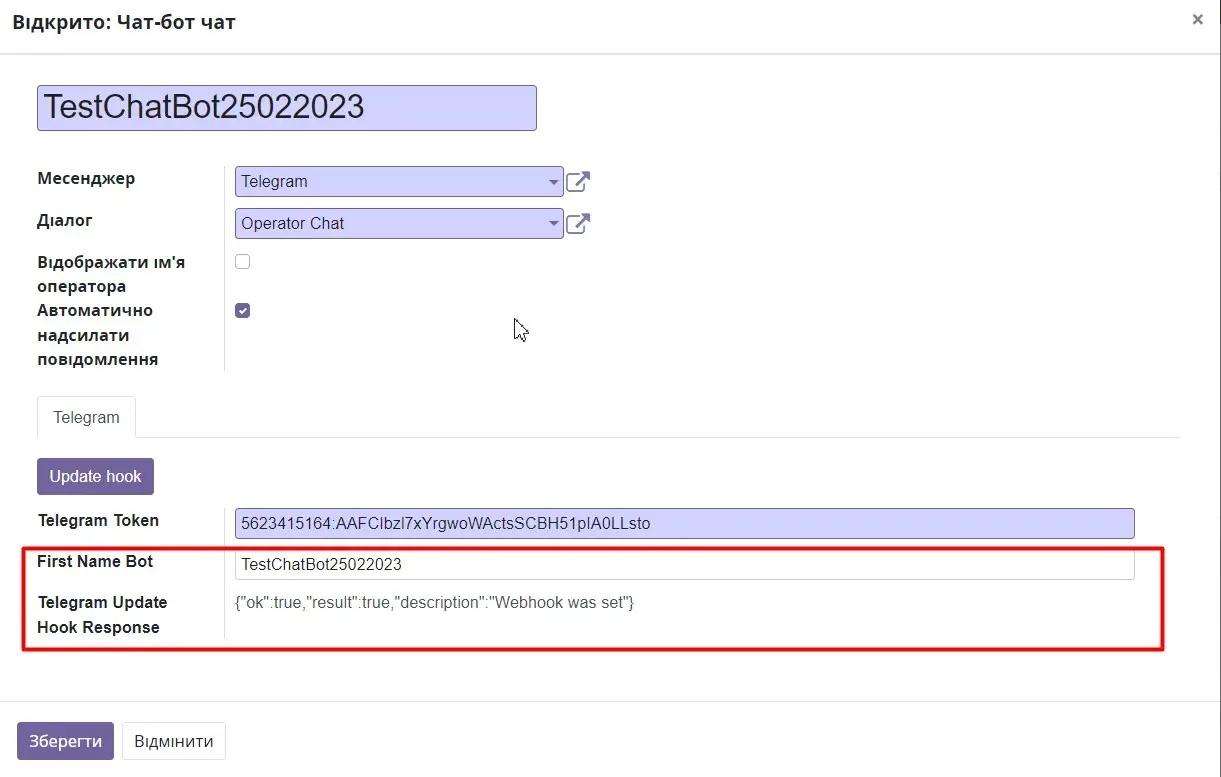
The window for adding a chatbot opens.
In field "Messenger" in the dropdown list, we select our messenger through which communication with the client will take place.
In field "Dialog" by default, the client chat is selected.
«Send operator name» - if the function is enabled, the client will receive a message, for example, "Yulia joined the chat", at the moment the operator joins the client's chat. To prevent the operator's name from appearing in dialogues, this functionality needs to be disabled. By default, the checkbox is not set.
"There is automatic message sending» - if the function is enabled, the client will receive a message about the operator joining the chat and the ability to end the dialogue from the chatbot settings. For example, "Operator Yulia joined the chat. To end the conversation, press /end".
Is Send End Consultation - if the function is enabled, after the consultation is completed, the user is sent a message about the completion of the dialogue from the chatbot settings.
We need in the field «Telegram Token" insert our copied token for the bot. (How to get the token is described in the section Create a bot in Telegram. After this, press the button "Update Hook".

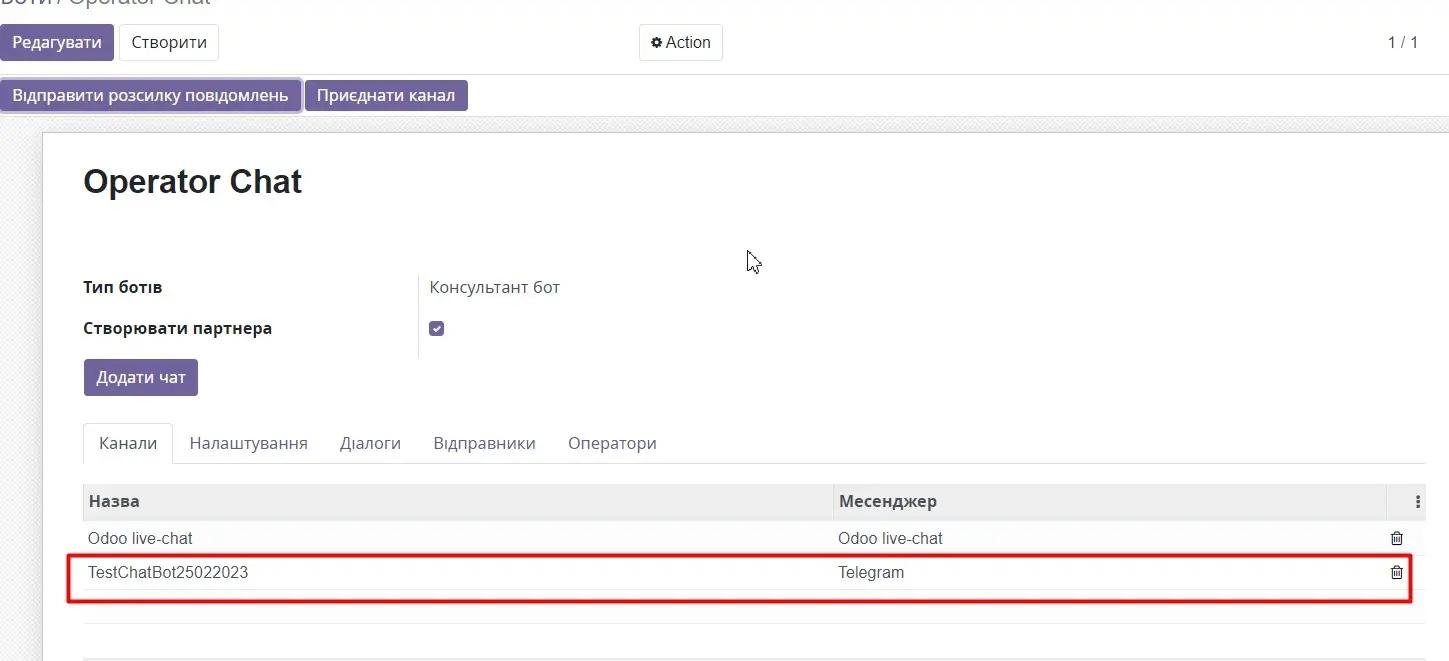
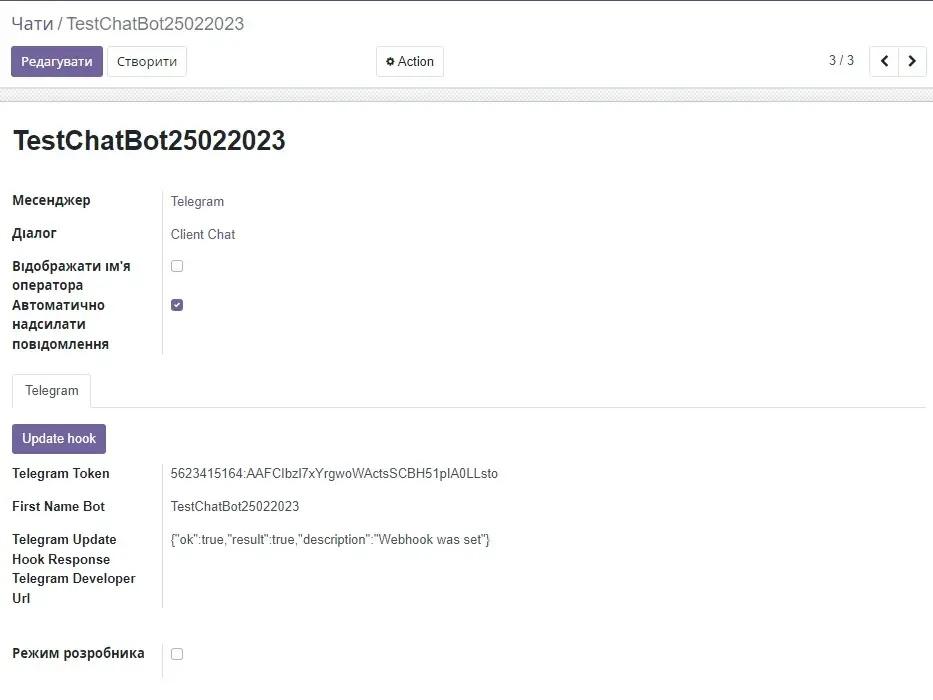
Our new bot, with which we can start working, is added to the list of channels:
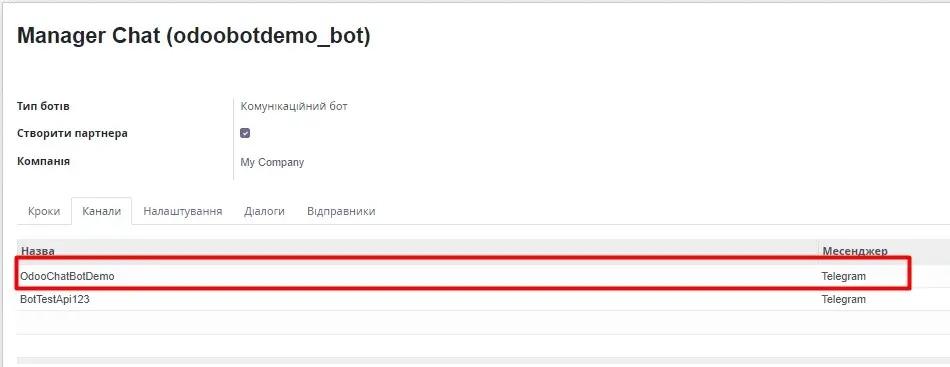
If you click on the name of our bot, a window opens with detailed information about it and updated data in the fields "Username in Telegram" and "Update Hook Response Telegram".
Button "Save"- saves all changes made on the communication channel editing form.
Button "Cancel"- cancels all actions on the communication channel editing form.
3.3. Channel setup via 'Client Chat'.
The second method of setting up the messenger is connecting the bot through the client chat.
For this, you need to go "Bots – Client Chat" and press the button "Add chat".

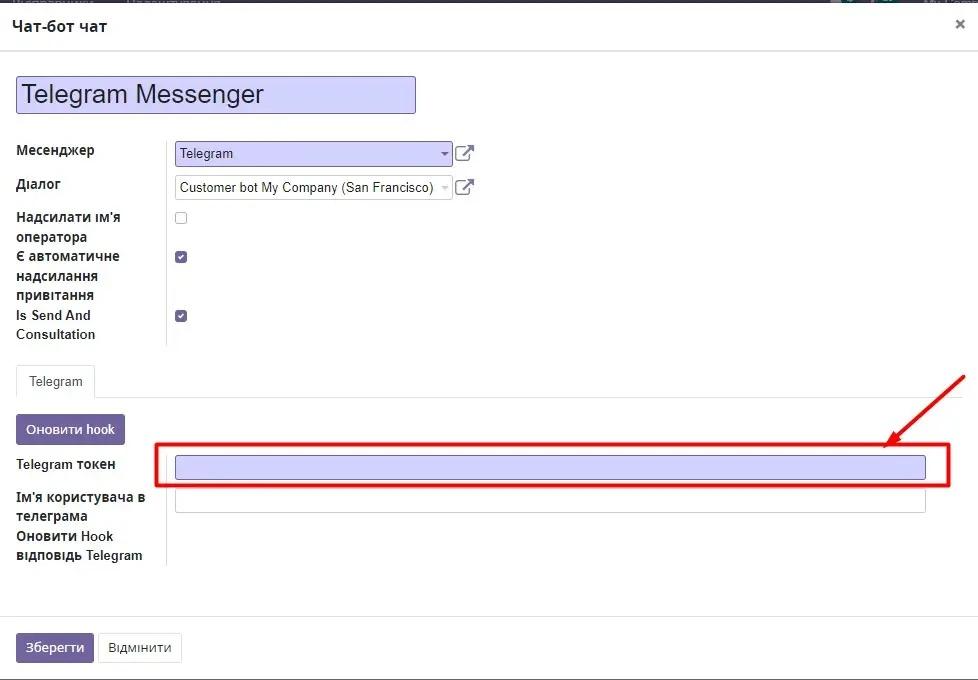
The window for adding a chatbot opens.
In field "Messenger" in the dropdown list, we select our messenger through which communication with the client will take place.
In field "Dialog" by default, the client chat is selected.
To display the operator's name in dialogues, you need to check the box Display name operator By default, the checkbox is not set. Checkbox "Automatically send messages" is set by default.
We need in the field «Telegram Token" insert our copied token for the bot. (How to get the token is described in the section Create a bot in Telegram. After this, press the button "Update Hook".
Our new bot, with which we can start working, is added to the list of channels:
If you click on the name of our bot, a window opens with detailed information about it and updated data in the fields "Username in Telegram" and "Update Hook Response Telegram"..
Button "Save"- saves all changes made on the communication channel editing form.
Button "Cancel"- cancels all actions on the communication channel editing form.
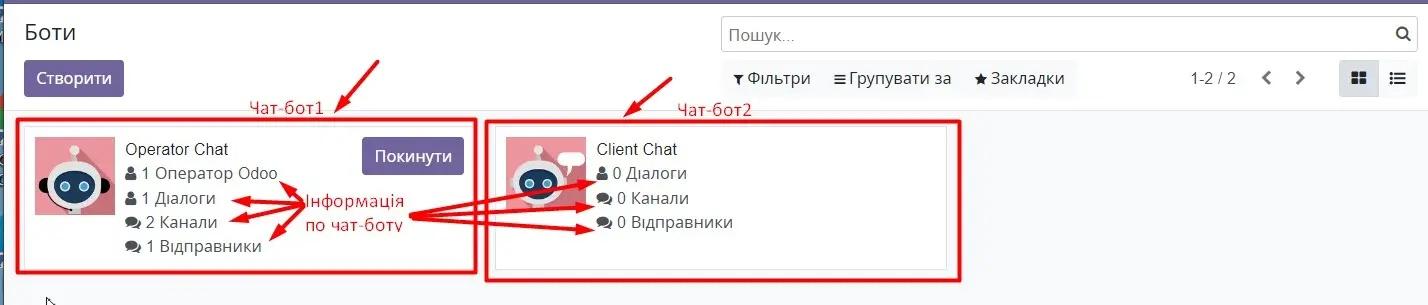
4. Section «Bots».

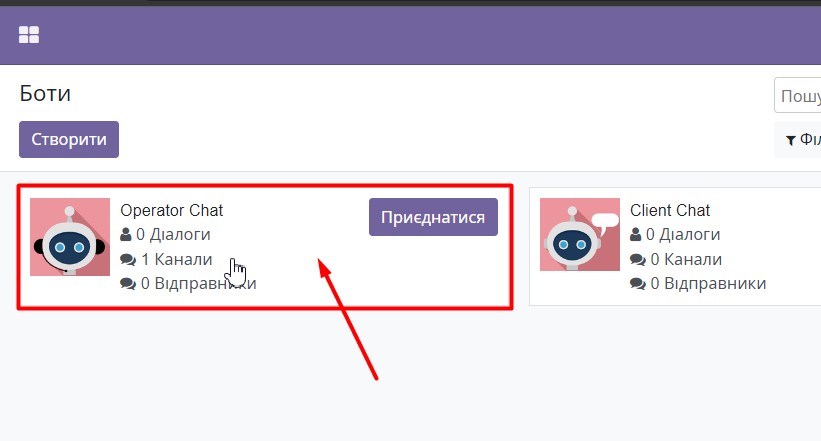
In the section "Bots" displays the main information for each chatbot registered in the system:
- chatbot name;
- number of operators connected to the chatbot;
- number of dialogs;
- number of communication channels with clients;
- number of message senders.
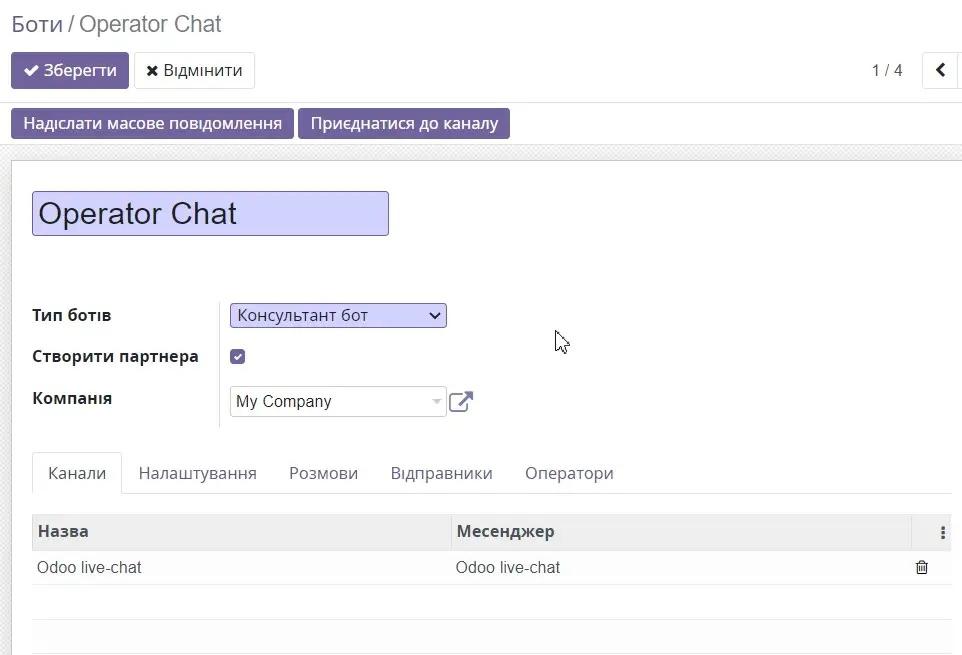
4.1. Consultation chatbot 'Operator Chat'.
For an Odoo system user to communicate with clients from different messengers, they need to join the consultation chatbot.
The consultation chatbot provides the opportunity:
- Send message broadcast – button 'Send message broadcast';
- Join channel - button Join channel;
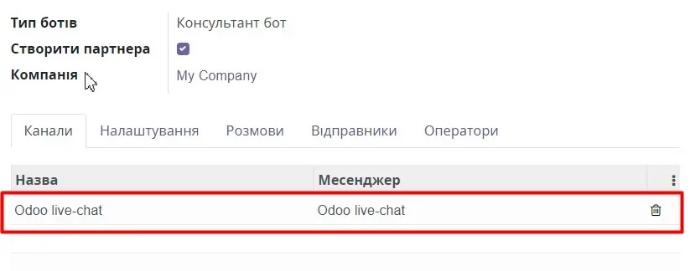
- Set the company working with this chatbot – 'Company' field;
- Create contacts for a new client who joined the chatbot - checkbox "Create partner"
- View list of communication channels - tab 'Channels';
- View and make current chatbot settings – 'Settings' tab;
- View dialogue information - tab 'Conversations';
- View sender information - tab Senders;
- View operator information - tab Operators.
By default, the checkbox is set "Partner creation". Thus, at the beginning of each dialogue with a new client, a contact for this client will be created and stored in the database for further interaction with him.
Important! If you disable the partner creation functionality for new clients who do not exist in the Odoo contact database, the system will not be able to recognize them and correctly display dialogues in the 'Discussion' module and in the dialogue pop-up window.
4.1.1. Administrator-operator connection to the bot-chat.
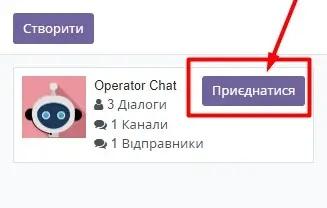
To start working, the operator needs to join the consultation chat. To do this, you need to click the button "Join" on the chatbot.
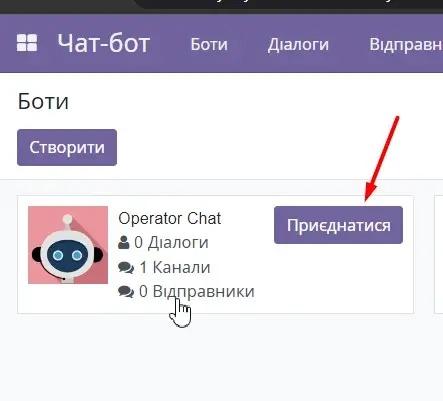 After joining the button "Join" will change to "Leave".
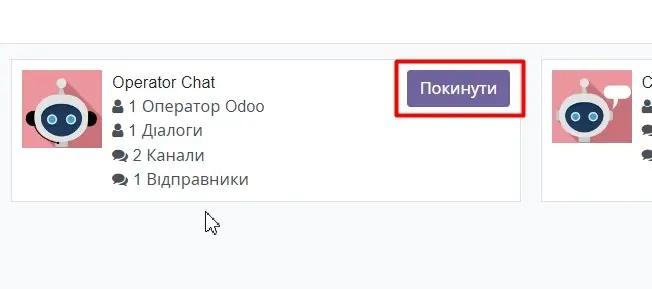
To enter the consultation chat, you need to click on the chatbot.
4.1.2. Moderation of chatbot operators.
The chatbot allows adding a user as an operator from any messenger or Odoo. Any person, after verification by the chatbot Administrator, can become a chat operator and communicate with the client.
Let's consider a few cases:
- all operators work in Odoo;
- the operator works through any messenger.
All operators in Odoo.
To become an operator in Odoo, you need to go to the Chatbot app and click the "Join" button:
The user becomes an operator of the consultation chat. Thus, all Odoo users can be operators. All new incoming messages are distributed among operators as follows: each new chat is redirected to the operator who has the least number of active chats.
Operators from other messengers.
Let's look at how to become an operator of a third-party messenger using the example of a Telegram chatbot.
The user joins the chatbot in Telegram and sends a message.
The consultation chat administrator responds to this message and in the tab "Senders" can confirm or reject the candidacy of the chatbot messenger operator:
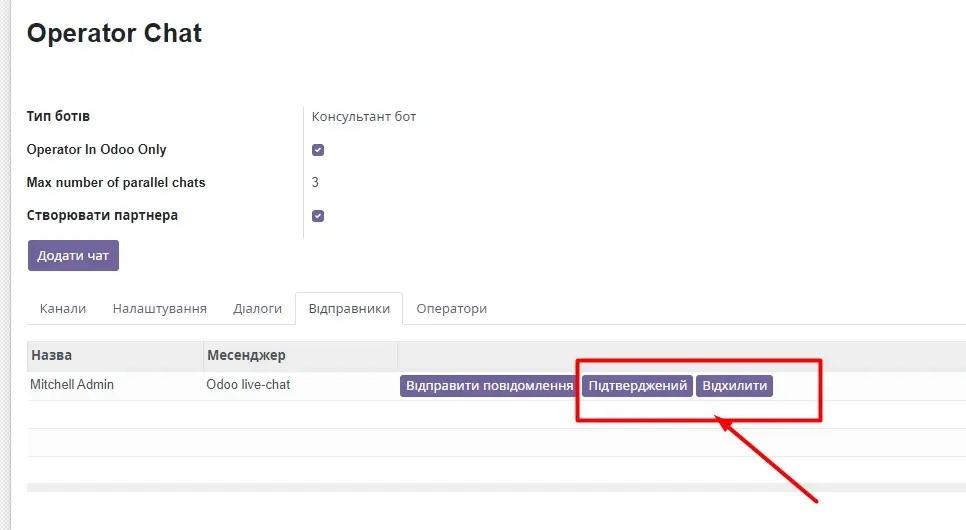
After confirmation, the user becomes a chatbot operator. The operator can only communicate with one incoming chat subscriber at a time because messages are sent to a specific person and the chatbot, not in separate personal messages in telegram.
4.1.3. Sending bulk messages.
The chatbot provides the ability to create mass message distribution for the entire list of contacts connected to the bot.
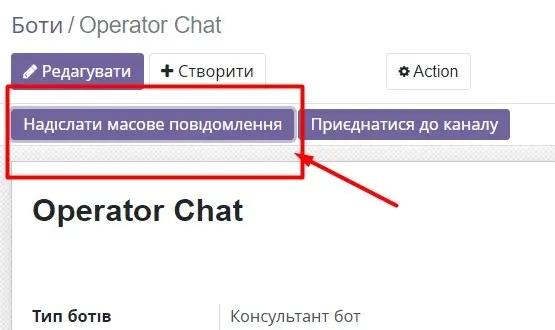
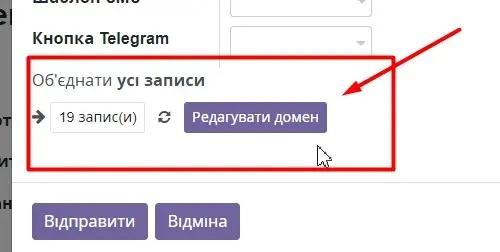
To create a mass message broadcast, you need to press the button "Send a bulk message"
On form "Mass mailing" enter a message in the text field to be sent to the contact list or select a pre-prepared template in the field "SMS Template".
A file can be added to the message. To do this, you need to press the button 'Download file".
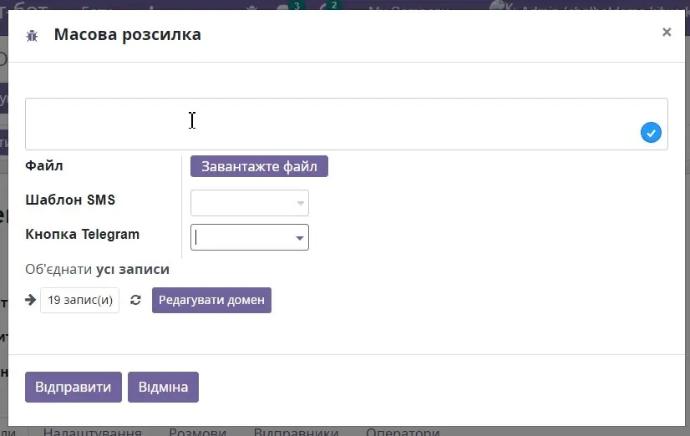
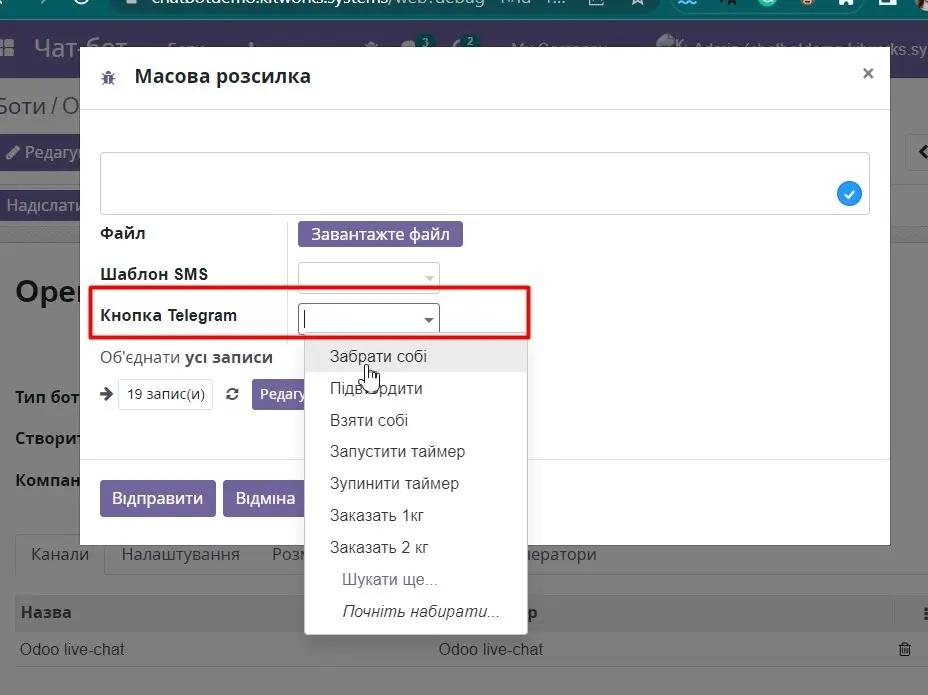
The "Telegram Button" field provides the ability to attach the function of mass messaging through the dialogue in the client chatbot.
In addition, on the mass mailing creation form, there is an option to add a filter to the contact list to whom the messages will be sent:
4.1.4. Tab «Channels».
Tabular tab "Channels" contains the following elements:
"Name"- the name of the chatbot used for communication with clients.
"Messenger"- the name of the messenger of the communication channel that is working.
"Cart" - trash icon, to be able to remove the bot from the list of communication channels.
By default, the consultation chat is connected to the "Oddo live-chat" channel. It is displayed in the operator's channel list.
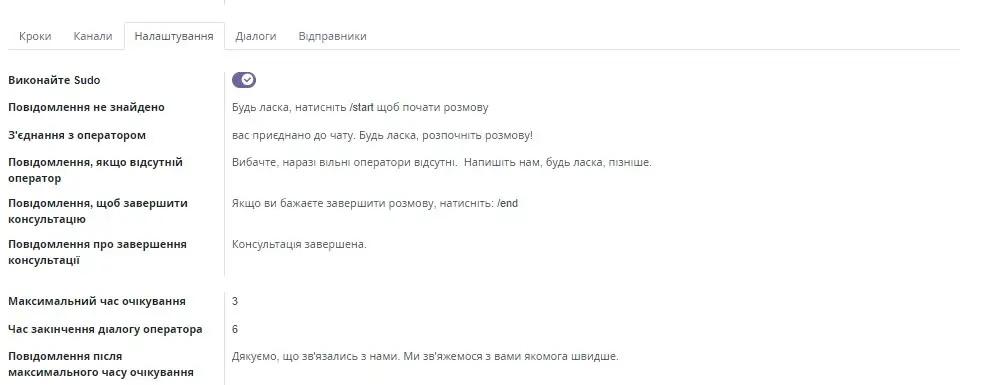
4.1.5. Tab "Settings"
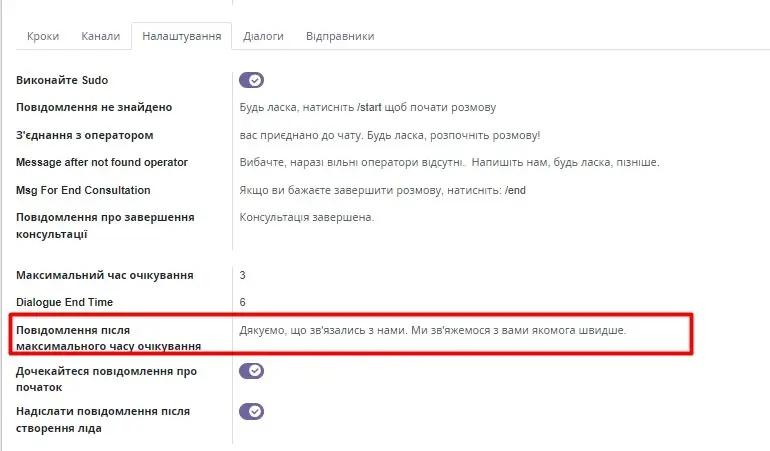
Tab "Settings" allows setting the message text that will be displayed to the client by default during the first interaction with the bot and other special actions.
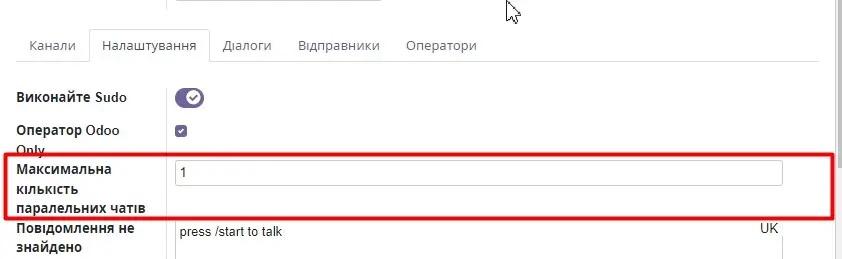
Switch "Sudo" - provides extended rights to the user for making changes in the Odoo module through chatbot commands.
Checkbox "Operator Odoo Only" - allows working in the operator chat only for operators from the Odoo system.
Field "Maximum number of parallel chats» - allows setting the number of chats an operator can work with simultaneously. The number of chats is set the same for all operators. It is not possible to set 2 for one operator and 10 for another.
By default, the system creates the following auto-notifications for users depending on certain actions performed by the operator or user:
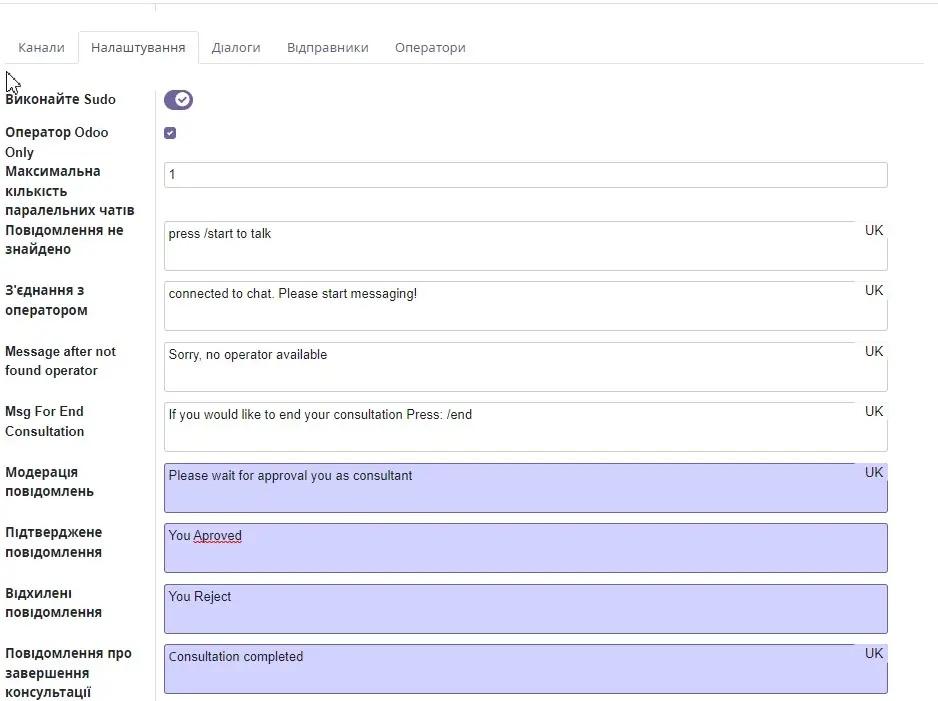
- Field "Message not found" - text that is displayed to the client after joining the chatbot so that they can start working with the chatbot. You can disable it with a switch Wait for the start message in the settings below. Text edited. By default, the field contains the text: 'Press /start to talk.'
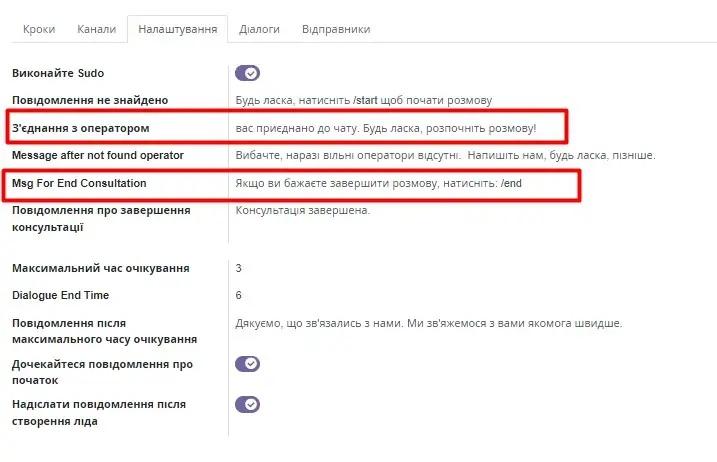
- Field "Connection with operator" - the message that will be displayed to the user when the operator joins the chat. It is disabled in the chat settings by the "Automatic greeting sending" property. The text is edited. By default, the field contains the text: "connected to chat. Please start messaging!".
- Field "Message if the operator is absent" - message displayed to the user if all operators are busy or no operators are connected to the consultation chat at the time of connection. The text is edited. By default, the field contains the text: «Sorry, no operator available».
- Field "Message to end the consultation" - a message that informs the user with which command they can end the conversation with the operator at any convenient moment. The text is edited. By default, the field contains the text: "If you would like to end your consultation Press: /end".
- Field "Message moderation" - a message displayed to the operator attempting to join the consultation chatbot from an external resource, such as Telegram. The text is edited. By default, the field contains the text: "Please wait for approval you as consultant".
- Field "Confirmed message" - message displayed to the operator if they are approved as an operator of the consultation chatbot. The text is edited. By default, the field contains the text: «You Approved".
- Field "Rejected messages"- message displayed to the operator if they are not approved as an operator of the consultation chatbot. The text is edited. By default, the field contains the text: «You Reject».
- Field "Message about the end of the consultation" - message displayed to the user in the chat after the consultation ends. The text is edited. By default, the field contains the text: «Consultation completed».
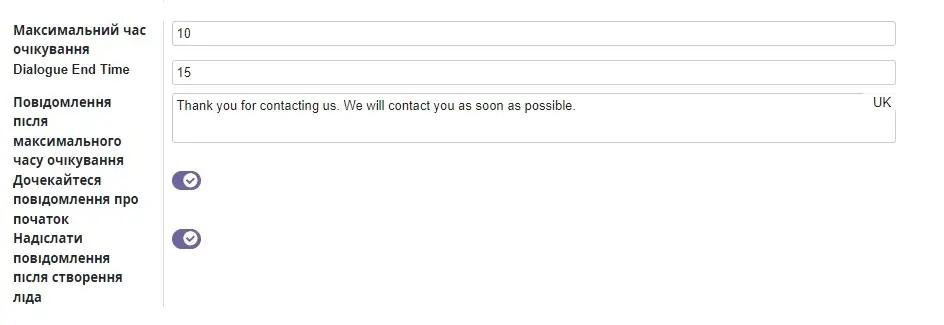
- Field "Message after maximum waiting time" - message displayed to the user after the conversation with the operator times out. The text is edited. By default, the field contains the text: «Thank you for contacting us. We will contact you as soon as possible.»
Field "Maximum waiting time" - in this field, the value is set for how many minutes to send a message to the user of the "Message after maximum waiting time" field.
Field "End time of the dialogue" - in this field, the value is set for how many minutes the communication channel between the operator and the user ends and the conversation will be closed.
Switch "Wait for the start message" - if the switch is on, the chatbot will wait for the user to press the 'Start' button or '/start' in telegram. If the switch is off, the chatbot immediately starts a conversation with the user without waiting for the user to initiate it.
Switch "Send a message after creating a lead" - if the switch is on, the chatbot displays the step message text with the type 'Create lead'. If the switch is off, the step text is not displayed after the lead is created in the CRM.
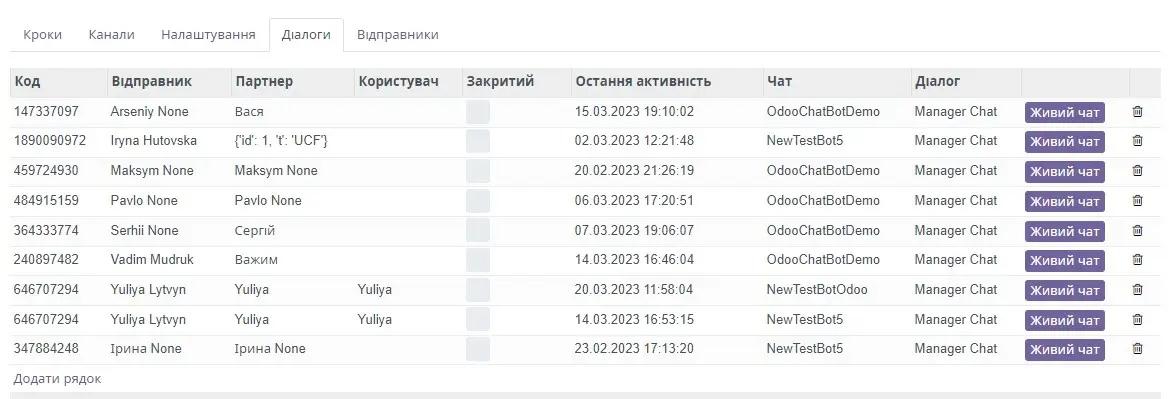
4.1.6. Tab «Dialogs»
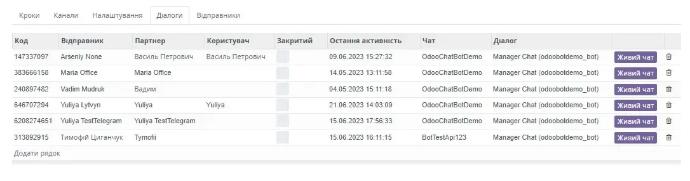
Tabular tab "Dialogs" displays detailed information about operators who can conduct dialogues with clients.
Tab "Dialogs" contains the following elements:
Field "Code" Chatbot operator code;
Field "Sender" - the name of the message sender in the messenger;
Field "Partner" name of the contact created in Odoo.
Field "User" - the username in the Odoo system, if the sender has undergone the procedure of merging the sender from the messenger with a contact in Odoo.
Field "Closed"- indicator of whether the dialogue with the client is closed or open;
Field "Last activity"- date and time of the last activity in the dialogue;
Field "Chat"- the name of the chat in which communication took place;
Field "Dialog"- the name of the chat-bot in which the dialogue took place;
Button "Live chat" - allows the operator to initiate the start of a new conversation with a contact after the previous one has ended.
Icon "Cart" - allows you to delete a dialog from the list of dialogs.
4.1.7. Tab «Senders»
The "Senders" tabular tab displays information about senders who communicated with the operator. It contains the values:
Field "Name" name of the message sender;
Field "Messenger" - the name of the messenger through which communication took place.
Button "Send message" - allows the operator to go to the message sending form for the client with whom the dialogue took place.
Button "Confirmed" - user confirmation by the consultation chat operator.
Button "Reject" - denial of user access to the consultation chat.

Functionality Serve only own clients
The chatbot allows restricting the operator's contact list to only their clients. In this case, the operator sees dialogues only with their clients. To make the appropriate settings, go to the 'Senders' section.
Go to operator record:
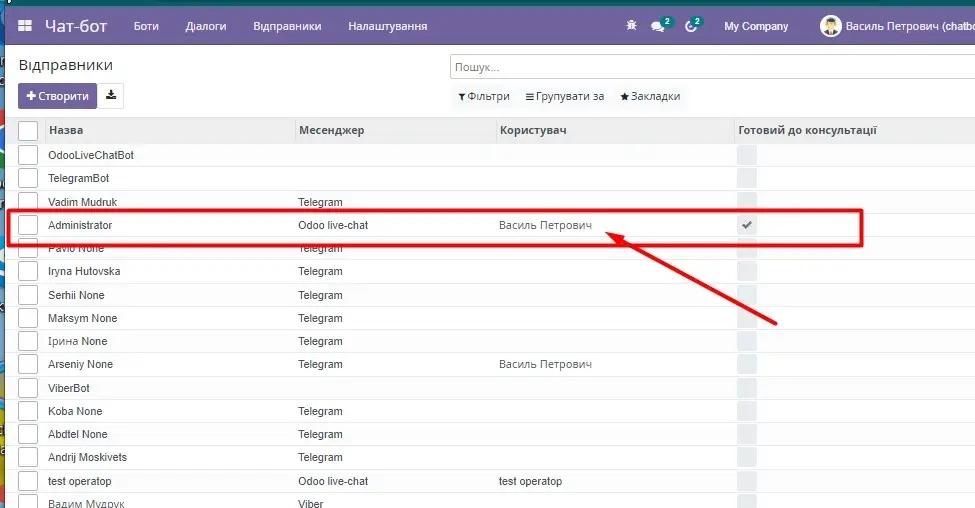
Press the 'Edit' button and turn on the switch 'Connect Only To My Clients':
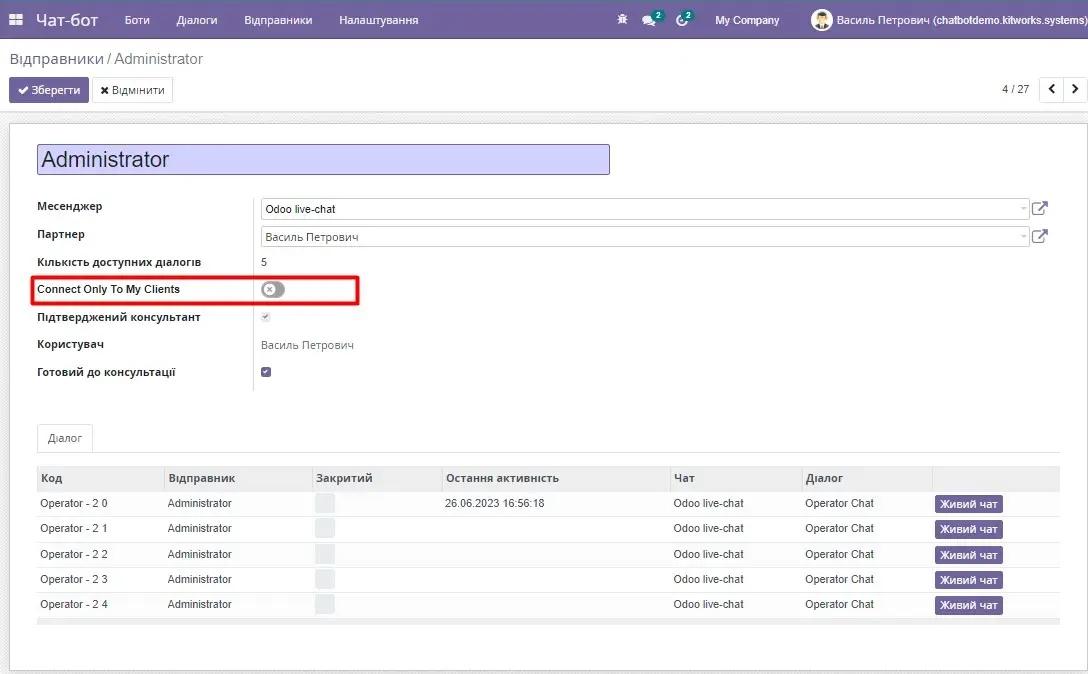
In the "User Salesperson" field, specify the user who is chosen as the salesperson in the client's contact:

In the client card on the "Sales and Purchases" tab, the user who is the seller of this contact and to whom all dialogues in the chatbot should be redirected is specified:
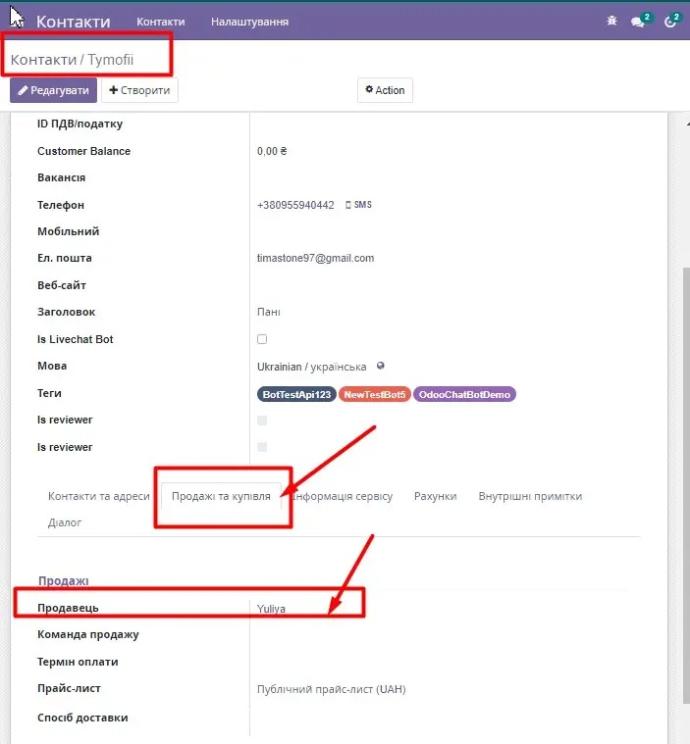
After completing the settings, the operator will only see messages from their clients.
4.1.8. Tab «Operators»
Tabular tab «Operators" contains information about chat bot operators. Consists of:
Field "Name" - operator name;
Field "Messenger" - messenger name.

4.2. Communication chatbot 'Client Chat'.
The communication chatbot "Client Chat" provides the ability to build dynamic conversations with the client without operator participation. If necessary, at the stage of communication with the client, connect the operator to the dialogue. It helps simplify the work of managers by providing the ability to create and edit information in Odoo through the chatbot functionality.
With the help of a communication chatbot, it is possible:
- Create contacts for a new client who joined the chatbot - checkbox "Create partner".
- Configure interaction steps with the client in various formats, for example, question-answer - "Steps" tab, new lead or inquiry;
- View list of communication channels - tab 'Channels';
- View current chatbot settings – 'Settings' tab;
- View dialogue information - tab 'Conversations';
- View sender information - tab Senders.
4.2.1. Button «Create»
The 'Create' button allows you to add new chatbots to the system. It can be either a consultation or a communication chatbot. A more detailed instruction for adding a new chatbot can be viewed in the section «Messenger settings».
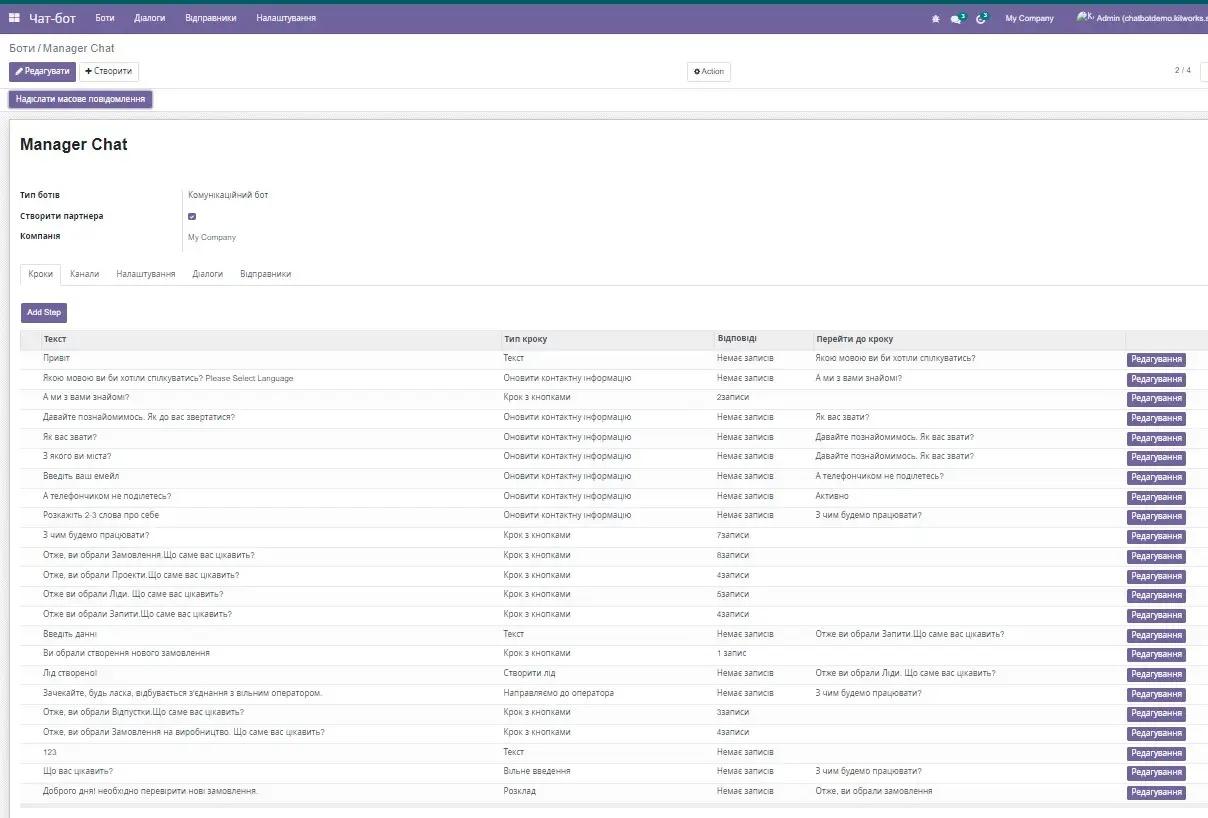
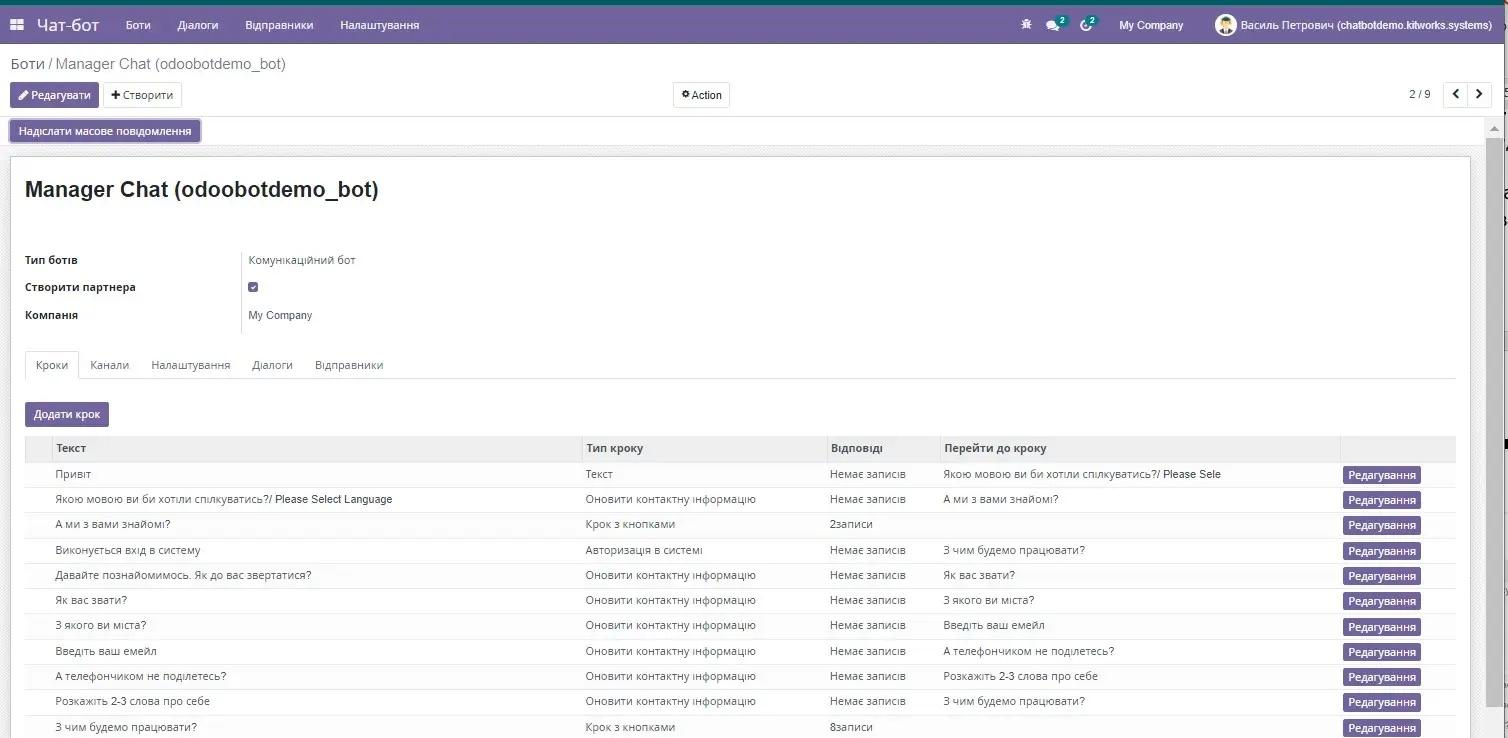
4.2.2. Tab «Steps»
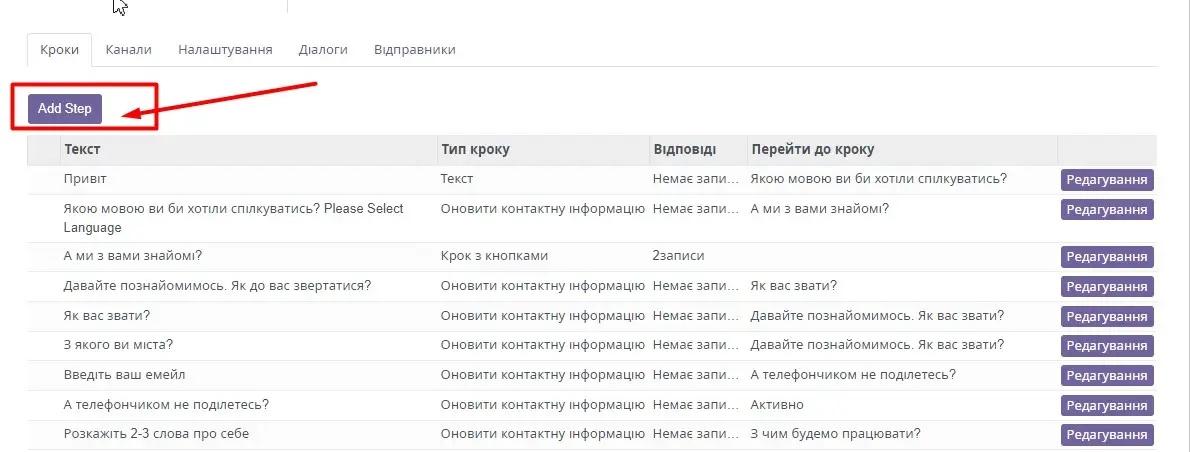
The table tab Steps contains fields:
Field "Text" text of the dialog step with the user;
Field "Step type" - indicates the method of interaction between the bot and the client;
Field "Responses" - response options for building a question-answer dialogue series;
Field "Go to step" - displays information about the next step for the user after completing the current one;
Button "Add step" - the user is redirected to the step editing form.
Button "Editing" - allows the user to navigate to the step editing form.
About step settings in more detail in the section Creating steps for the communication chatbot.
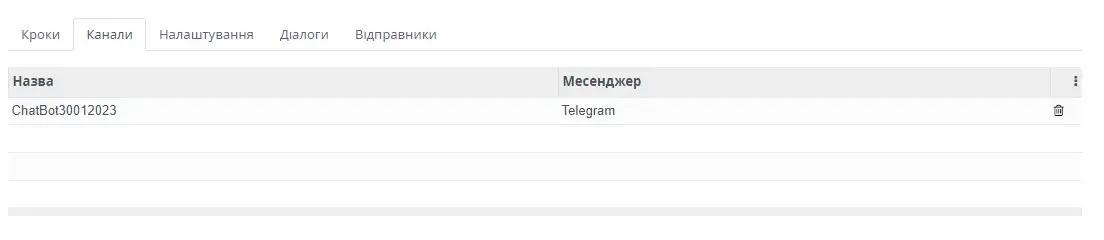
4.2.3. Tab "Channels"
Tabular tab "Channels" contains the following elements:
"Name"- the name of the chatbot used for communication with clients.
"Messenger"- the name of the messenger of the communication channel that is working.
"Cart" - trash icon, to be able to remove the bot from the list of communication channels.
By default, the consultation chat is connected to the "Oddo live-chat" channel. It is displayed in the operator's channel list.
4.2.4. Tab "Settings"
The "Settings" tab allows you to set the message text that will be displayed to the client by default during the first interaction with the bot and other special actions.
Switch "Sudo" - provides extended rights to the user for making changes in the Odoo module through chatbot commands.
By default, the system creates the following auto-notifications for users depending on certain actions performed by the operator or user:
- Field "Message not found" - text that is displayed to the client after joining the chatbot so that they can start working with the chatbot. It can be disabled by the "Wait for start message" switch in the settings below. The text is edited. By default, the field contains the text: "Press /start to talk."
- Field "Connection with operator" - the message that will be displayed to the user when the operator joins the chat. It is disabled in the chat settings by the "Automatic greeting sending" property. The text is edited. By default, the field contains the text: "connected to chat. Please start messaging!".
- Field "Message if the operator is absent" - message displayed to the user if all operators are busy or no operators are connected to the consultation chat at the time of connection. The text is edited. By default, the field contains the text: «Sorry, no operator available».
- Field "Message to end the consultation" - a message that informs the user with which command they can end the conversation with the operator at any convenient moment. The text is edited. By default, the field contains the text: "If you would like to end your consultation Press: /end".
- Field "Message about the end of the consultation" - message displayed to the user in the chat after the consultation ends. The text is edited. By default, the field contains the text: «Consultation completed»
- Field "Message after maximum waiting time" - message displayed to the user after the conversation with the operator times out. The text is edited. By default, the field contains the text: «Thank you for contacting us. We will contact you as soon as possible.»
Field "Maximum waiting time" - in this field, the value is set for how many minutes to send a message to the user of the "Message after maximum waiting time" field.
Field "End time of the dialogue" - in this field, the value is set for how many minutes the communication channel between the operator and the user ends and the conversation will be closed.
Switch "Wait for the start message" - if the switch is on, the chatbot will wait for the user to press the 'Start' button or '/start' in telegram. If the switch is off, the chatbot immediately starts a conversation with the user without waiting for the user to initiate it.
Switch "Send a message after creating a lead" - if the switch is on, the chatbot displays the step message text with the type 'Create lead'. If the switch is off, the step text is not displayed after the lead is created in the CRM.

4.2.5. Tab «Dialogs»
Tab "Dialogs" contains the following elements:
- Field "Code" Chatbot operator code;
- Field "Sender" - the name of the message sender in the messenger;
- Field "Partner" name of the contact created in Odoo.
- Field "User" - the username in the Odoo system, if the sender has undergone the procedure of merging the sender from the messenger with a contact in Odoo.
- Field "Closed"- indicator of whether the dialogue with the client is closed or open;
- Field "Last activity"- date and time of the last activity in the dialogue;
- Field "Chat"- the name of the chat in which communication took place;
- Field "Dialog"- the name of the chat-bot in which the dialogue took place;
- Button "Live chat" - allows the operator to initiate the start of a new conversation with a contact after the previous one has ended.
- Icon "Cart" - allows you to delete a dialog from the list of dialogs.
4.2.6. Tab "Senders"
The "Senders" tabular tab displays information about senders who communicated with the operator. It contains the values:
Field "Name" name of the message sender;
Field "Messenger" - the name of the messenger through which communication took place.
Button "Send message" - allows, if necessary, to go to the message sending form for the client with whom the dialogue took place in the client chat.

4.3. Creating additional chats.
In the course of work, there may be a need to divide client flows by different regions or service departments, or to create a separate chatbot for communication with clients and manager work in the program. For example, a client chat for Lviv and Kyiv. To solve this issue, it is necessary to create a separate consultation chat for each client flow, to which its own chatbot will be attached.
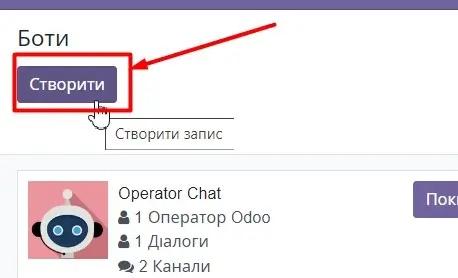
Create a new chat either from the main application page "Bots" and from within any chat-bot that exists in the system.
To create from the main page of the application, you need to press the button "Create" and the user will open the new chat creation form:
To create a new chat from an existing configured chatbot, you need to go inside this chatbot and click the button "Create":
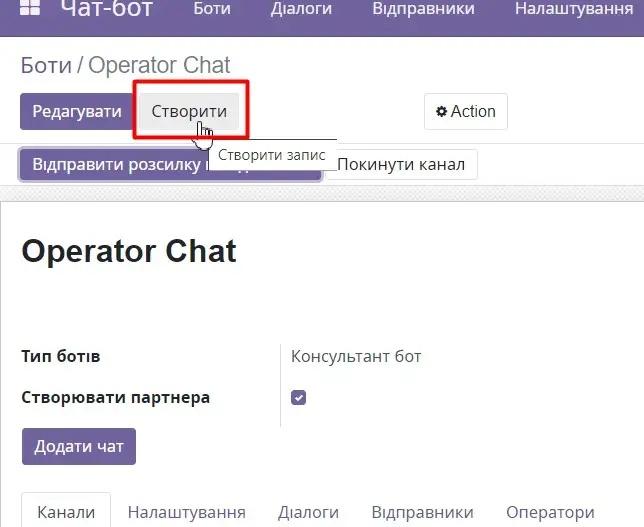
The user is redirected to the new chat creation form.
In the form, you need to enter the name of the new chat-bot.
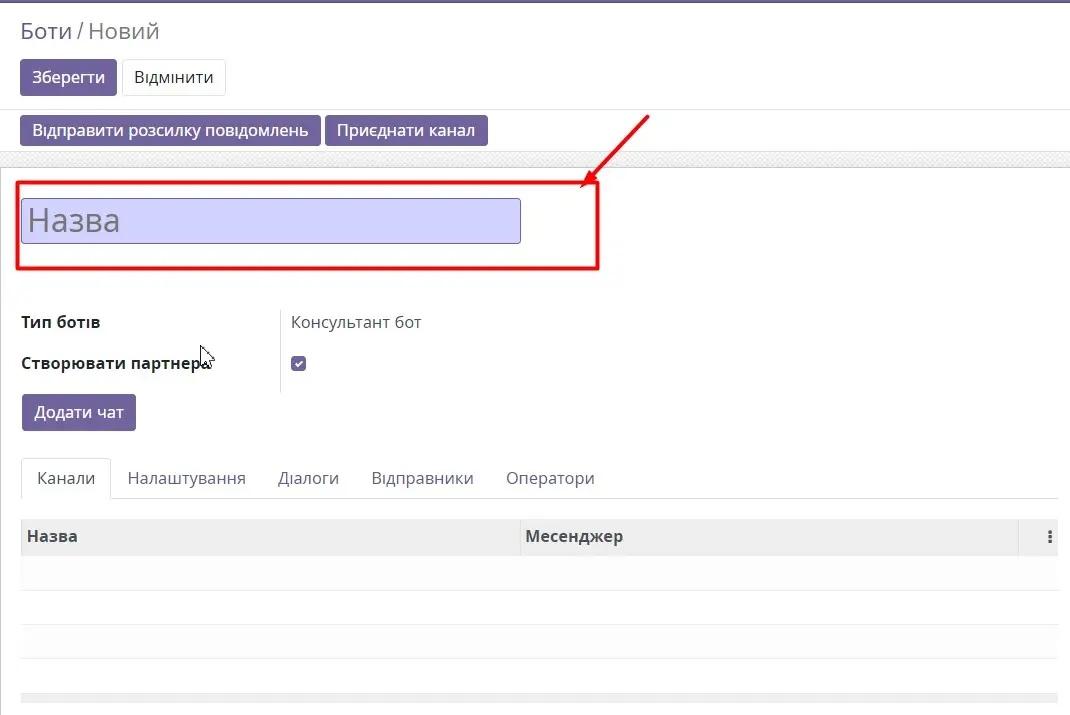
Add a chat through which further communication with the client will take place by clicking the button "Add chat". A detailed instruction on how to create a new bot and add it to the system can be read in the section «Messenger settings.»
5. Creating communication chat-bot steps.
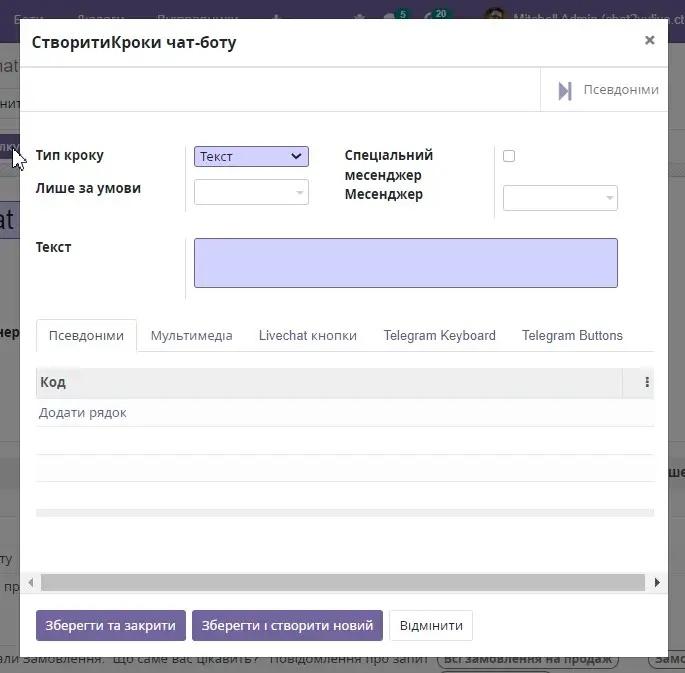
To add a step, you need to press the button "Add step on the tab "Steps":
The user is redirected to the step creation form.
To start editing an already created step, you need to click the "Edit" button in the step row. By clicking the "Edit" button, the step settings form is displayed. To start editing the step, you need to click the "Edit" button:
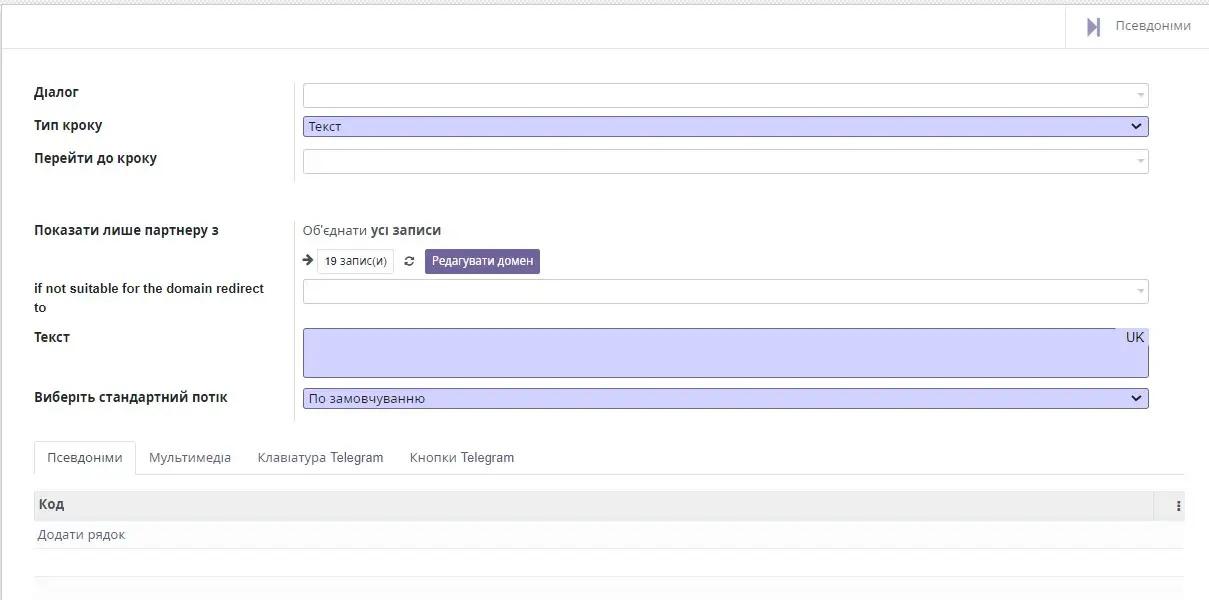
The user is redirected to the form for adding a new step. The form contains the following functionality:
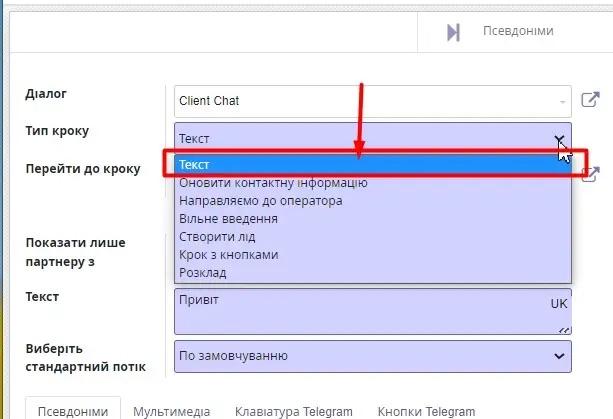
- Field "Dialog" - dropdown list of bots that exist in the system.
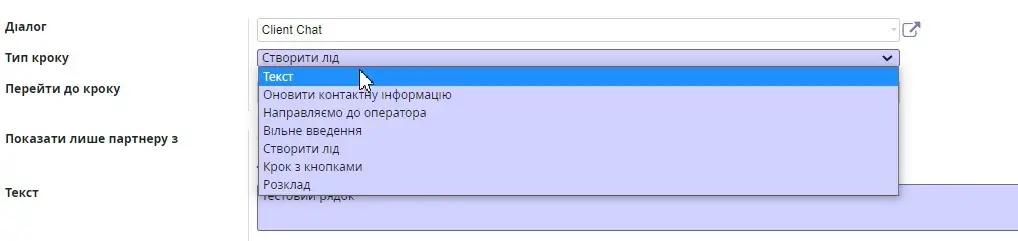
- Field "Step type" - allows selecting the type of step to create from the dropdown list.
- Field "Go to step" - value of the next step after completing the current one.
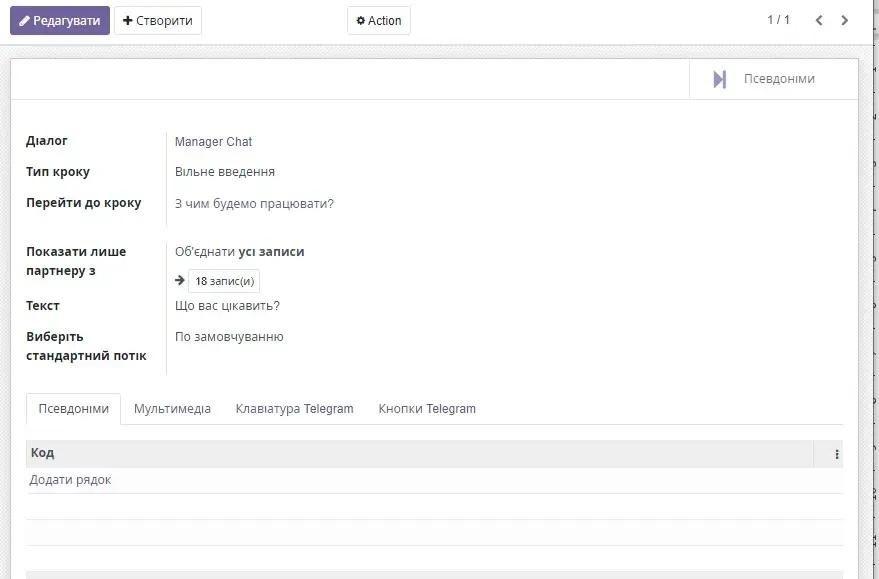
- Field "Show only to partner from" - allows applying filters to display information from the model used when building the step.
- Field "If not suitable for domain redirection" - value of the step that is executed if the current step is unavailable for execution.
- Field "Text" - the text is entered, which is displayed to the user in the chat-bot.
- Field "Select standard flow" - allows connecting additional step-building modules such as creating surveys, new orders. Depending on the choice, the user has access to an additional tab "Bot Sale" or "Bot Survey Settings". More detailed settings for additional features will be discussed in the following sections.
- Tab "Answers" - displayed or hidden for the user depending on the selected step type.
- Tab "Aliases" - alias of the created step. Used in further step interactions.
- Tab "Multimedia" - allows you to transfer and display images, audio, or video files to the client in the chatbot.
- Tab "Telegram Keyboard" - allows creating buttons for possible response options in the Telegram message input area. The tab is available after connecting the Telegram messenger to the system. It looks as follows:

13. Tab "Telegram Buttons" - allows creating buttons for possible response options in the Telegram message display area. The tab is available after connecting the Telegram messenger to the system. It looks as follows:
14. Button "Save"- Save changes made to the step.
15. Button "Cancel" - cancel changes made to the step.
5.2. Types of steps.
Text – allows displaying a text message to the user in the chatbot. After that, it proceeds to the next step. It does not expect a response from the client. It is most often used for creating informational messages and greeting steps with the client.
Update contact information – using this type of step, a request is made to update the client's contact information in res.partner. For example, updating name, phone number, email, etc. If the client did not exist in the database, a client card is created and the provided information is recorded. If the client was previously created in the database, the information is updated, and duplication of records in the system does not occur.
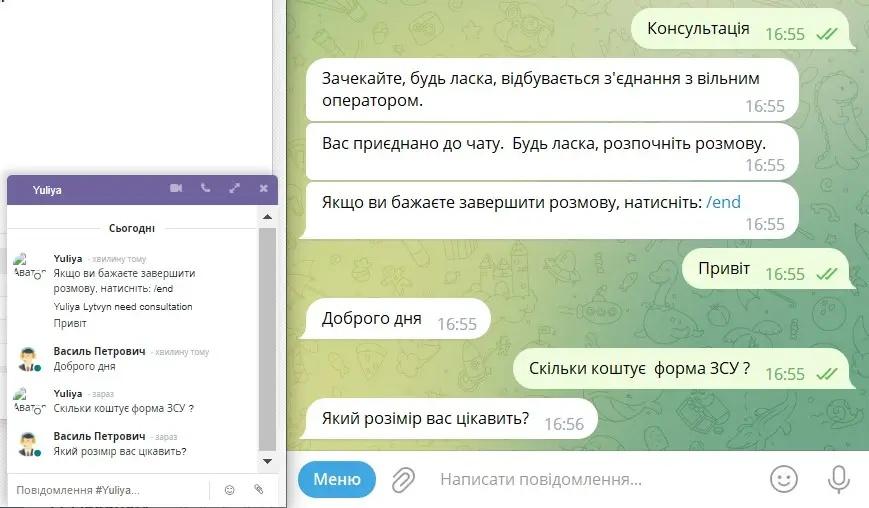
Direct to operator – provides the opportunity at any stage of communication to connect the client with an operator to identify and meet their needs if this was not done through automated responses.
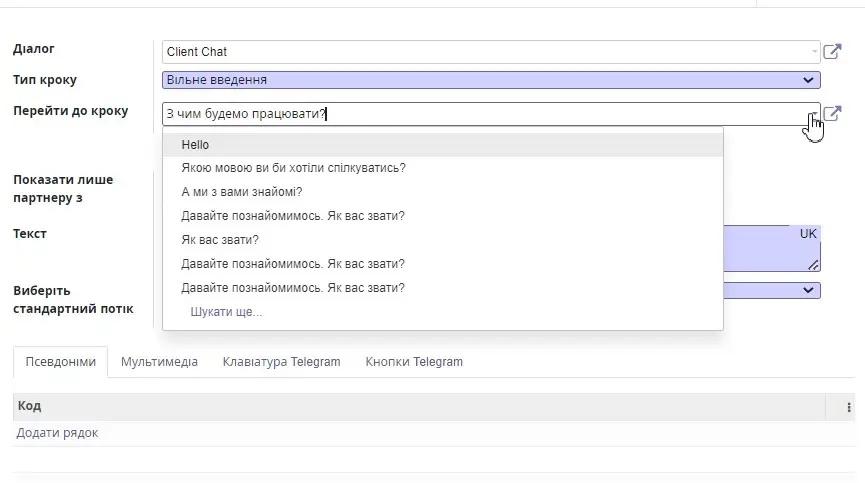
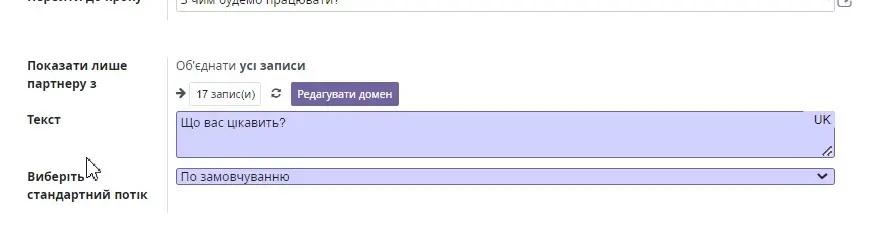
Free input – this type of step waits for input from the user. Allows creating a text message for which a client response is expected. If there is a corresponding step name for the response result, the user will be redirected to this step. For example, if you ask the user: "What would you like to work with?" and the user answers "Leads", the chatbot will go to the step named "Leads".
Create lead – this type of step allows creating a CRM Lead with the default configured sales channel, type, and tags specified in the step in the Odoo system for recording the client's request. In the newly created CRM lead, the entire conversation and the source of the lead are also recorded.
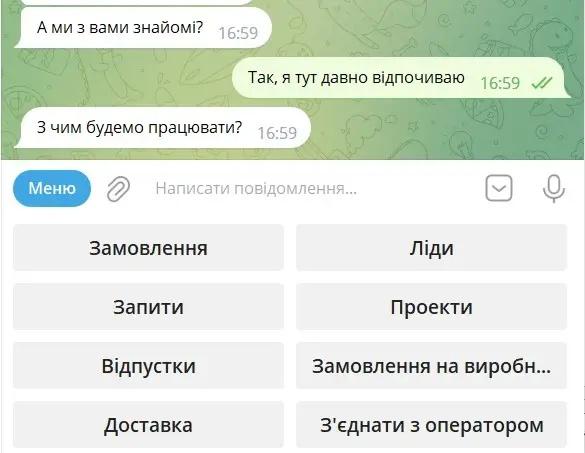
Step with buttons – allows creating conversation branching through the use of functionality in the form of questions and answer options. A question and answer option buttons are created. Depending on the selected answer, the client is redirected to the appropriate branch of the dialogue. For example, create a question "What will we work with?" with answer options: "Leads", "Orders", "Deliveries", etc.
Schedule – allows setting up the distribution of messages to all chatbot participants according to a configured schedule. It is most often used for creating automatic reminders for managers about their recurring
We will discuss the functionality of building each type of step in more detail below with examples.
Authorization in the system - step is added using the ChatBot login in system module. Allows enabling automatic Telegram user authorization in the Odoo system for further execution of all actions by the authorized system user.
5.3. Step type «Text».
Step type "Text" allows displaying an informational text message to the user in the chatbot. After that, it proceeds to the next step. This type of step does not expect a response from the client and simply performs the function of informing. It is most often used for creating greeting steps with the client.
Step creation.
In field "Type step" select "Text".
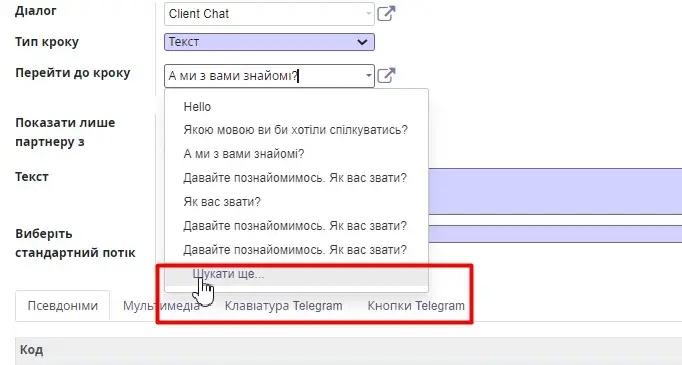
Field "Go to step" - if the next step has not been created yet, leave it blank. After creating the required step, return to this step and select the necessary value from the dropdown list of existing steps. The dropdown list displays the first 7 values. If the necessary value is not there, you need to click the "Search more..." button and find the required step in the full list of steps.

If you need to limit the list of partners to whom this step is displayed in the chatbot, you need to set a partner filter in the 'Show only to partner with...' field. In our example, the step is available for viewing to all bot subscribers.
In field "Text" displays the text that we will show in the chat-bot.
In field "Select standard flow" we leave the default value Default.
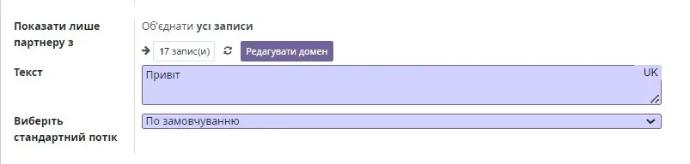
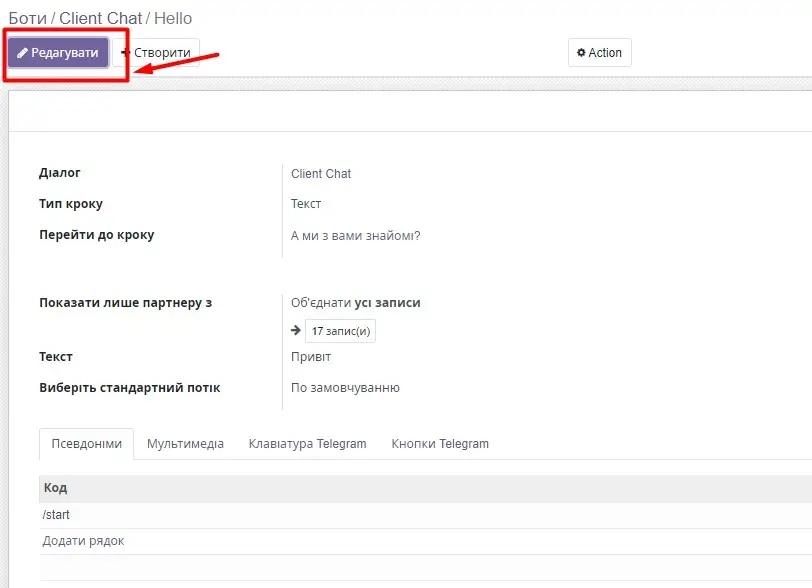
If this is the first step of our chat-bot, in the tab "Aliases» need to specify "/start", so that it executes after the subscriber joins the chatbot. The value in the field "Code" tab "Aliases" indicates after which step this step is performed.

If, along with the execution of the step, it is necessary to send the user photo or video files, they need to be added to the tab "Multimedia".
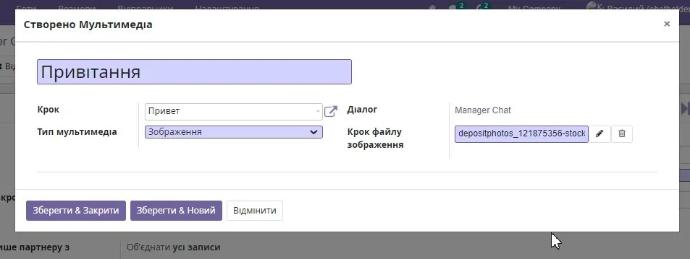
We click the "Add Line" button and fill in all the fields in the multimedia creation form:
Enter the name in the field "Name";
In field "Step" choose the step to which our file belongs;
In field "Media type" specify the type of file we are attaching: image or video;
Press the button "Download" and add a file.
Depending on the necessity, press the button "Save & Close" or "Save & New" or "Cancel".
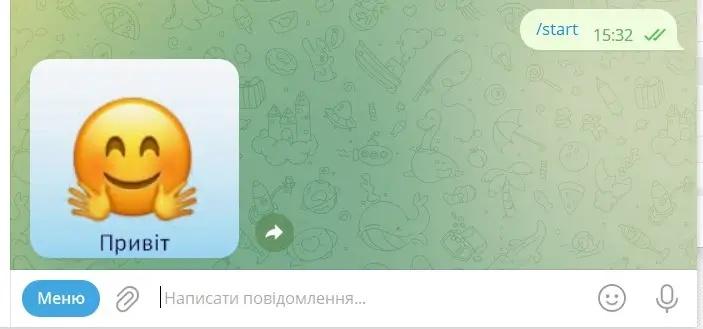
 Record added to the tab Multimedia In the bot, it looks as follows:
No additional settings are added to other tabs.
General view of the settings:

5.4. Step type Update contact.
Step type "Update contact information" - using this type of step, a request is made to update the client's contact information in res.partner. For example, updating name, phone number, email, etc. If the client did not exist in the database, a client card is created and the provided information is recorded. If the client was previously created in the database, the information is updated, and duplication of records in the system does not occur.
In addition, this type of step allows searching for a contact in the Odoo database by phone number and merging the contact with the Odoo sender in one record, thus not multiplying partners in the Odoo system. To do this, you need to enable the functionality on the step of requesting the phone number from the client via the chatbot.
Step creation.
In field "Step type" select "Update contact information".
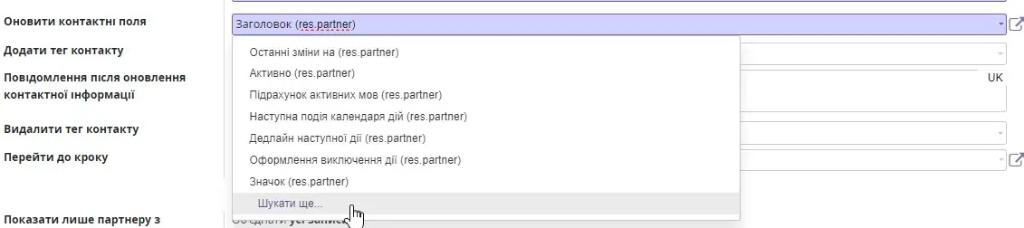
In field "Update contact fields" we choose from the list of available fields the one we want to refine our data by. The dropdown list displays the first 7 values. If the required value is not there, you need to click the 'Search more...' button and select the required value from the full list:
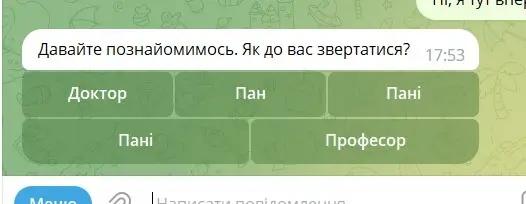
If this field is a reference and there is a certain set of values in the database for it, the user will see buttons with all possible response options. For example, the question 'How should we address you?' will look like this in the chatbot:
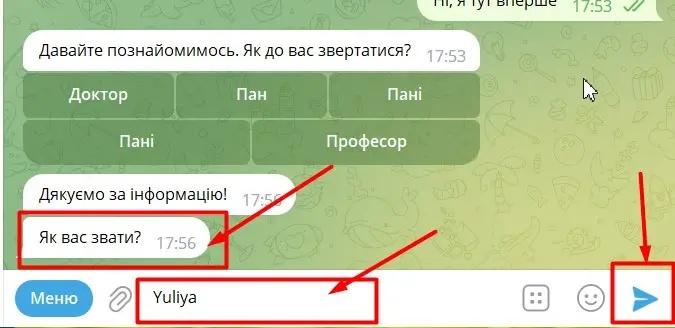
If you need to update a text field, the chatbot will expect a text response from the user. For example, to update the name or city of residence field:
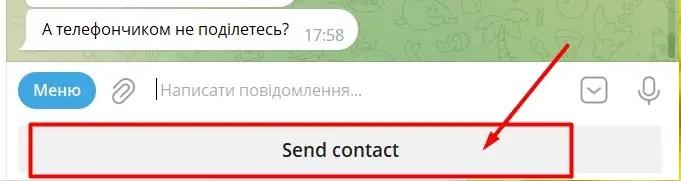
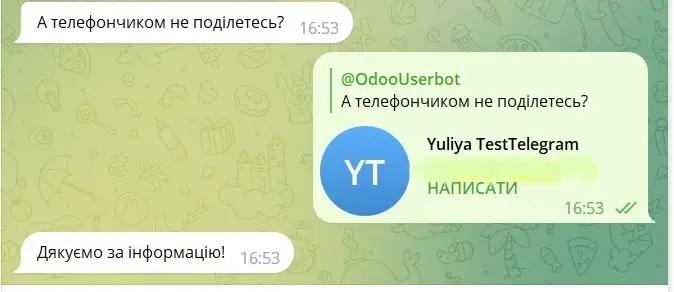
If you need to request a phone number, it will wait for the client to share their contact. For example:
When executing the step, the bot provides the ability to add tags to the contact card that will provide information on where the data update came from. It also allows removing tags from the contact card. Multiple values can be used for tags. For this, it is necessary to enter the required values in the fields " Add contact tag" and "Delete contact tag" respectively:
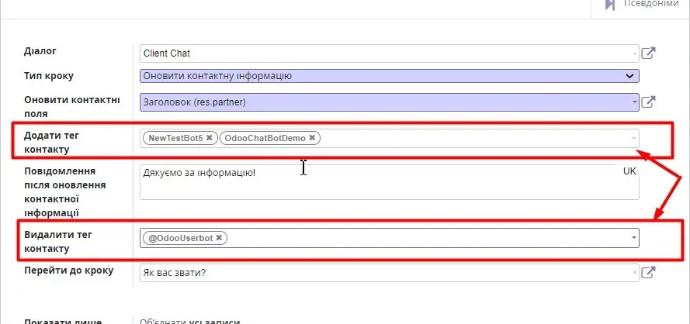
In field " Message after updating contact information" the message text displayed to the client after completing the step is configured.
Field "Go to step" - if the next step has not been created yet, leave it blank. After creating the required step, return to this step and select the necessary value from the dropdown list of existing steps. The dropdown list displays the first 7 values. If the necessary value is not there, you need to click the "Search more..." button and find the required step in the full list of steps.
If you need to limit the list of partners to whom this step is displayed in the chatbot, you need to set a partner filter in the 'Show only to partner with...' field. In our example, the step is available for viewing to all bot subscribers.
In field "Text" displays the text that we will show in the chat-bot.
In field "Select standard flow" leave the default value "By default".
In tab "Responses" no additional information is entered. In the tab Aliases automatically assigns a step alias after which this step is executed.

If necessary, we add multimedia files, as shown in the section Step type «Text».
No additional settings are added to other tabs.
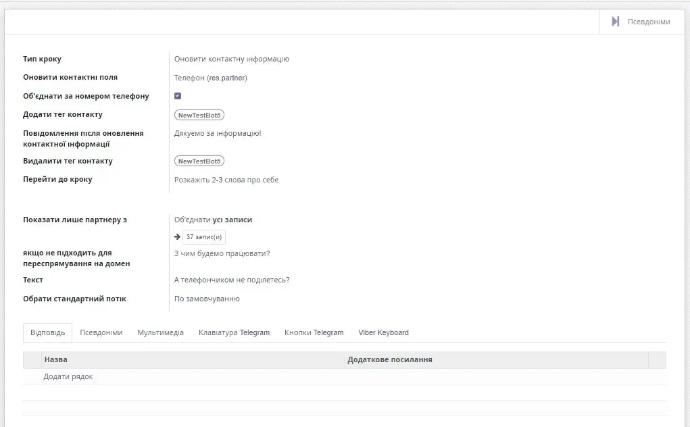
General view of the settings using the example of the phone number update step:
View in the Telegram channel:
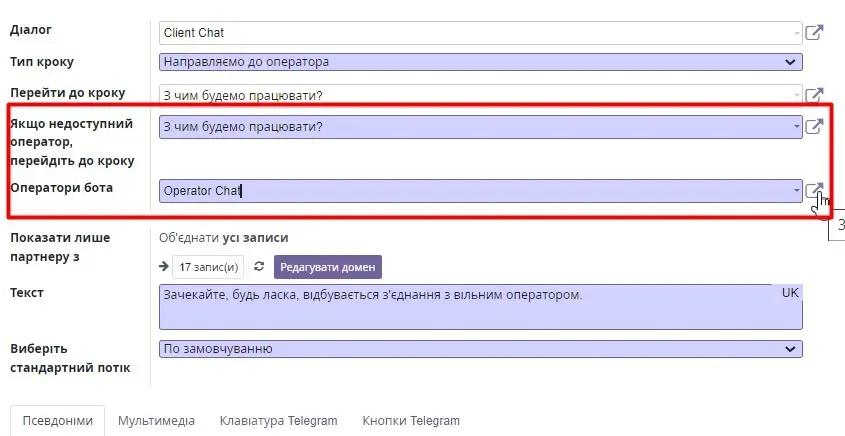
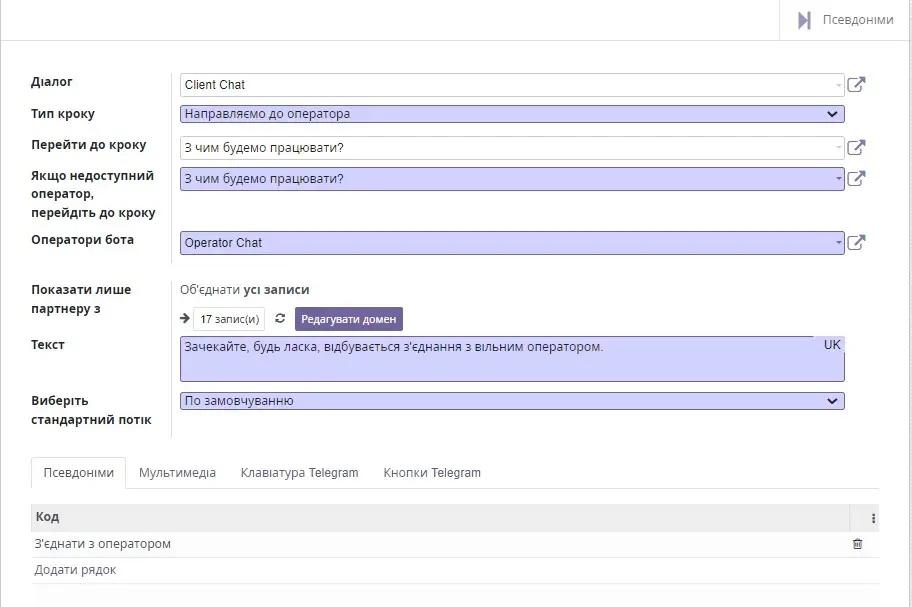
5.5. Step type 'Direct to Operator'.
To provide the client with the opportunity to resolve issues that were not covered within the created dialogue, a step is created that allows direct contact with the operator.
During connection, new requests are sequentially distributed among operators. The total number of available active chats for one operator is set in the general settings of the consultation chatbot. If after the time specified in the "Maximum waiting time" field the client does not respond to the operator, the client is sent a message from the "Message after maximum waiting time" field. If after the time specified in the "Dialogue completion time" field the client does not respond to the operator, the dialogue is completed and transitions from the "active" state to "completed", and the connection is terminated.
Create step
In field "Step type" select the value Direct to operator.
Field "Go to step" - if the next step has not been created yet, leave it blank. After creating the required step, return to this step and select the necessary value from the dropdown list of existing steps. The dropdown list displays the first 7 values. If the necessary value is not there, you need to click the "Search more..." button and find the required step in the full list of steps.
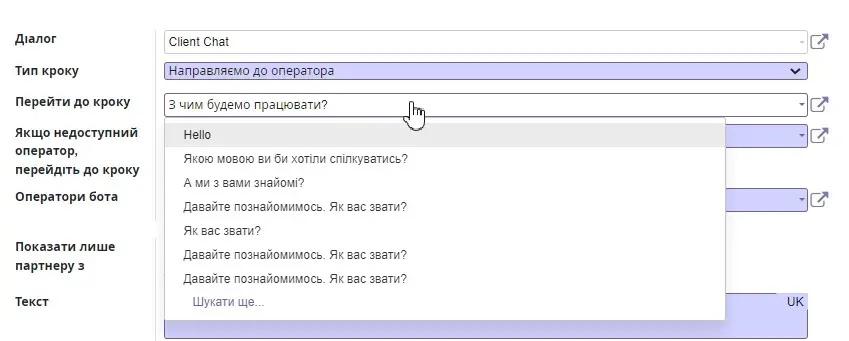
In field "If the operator is unavailable, proceed to the step" - configure which step to transfer the client to if at the moment of contact there are no available operators.
In field "Bot operators" we select the consultation chat that works with this dialogue.
If you need to limit the list of partners to whom this step is displayed in the chatbot, you need to set a partner filter in the 'Show only to partner with...' field. In our example, the step is available for viewing to all bot subscribers.
If you need to limit the list of partners to whom this step is displayed in the chatbot, you need to set a partner filter in the 'Show only to partner with...' field. In our example, the step is available for viewing to all bot subscribers.
In field "Text" displays the text that we will show in the chat-bot.
In field "Select standard flow" leave the default value "By default".
In tab "Aliases" automatically sets the step alias after which this step is executed. If necessary, add multimedia files as shown in the item Step type «Text».
No additional settings are added to other tabs.
General view of the step settings:
View in the Telegram channel:
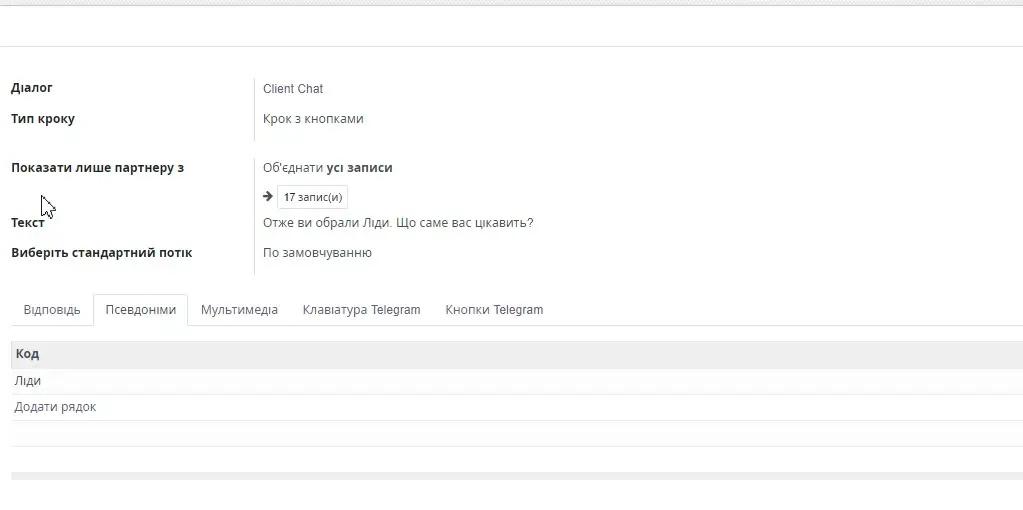
5.6. Step type Step with buttons.
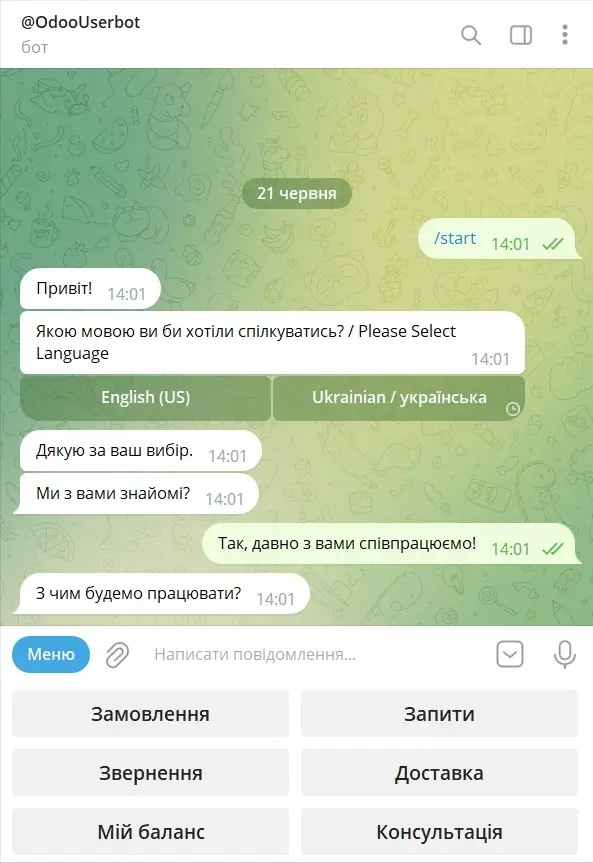
Step type "Step with buttons" – allows creating conversation branching through the use of functionality in the form of questions and answer options. A question and answer option buttons are created. Depending on the selected answer, the client is redirected to the appropriate branch of the dialogue. For example, you can create a branching of acquaintance questions. Ask the client if we are familiar or meeting for the first time and depending on the answer, direct to different branches of conversation. For instance, if we have already collaborated, redirect to the menu for choosing question topics. If the client joined for the first time, collect personal information, phone number, email, and proceed to choose a question topic.
Let's take a closer look at the setup algorithm for this step.
5.7. Step type Free input.
Step type "Free input" – allows displaying a text message for which a client response is expected. For example, we want the client to transition to a branch of questions related to leads when responding "Leads". (An example of creating a branch with a question-answer type is discussed in more detail in the section Step type Step with buttons.
For this, it is necessary in the main step, for the branch "Leads" in the aliases tab, write the keyword by which the transition to this step will occur. For example "Leads".
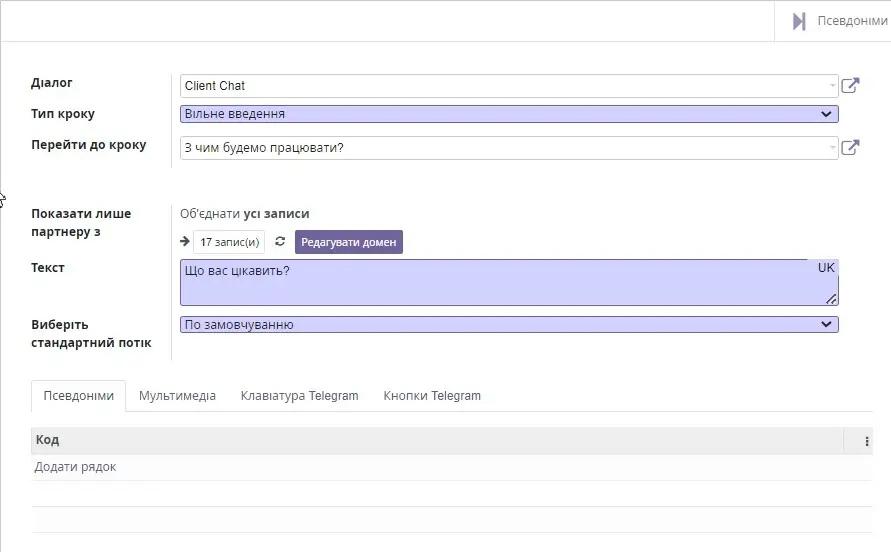
Налаштовуємо крок з типом "Free input".
In field "Dialog" we choose the bot within which this step will be called. One step only has one bot.
In field "Step type" choose the value Free input.
Field "Go to step" - if the next step has not been created yet, leave it blank. After creating the required step, return to this step and select the necessary value from the dropdown list of existing steps. The dropdown list displays the first 7 values. If the necessary value is not there, you need to click the "Search more..." button and find the required step in the full list of steps.
If it is necessary to restrict the list of partners to whom this step is displayed in the chatbot, a partner filter should be set in the field "Show only to partner with…" In our example, the step is available for viewing by all bot subscribers.
In field "Text" displays the text that we will show in the chat-bot.
In field "Select standard flow" we leave the default value Default.
In tab "Aliases" automatically sets the step alias after which this step is executed. If necessary, add multimedia files as shown in the item Step type «Text».
No additional settings are added to other tabs.
General view of the settings:
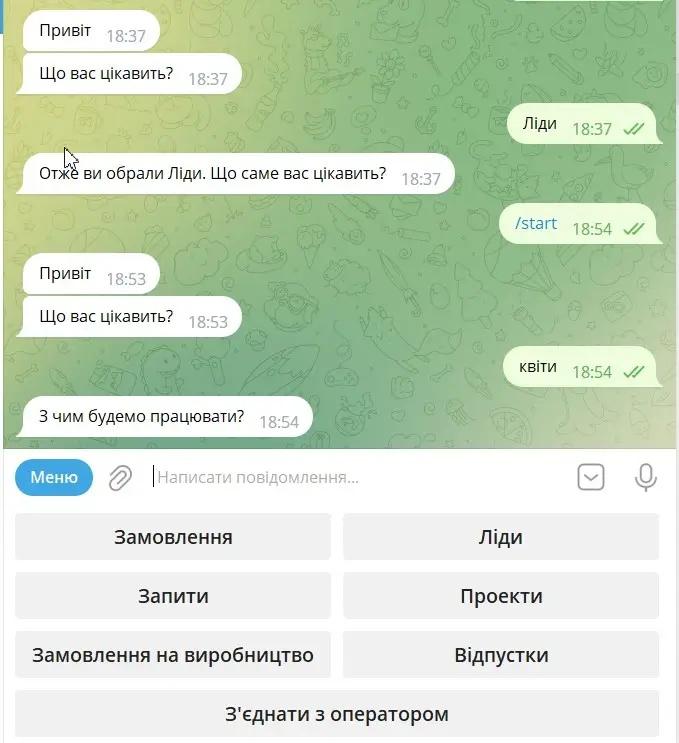
In the bot, it looks like this:
The bot asks the client. It processes the client's response and moves to the step that corresponds to the entered text. If the text entered by the client does not match any alias of the created step, the bot moves to the next step specified in its settings.
If necessary, add multimedia files in the 'Multimedia' tab, as shown in the section Step type «Text».
No additional settings are added to other tabs.
General view of the settings:
Step creation.
In field "Step type" select the value "Step with buttons".
If you need to limit the list of partners to whom this step is displayed in the chatbot, you need to set a partner filter in the 'Show only to partner with...' field. In our example, the step is available for viewing to all bot subscribers.
In field "Text" displays the text that we will show in the chat-bot.
In field "Select standard flow" leave the default value "By default".
After completing the main settings, go to the tab Responses and add all response options.
You need to press "Add line":
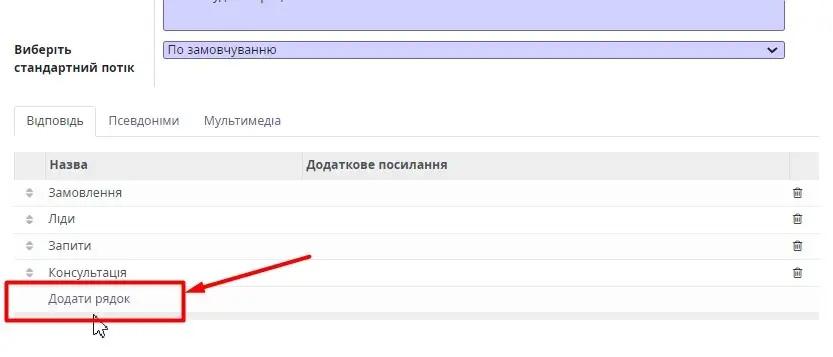 The user is redirected to the answer creation form
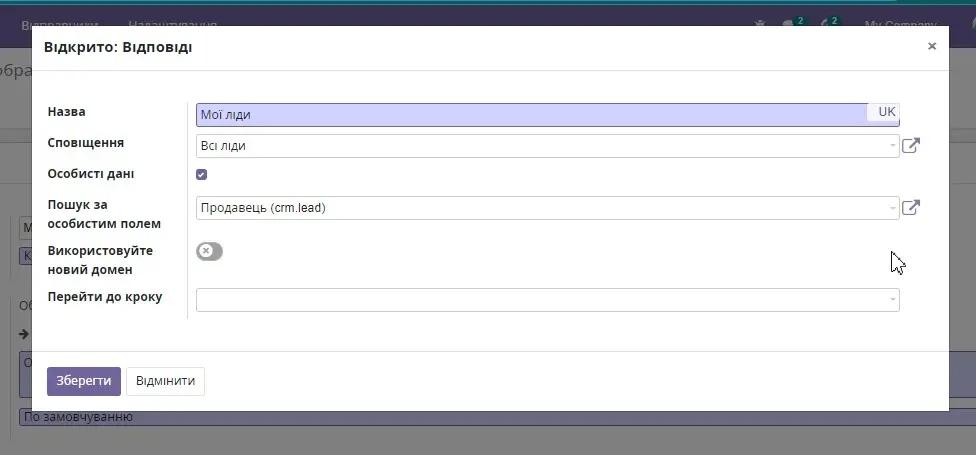
In field "Name" enter the name of the button that will be displayed in the chatbot in the telegram keyboard menu.
If, after pressing the button, some request to the database should be triggered, it is necessary to create and connect a notification in the field "Notifications".
Creating different types of notifications is discussed in the section "Notifications."
The checkbox provides the ability to add a filter and display only those records that relate to the current client.
For this, you need to set the checkbox "Personal data" and in the field "Search by personal field" choose by which personal field the data will be filtered. For example, we want to restrict the list of leads by salesperson. So that each salesperson works only with their leads.
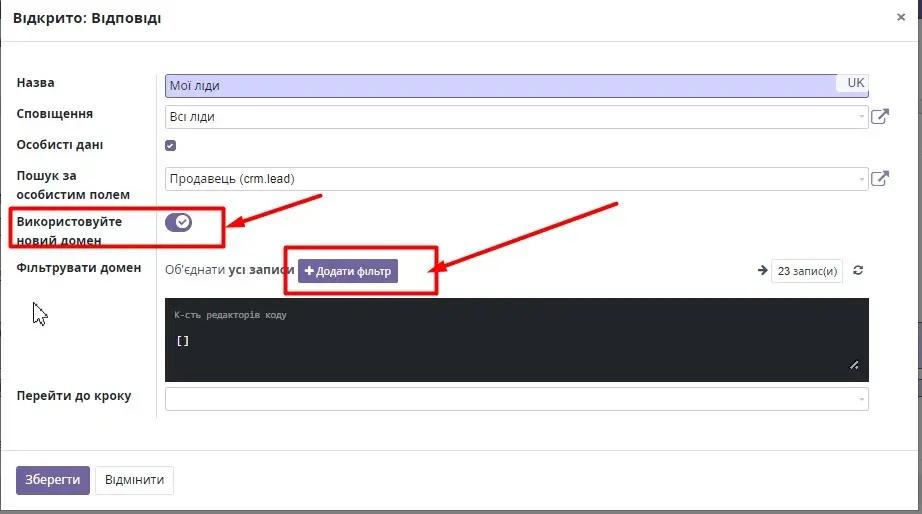
If you need to add other constraints to the existing filter, you need to switch the 'Use new domain' toggle to the active position and set up the filter similarly to how it was set up when creating the main step:
Field "Go to step" - if the next step has not been created yet, leave it blank. After creating the required step, return to this step and select the necessary value from the dropdown list of existing steps. The dropdown list displays the first 7 values. If the necessary value is not there, you need to click the "Search more..." button and find the required step in the full list of steps.
Press the button «Save" and proceed to create a new button.
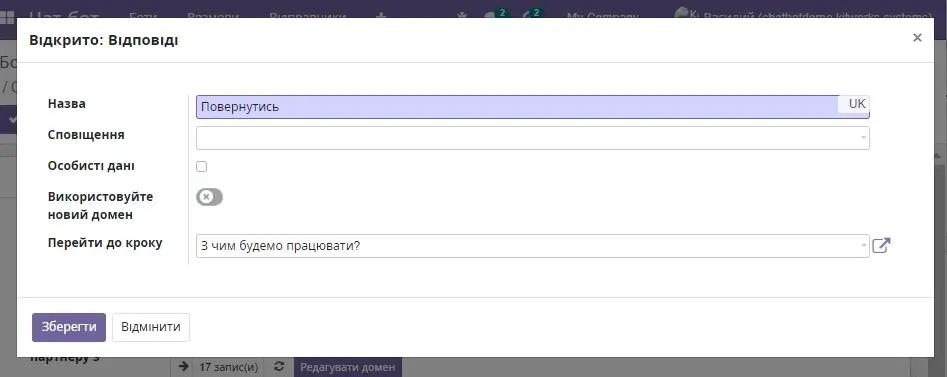
If no entries need to be made when pressing the button, but a transition to another step is required, only 2 fields "Name" and " are filled. Go to step For example, button "Return":
Automatically, all created buttons are added to the tab list "Telegram Keyboard".
If necessary, we add multimedia files, as shown in the section Step type «Text».
No additional settings are added to other tabs.
General view of the settings:

View in the Telegram channel:
5.8. Step type Create lead.
Step type "Create lead" – allows you to make all the necessary settings to be able to create a new lead in the system at the request of the client from the chatbot.
Step creation.
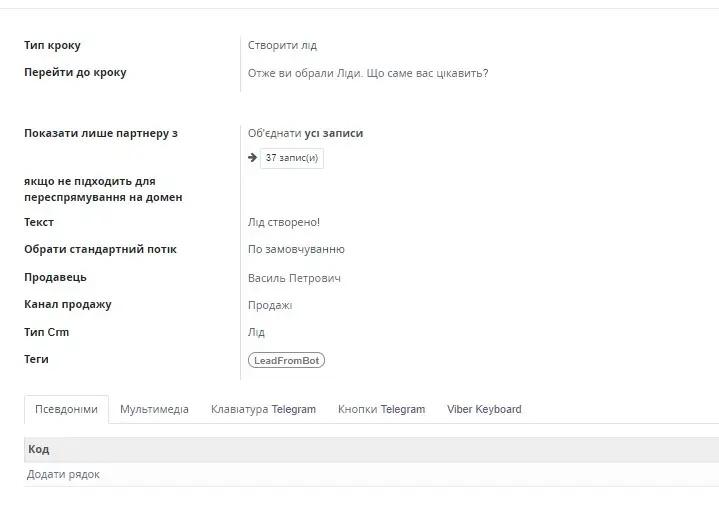
In field "Step type" choose the value Create a lead.
Field "Go to step" - if the next step has not been created yet, leave it blank. After creating the required step, return to this step and select the necessary value from the dropdown list of existing steps. The dropdown list displays the first 7 values. If the necessary value is not there, you need to click the "Search more..." button and find the required step in the full list of steps.
If it is necessary to restrict the list of partners to whom this step is displayed in the chatbot, a partner filter should be set in the field "Show only to partner with…" In our example, the step is available for viewing by all bot subscribers.
In field "Text" displays the text that we will show in the chat-bot.
In field "Select standard flow" we leave the default value Default.
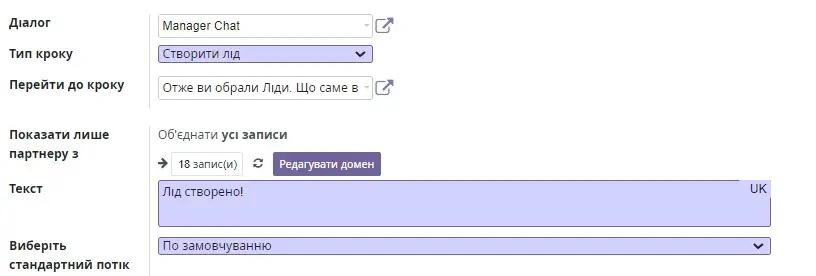
In field "Seller" select the seller to whom all new leads will be assigned.
In field "Sales channel" choose the required sales channel.
In field "CRM Type" select the value Lead.
In field "Tags" you can choose an already created tag or create a new one that will be added to each newly created lead.

No additional settings are added to other tabs.
General view of the step settings:
View in the Telegram channel:
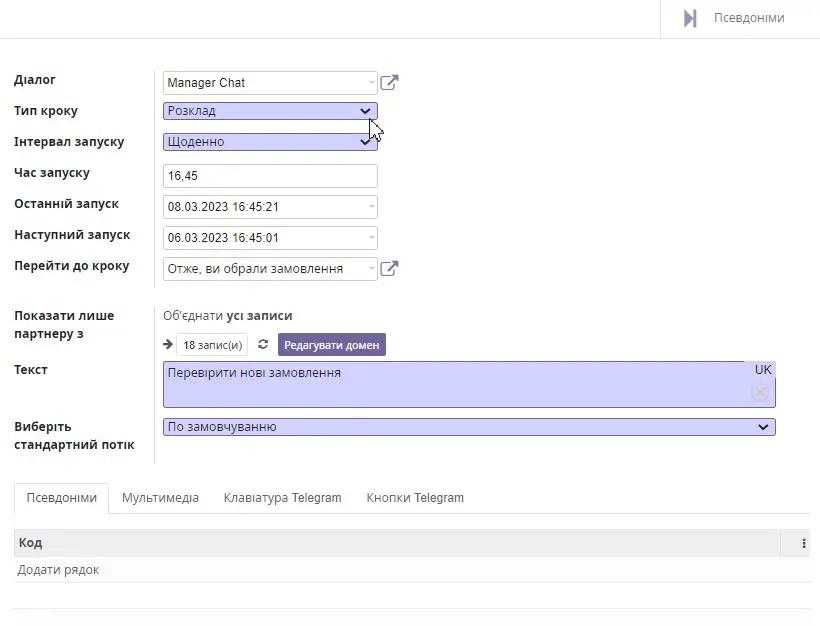
5.9. Step type Schedule.
Step type "Schedule" – allows you to set up the distribution of messages to all chatbot participants according to a configured schedule with important messages. For example, remind managers every day to check the list of new requests that remain unprocessed from the previous day.
For this, we create a new step.
Step creation.
In field "Step type" select the value "Schedule".
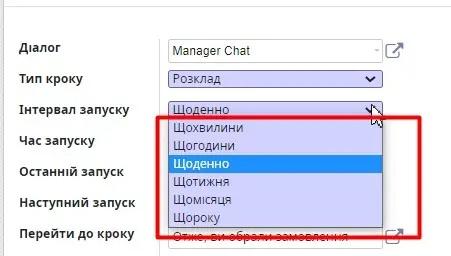
In field "Launch interval" specify the frequency at which messages will be sent in the chatbot.
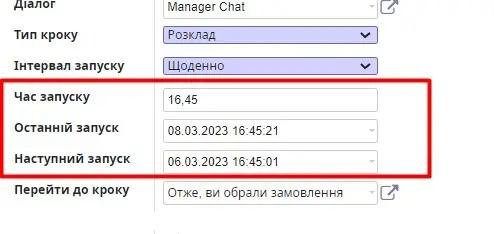
In field "Launch time" specify the time at which the step should execute.
In field "Last step run" - date and time when the last step execution will occur.
In field "Next launch" - date and time when the first step execution will occur.
In field "Go to step" we choose which step the client will be directed to after receiving the message. Since we are considering an example with orders, we move the chatbot to the order processing step.
In field "Text" displays the text that we will show in the chat-bot.
In field "Select standard flow" we leave the default value Default.
No additional settings are added to other tabs.
General view of the settings:
In the bot after sending messages:
5.10. Step type 'System Authorization'.
Step type 'Authorization in the system' allows for automatic user authorization in the Odoo system directly through the chatbot. For this, the client must have an account in the Odoo system and install the app "ChatBot login in system".
Step creation.
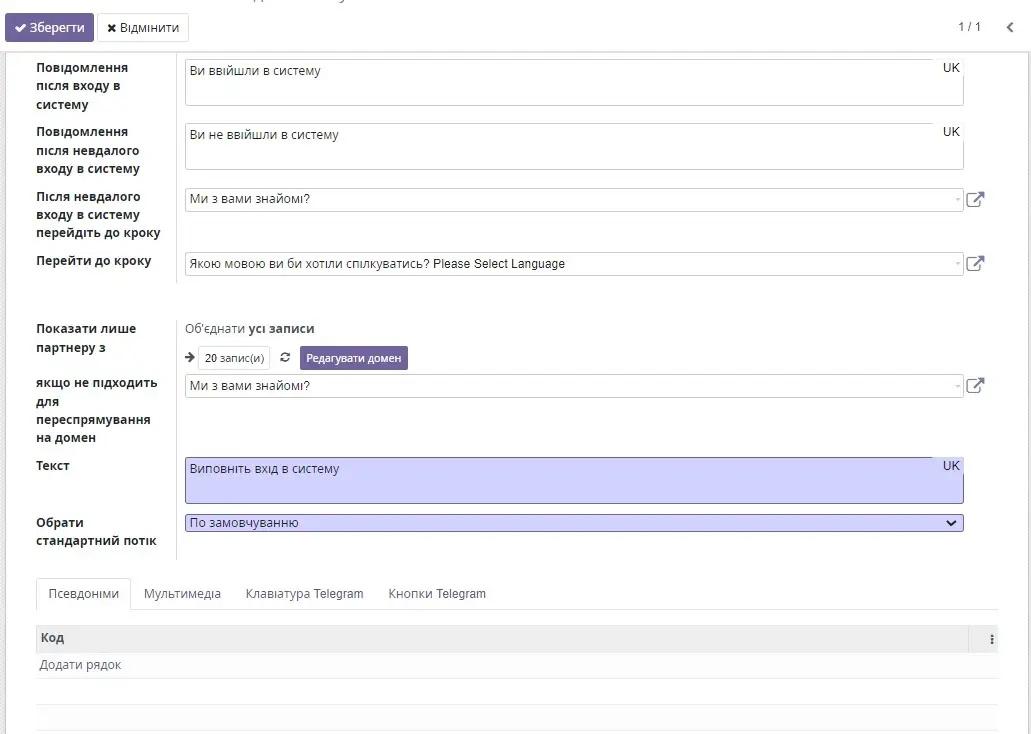
In field "Step type" select the value "Authorization in the system".
In field "Message after logging into the system" - a message is entered that will be displayed to the user after successful authorization in the system.
In field "Message after unsuccessful login to the system" - a message is entered that will be displayed to the user after unsuccessful authorization in the system.
In field "After a failed login, proceed to the step" specifies the step to which the user will transition if authorization in the system does not occur.
In field "Go to step" specifies the step to which the user will transition after authorization in the system and successful matching of the filter in the field "Show only to partner with".
If it is necessary to restrict the list of partners to whom this step is displayed in the chatbot, a partner filter should be set in the field "Show only to partner with…" In our example, the step is available for viewing by all bot subscribers.
In field "if not suitable for redirection to the domain" specifies the step to which the user will transition if it does not match the filter in the field "Show only to partner with".
In field "Text" displays the text that we will show in the chat-bot.
In field "Select standard flow" we leave the default value Default.
No additional settings are added to other tabs.
General view of the settings:
5.11. Additional functionality.
Using integration with the Survey and Sales module, the manager has the ability to create new sales orders and requests directly from the chatbot dialog window without transitioning to the Odoo system.
5.11.1. Creating a Sales Order
The chatbot provides the ability, during communication with the client in the messenger, to create new orders in Odoo. This is done without directly transitioning to the website. To do this, you need to install the app "Chatbot builder sale".
Let's take a closer look at the algorithm for creating a step for this functionality.
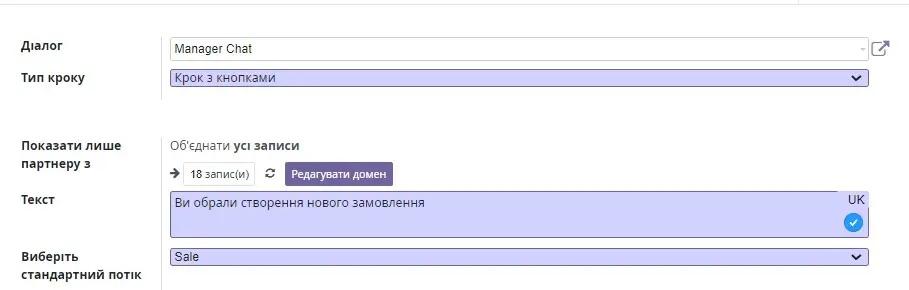
Create a new step.
In field "Step type" specify the value "Step with buttons".
In field "Text" enter our message, for example, 'You have chosen to create a new order.'
In field "Select standard flow" choose the value "Sale".
In tab "Response" add a button to return to the previous step after completing the order creation.

In tab "Aliases" automatically created a step alias that will trigger the creation of a new order.
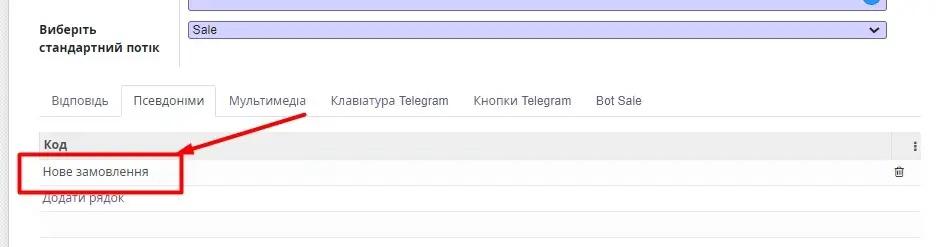
Go to the tab "Bot Sale" to set up the creation of a new order.
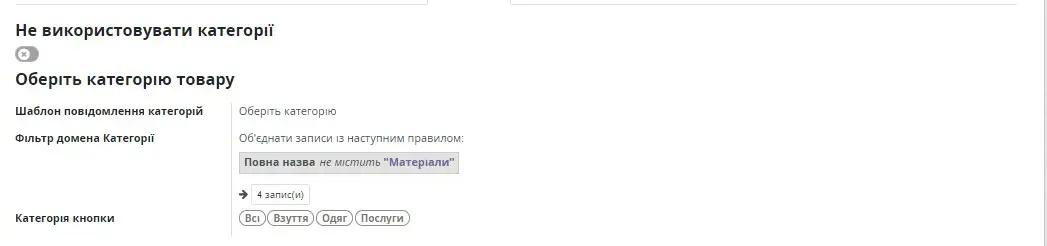
Step 1. Setting up product categories.
In field "Category message template" the default standard message text is displayed to the user in the chatbot after transitioning to the order creation step. It can be changed to your own.
In field "Category buttons" displays all available categories after filtering:
If products are grouped in the system by categories, we can configure the list of categories displayed to the client using the system's standard filters.
If the products in the system do not have category gradation, this step can be disabled by activating the switch "Do not use categories":
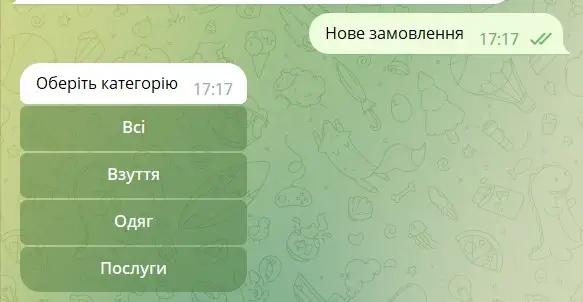
In the chat-bot, this setting looks as follows:
Step 2. Setting up the product list.
Switch "Use images in product selection" - disabled by default. Product photos are not displayed in the chatbot. If activated, photos existing on the site will be displayed for each product in the bot.
In field "Product Model" select from which model the list of products should be displayed.
Field "Model" displays the name of the selected model.
Field "Domain filter Product" helps set up an additional filter for product display.
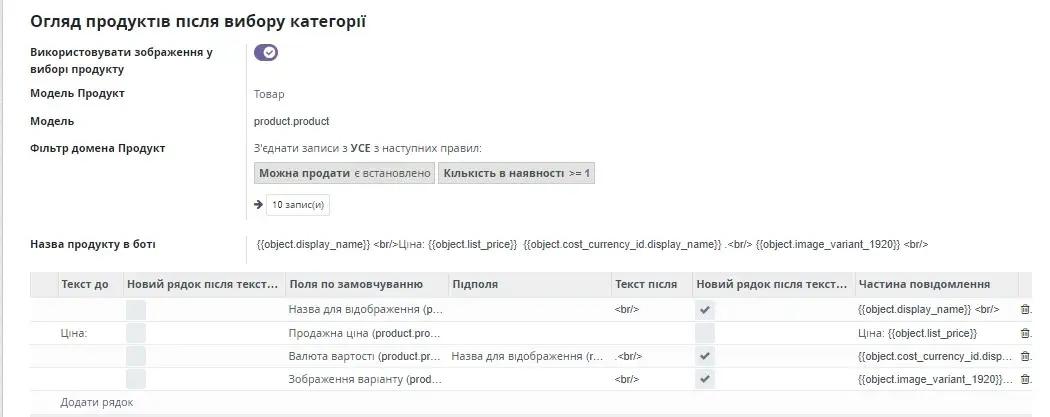
In the product list table, we set up a template for displaying information on selected products. For example, we want to display the product name and its price for the client.
Need to press the button "Add line".
In column "Text before" the default standard message text is displayed, which will be shown to the user in the chatbot. You can change it to your own.
Checkbox "New line after text"- if specified, the subsequent text starts on a new line.
In field "Default fields" set the necessary field. If it is necessary to connect a child field for its display, for example, partner code - name for displaying the partner, then fill it in the field "Subfields". In field "Text after"- enter the text that will follow the value of the selected field.
Field "Part of the message" - system field, generates the display of code that will be executed after adding display settings.

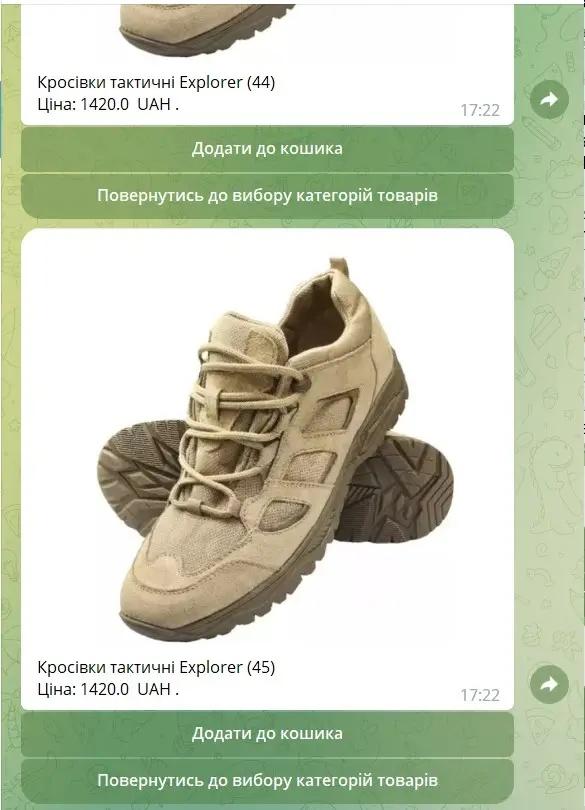
In the chat-bot, this setting looks as follows:
Step 3. Cart setup. Selection of product quantities.
In field "Name of the add to cart button" - the default standard message text is displayed, which will be shown to the user in the chatbot. You can change it to your own.
In field "Name of the return to categories button" - the default standard message text is displayed, which will be shown to the user in the chatbot. You can change it to your own. Step 4. Configuring delivery methods.
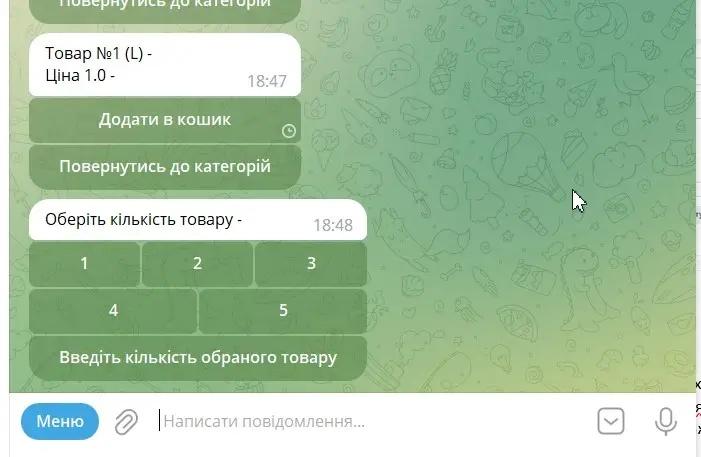
In field "Notification of product quantity selection" by default, a standard mechanism for selecting the quantity of goods in the cart is configured. The user can choose a quantity from 1 to 5 or enter their own free value.
In field "Button for selected quantity" the default standard message text is displayed, which will be shown to the user in the chatbot. You can change it to your own.
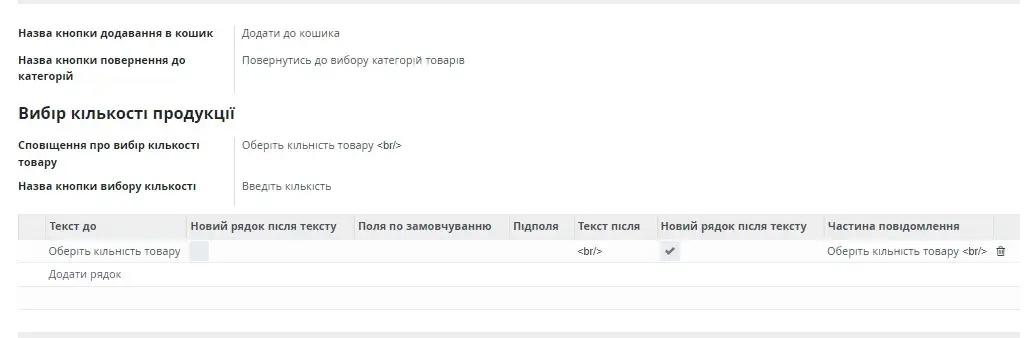
In the chat-bot, this setting looks as follows:
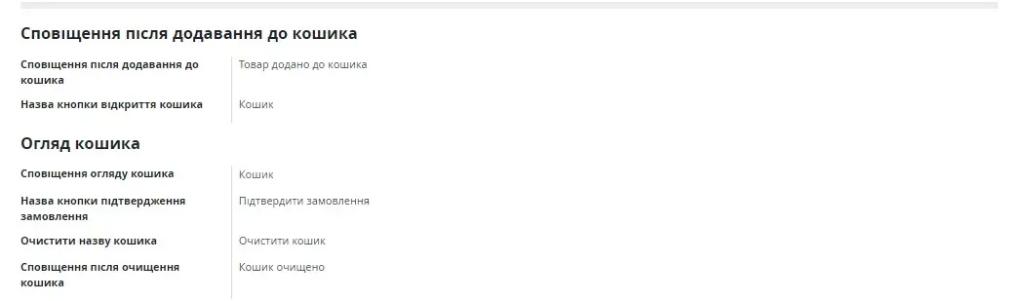
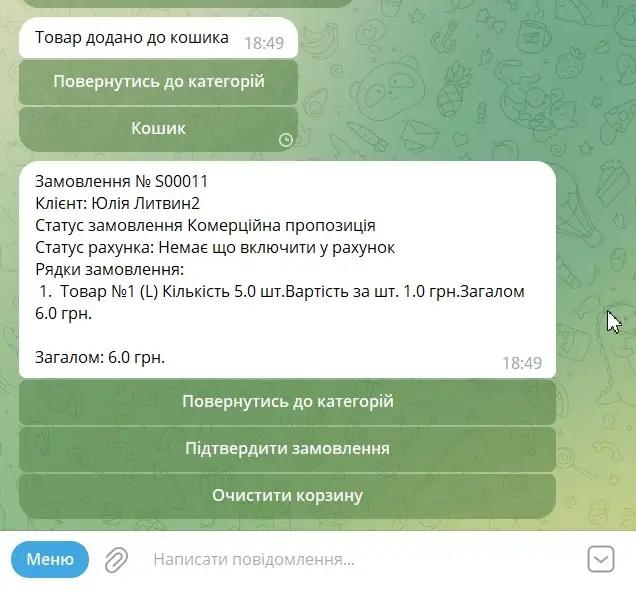
Step 4. Cart setup. Adding/removing items from the cart.
In fields "Notification after adding an item to the cart", "Name of the button to go to the cart", "Name of the order confirmation button", "Clear cart button name", "Message about clearing the cart" the default standard message text is displayed, which will be shown to the user in the chatbot. You can change it to your own.
In field "Notification Cart overview" it is necessary to connect a notification that will be responsible for the appearance of the cart in the chatbot. For this, settings are made in the menu Settings – By external event Discussed in more detail in the section "Notifications."
In the chat-bot, this setting looks as follows:
Step 5. Setting up delivery methods.
If it is not necessary to specify delivery information, you can use the switch "Do not use the delivery method" disable this functionality.
In field "Message about choosing the delivery method" the default standard message text is displayed, which will be shown to the user in the chatbot. You can change it to your own.
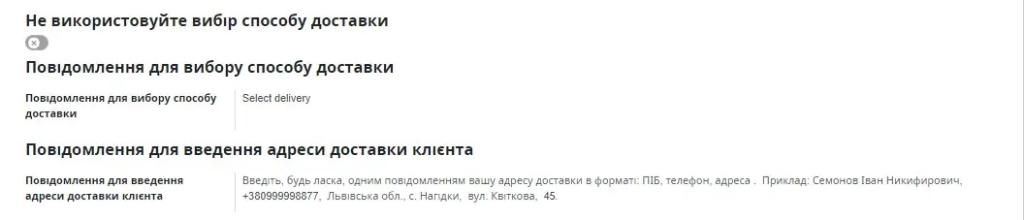
In field "Message for entering the client's delivery address" a template is created for the client to fill in information in the bot about the delivery method. The information is entered into a text field for further verification and approval by company managers.
After entering the delivery information, the user is sent a message that their order is confirmed. The text of the appeal is set in the field "Message for entering the client's delivery address" and by default standard, but change it to your own.
In field "Tags" you can set tags that will be created along with new orders to be able to identify them later in the program and analyze orders from the chatbot.

Step 6. Setting up payment methods.
In payment methods, you can specify whether to send the client a link to the payment service using a switch. To do this, activate the 'Do not use payment link' switch if you do not need to send it.
Otherwise, in the 'Payment Link' field, you need to add a link to the payment service.
In the field "Payment button name"
The default standard message text is displayed, which will be shown to the user in the chatbot. You can change it to your own.

After completing the settings, click the button 'Save'.
5.11.2. Creating 'New Request' in the Requests module.
With the functionality of the chatbot, the Odoo system manager or the user themselves have the opportunity to create a new request in the Requests module through the Telegram interface.
To build the body of the future request, we will use the Survey module. Before starting work, it is necessary to ensure that the module is installed Chatbot Odoo Survey and Chatbot Telegram Survey.
To create a new request, we need to pass the values of all required fields through the telegram bot, these are: Created by, Author, Creation Date, Request Category, Request Type, Description.
Creating a request body template.
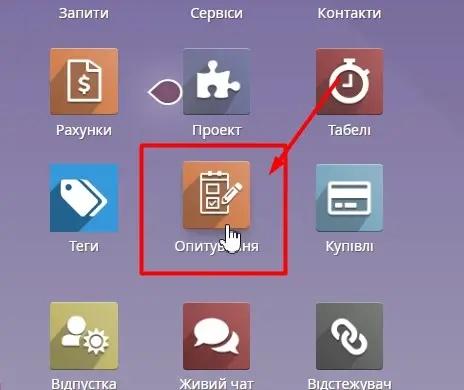
Go to the Survey module:
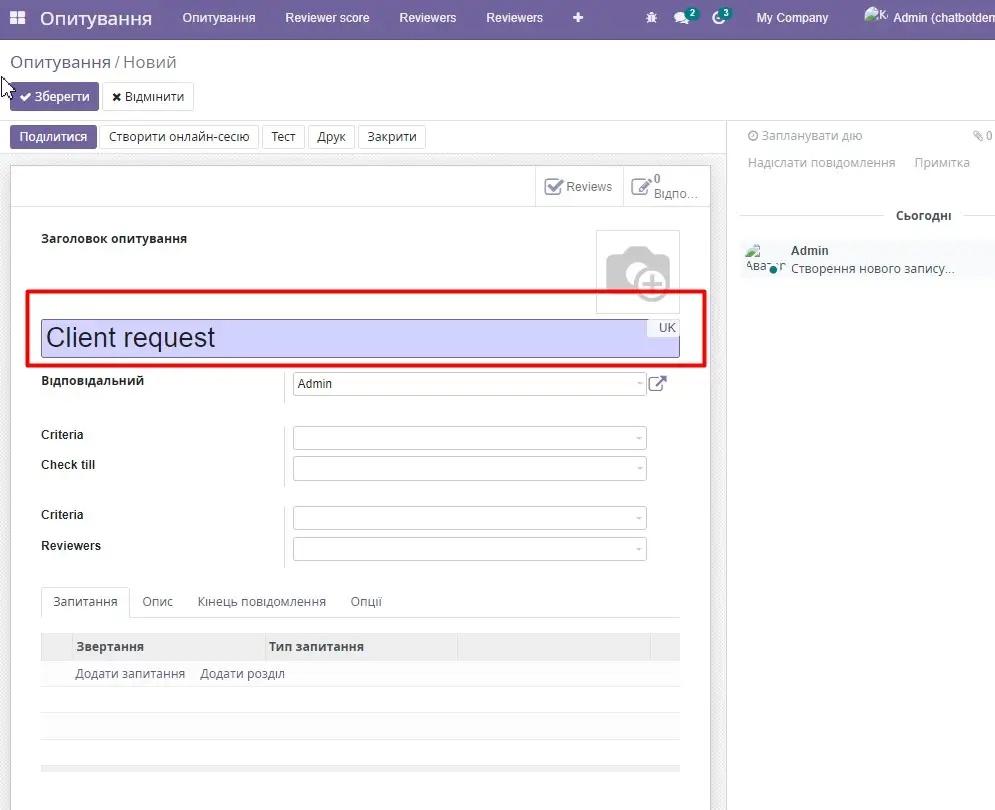
Press the button "Create" and enter the name of our survey. For example, it will be 'Client request':
Since we are not interested in a regular survey, and the result of the survey should be the creation of a new request in the Requests model, it is necessary to go to the tab "Options" and enable the option "Create entity".
In field "Entity model" choose model "Request".

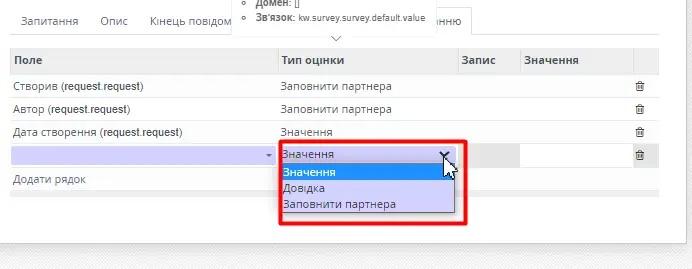
In the 'Default Fields' tab, we add settings for fields that should be automatically filled when creating a request without additional information from the client. These fields are: 'Created by', 'Author', and 'Creation Date'.
In the 'Field' field, select the model field where the value should be recorded:
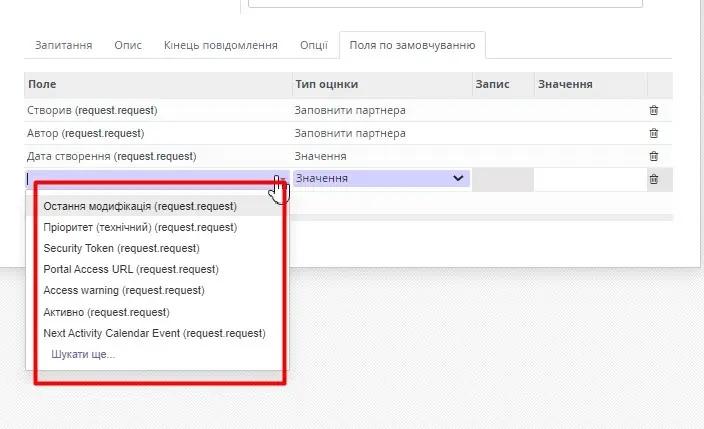
In the 'Evaluation Type' field, select which action should be applied to the selected field:
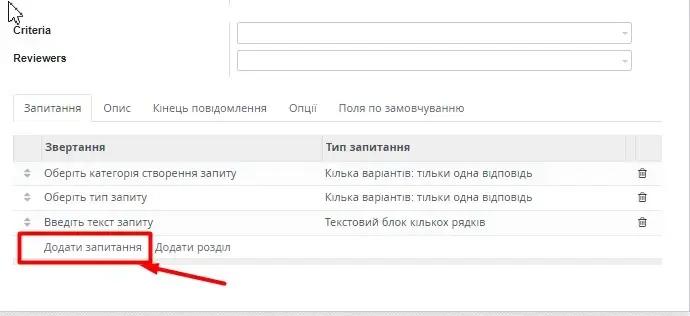
On the "Questions" tab, we create a list of questions that the user must answer for a successful request creation.
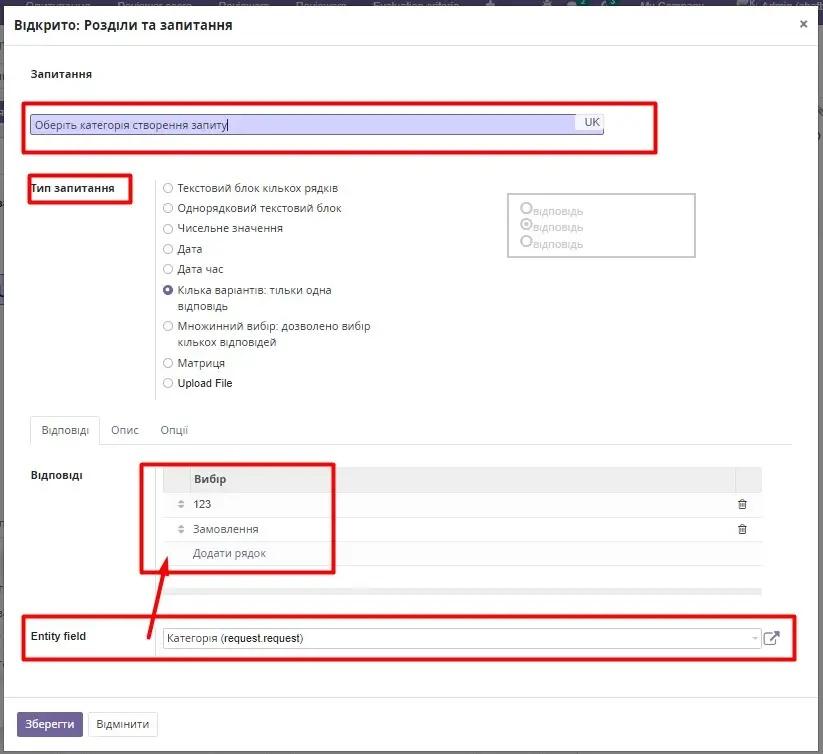
For example, we create a step for selecting a request category. We click "Add question".
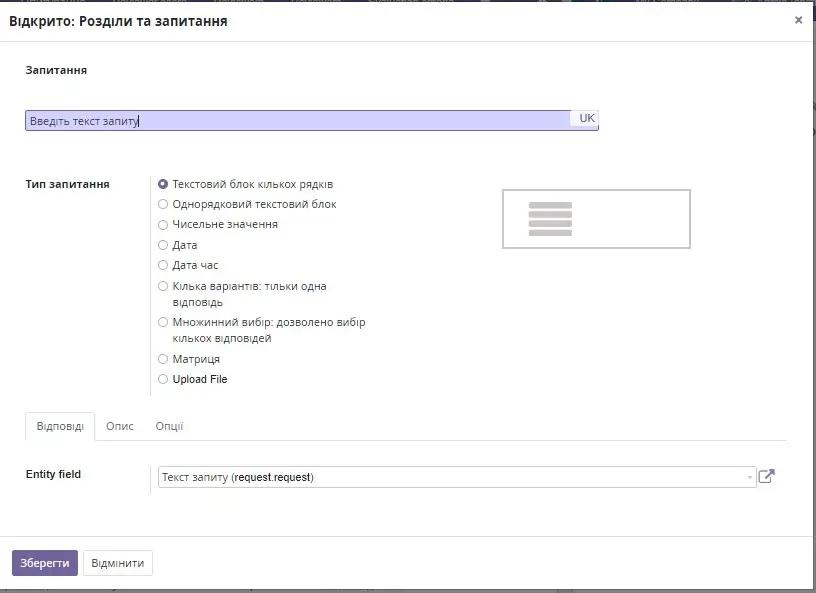
The user is redirected to the data entry form. Enter the name.
In the "Question Type" field, we choose what format of response is expected from the user.
In the "Entity field" field, select a field from the "Request" model for which a response is expected. If it is a reference field and contains answer options, they are automatically pulled into the "Answers" block as shown in the image below. If we expect a text message from the user in response, we choose "Multi-line text block".
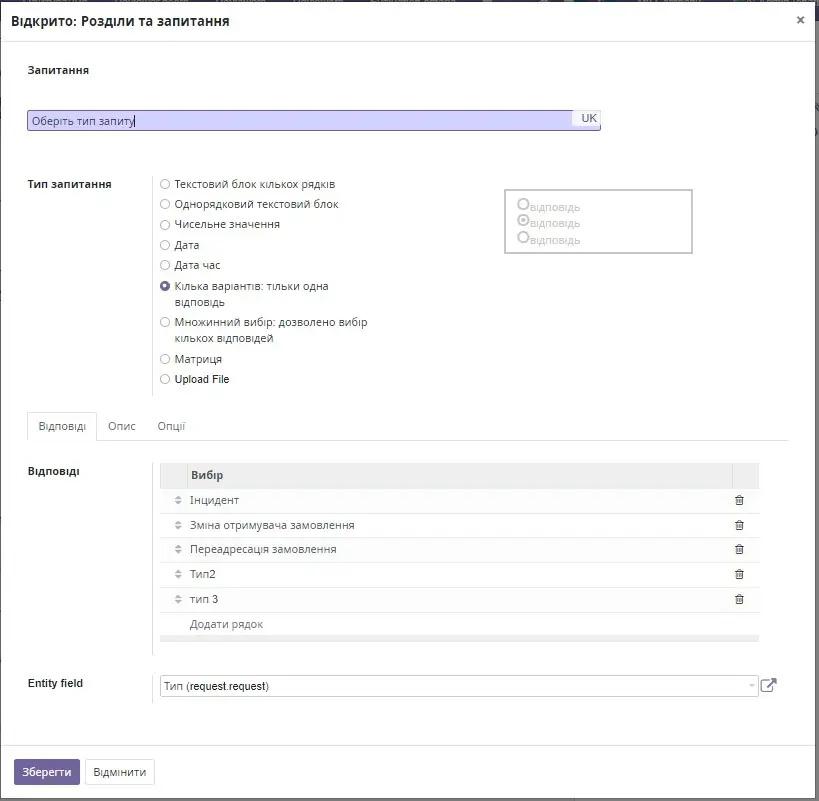
Similarly, we set up the question 'Query Type':
The question "Request description":
Press the "Save" button and with this, our work with the Survey module is completed. We proceed to the step setup in the chatbot.
Setting up a step in the chatbot.
Create a new step.
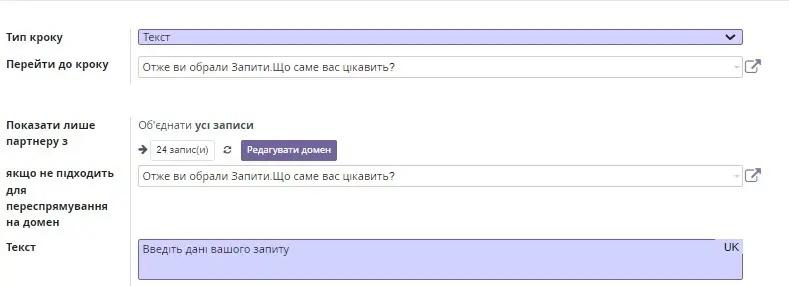
Choose step type "Text".
By analogy with the previously described steps, configure the field values "Show only to partner with", "Go to step", "If not suitable for domain redirection", "Text".
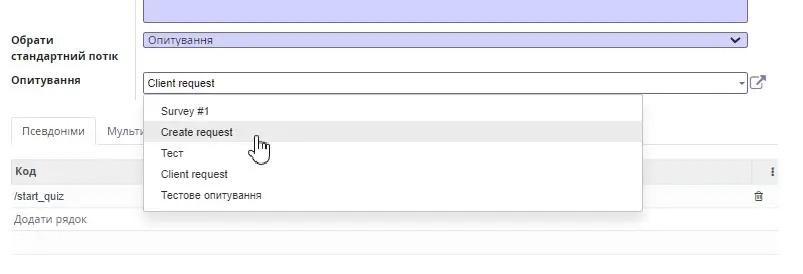
In field "Choose standard flow" choose "Polls".

In field "Polls" choose the created survey:
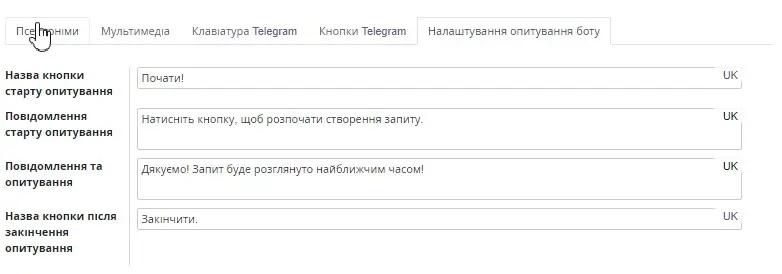
In the 'Bot Survey Settings' tab, we enter the names of the survey start and end buttons. Also, the message text that will be displayed to the user after pressing the corresponding steps:
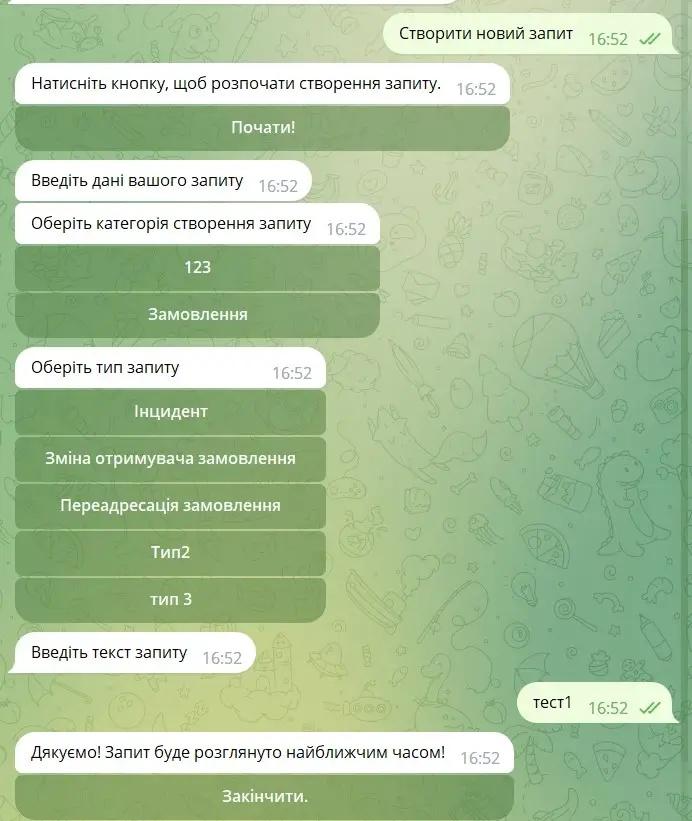
In the chatbot, the operation of this functionality will look as follows:
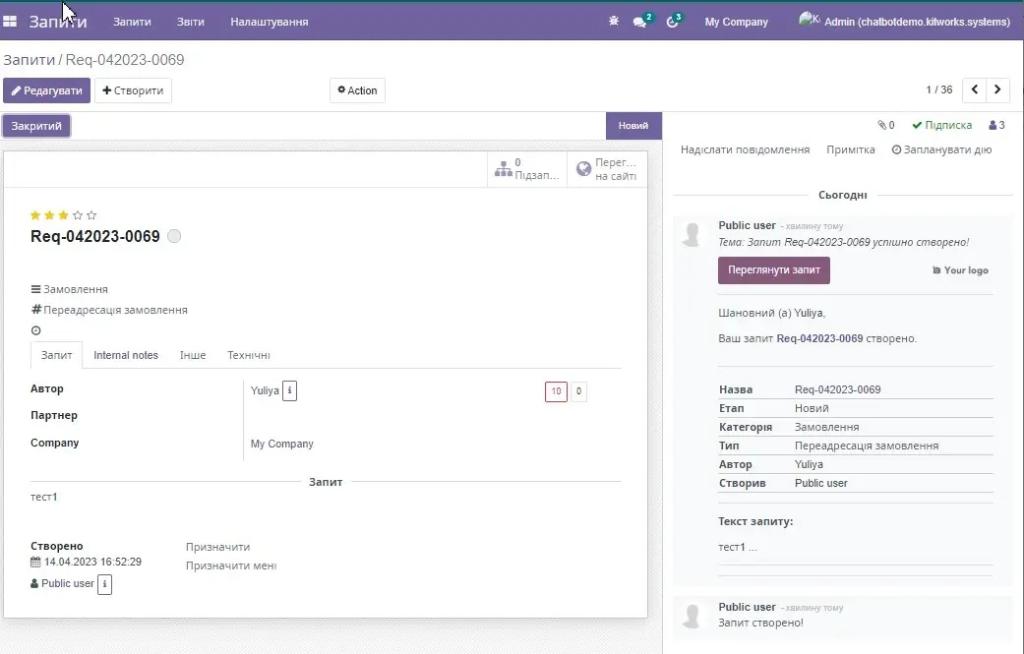
The result of this step's work, a new request created in Odoo in the 'requests' module:
6. Section «Dialogs».
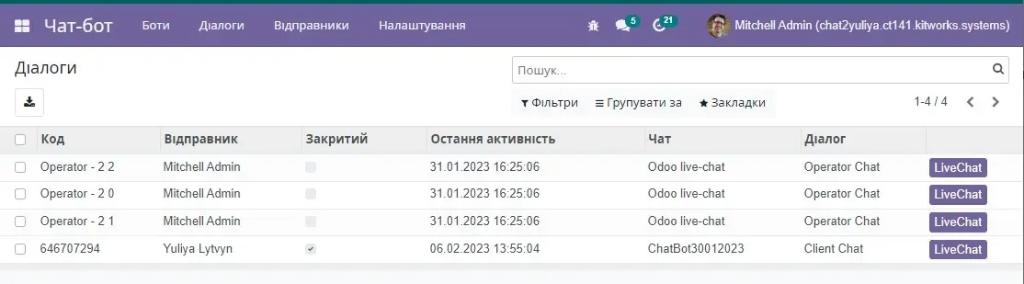
In this section, it is possible to view all the dialogues that were conducted through chatbots.
The section contains the following elements:
Field "Code"- the code of the operator who conducted the conversation with the client.
Field "Sender"- contains information about who is the sender of the messages.
Checkbox "Closed"- indicator of whether the dialogue with the client is closed or open.
Field "Last activity" date and time of last activity in the chat.
Field "Chat"- the name of the chat-bot through which communication was carried out.
Field "Dialog" - type of chatbot through which communication with the client was carried out.
 In the detailed information form about the sender, click on the line of the required dialogue

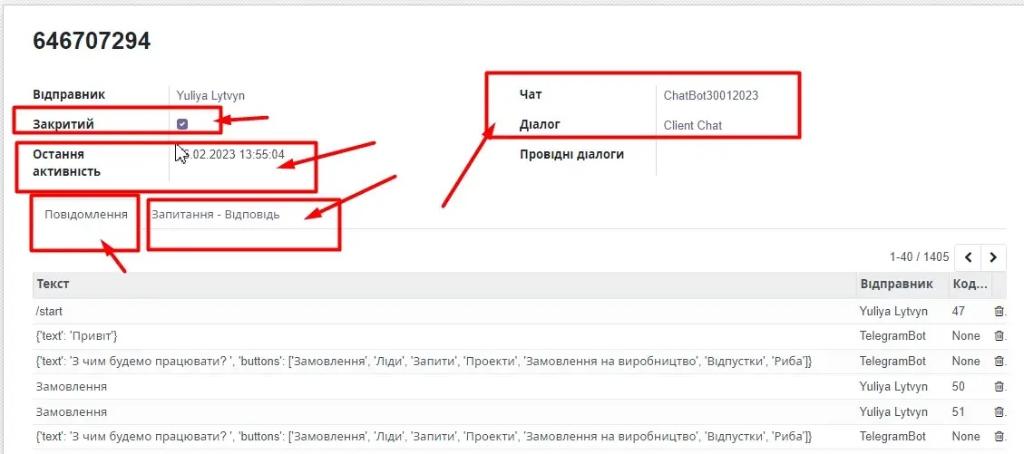
The dialog window contains information in the chat through which the chatbot communication took place – fields "Chat" and "Dialog" accordingly. Open or closed dialogue with the client – checkbox "Closed" When the last chat communication activity occurred - field "Last activity". Full history of the dialogue with the preservation of messages from all participants in the communication process – tab "Message" List of all questions and their answers - tab "Question – Answer".
7. Section "Senders".
Section "Senders" provides all detailed information about message senders, from which messenger and by which user communication was carried out. You can view the detailed history of dialogues with each sender.
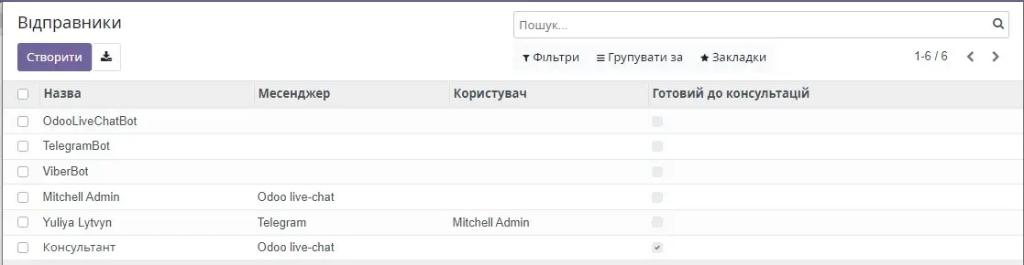
To go to the sender's message history, you need to left-click on the sender's line:

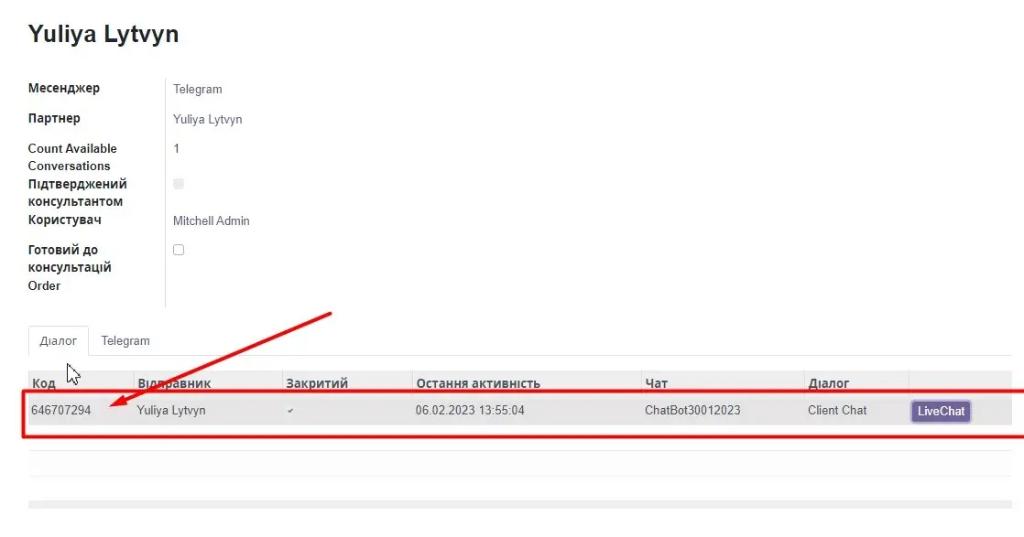
In the form of detailed information about the sender in the tab "Dialogs" click on the line of the required dialog:
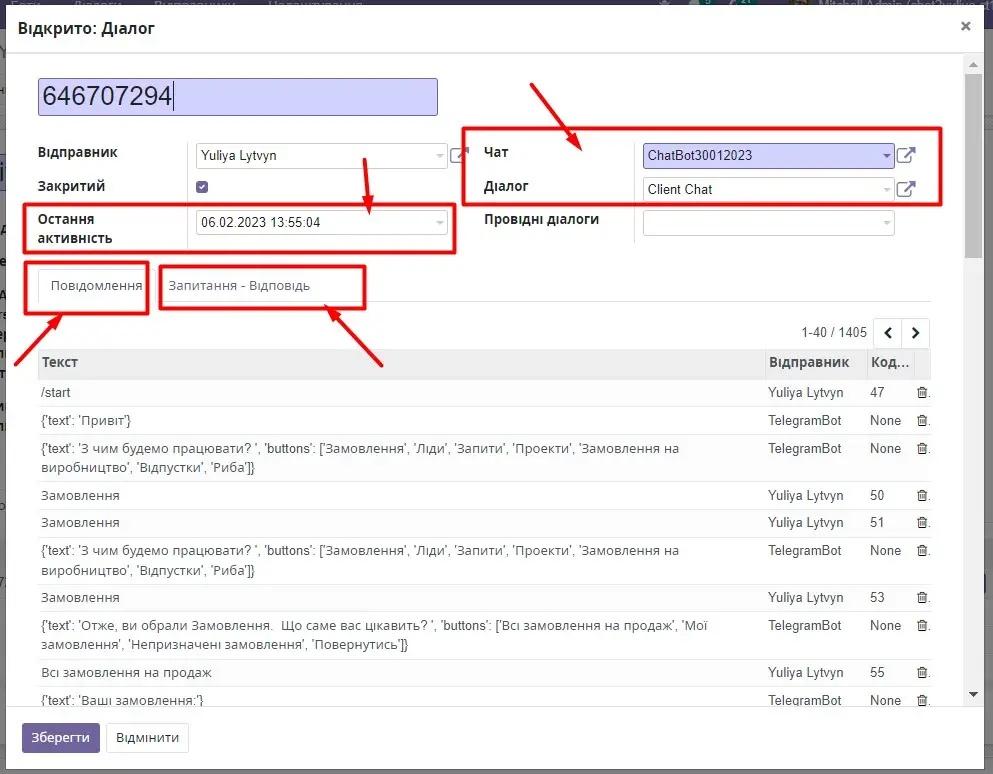
The dialog window contains information in the chat through which the chatbot communication took place – the fields 'Chat' and 'Dialog' respectively. Open or closed dialogue with the client – checkbox" Closed" When the last chat communication activity occurred - field "Last activity". Full history of the dialogue with the preservation of messages from all participants in the communication process – tab "Message" List of all questions and their answers - tab "Question – Answer".
8. Section "Settings".
In this section, it is possible to make additional settings to the chatbot system.
To select the required section, you need to click Chatbot – Settings.
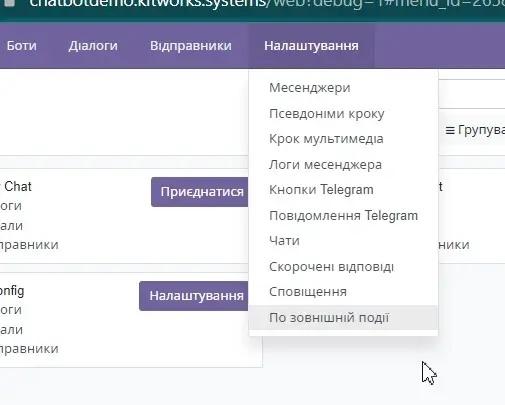
Available settings for the following elements:
- Messengers;
- Step aliases;
- Multimedia step;
- Messenger logs;
- Chats;
- Shortened answers;
- Notifications;
- On external event.
8.1. Messengers.
To go to the section "Messengers" need to open «Chatbot – Settings – Step Aliases".
In this section, the user configures all communication channels, messengers, through which the communication function with the client will be performed.
Detailed instructions on how to correctly set up a communication channel using the example of a Telegram channel are shown in the section "Messenger settings."
8.2. Step aliases.
To go to the section "Step aliases" need to open Chatbot – Settings – Step Aliases.
This section contains a list of all aliases for steps that were created during the construction of the dialogue in the client chat. Each alias is created automatically when the step is saved and is updated automatically with the update of the step. It does not require additional manipulations from the user. It is informational in nature.

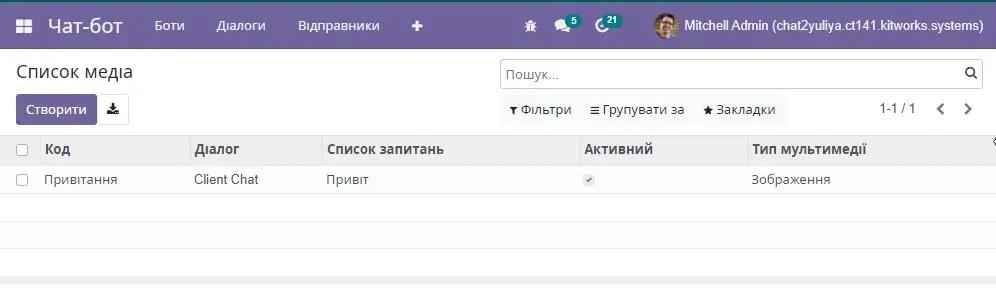
8.3. Multimedia step.
To go to the section "Media steps" need to open Chatbot – Settings – Media Steps.
This section contains a list of all steps to which media files were added during the construction of the dialogue in the client chat. Each record is created automatically when the step is saved and is updated automatically with the update of the step. It does not require additional manipulations from the user. It is informational in nature.
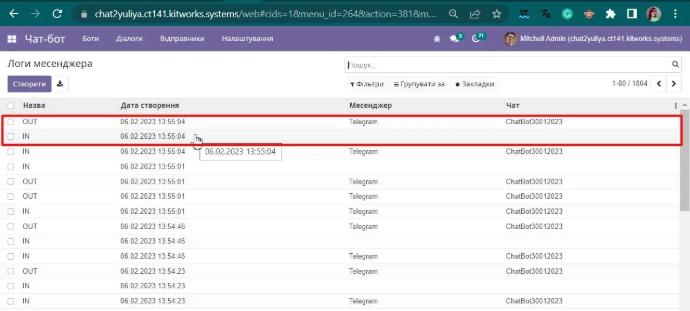
8.4. Messenger logs.
The system logs all actions performed during communication. This allows for the analysis of errors and failures in the communication system if necessary.
To go to the section "Messenger logs" need to open Chatbot – Settings – Messenger Logs.
8.5. Chats.
In this section, there is a list of all chatbots operating in the system. To go to the section "Chats" need to open Chatbot – Settings – Chats.
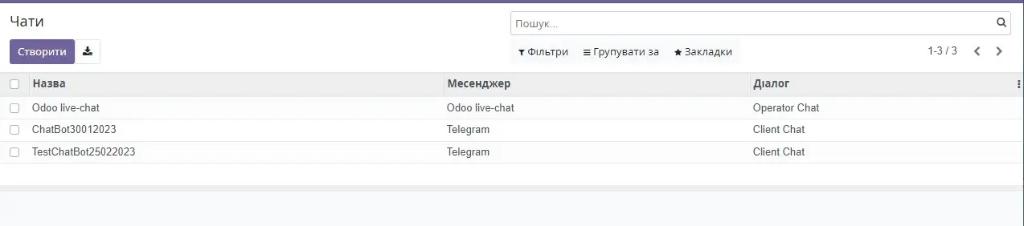
By clicking on the chatbot record, the user navigates to the setup form of this bot. A more detailed bot setup instruction is in the section "Messenger settings".
8.6. Shortened responses.
In the chatbot, to increase the efficiency and speed of responses, it is possible to use pre-prepared messages. To go to the pre-prepared messages settings section, you need to open Chatbot – Settings – Short Responses.
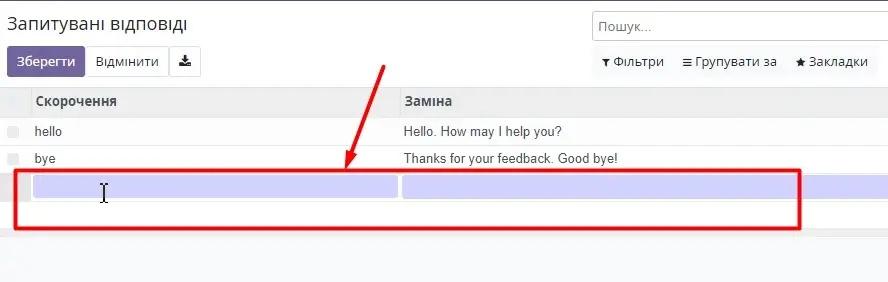
To add a new shortcut, you need to press the button "Create":
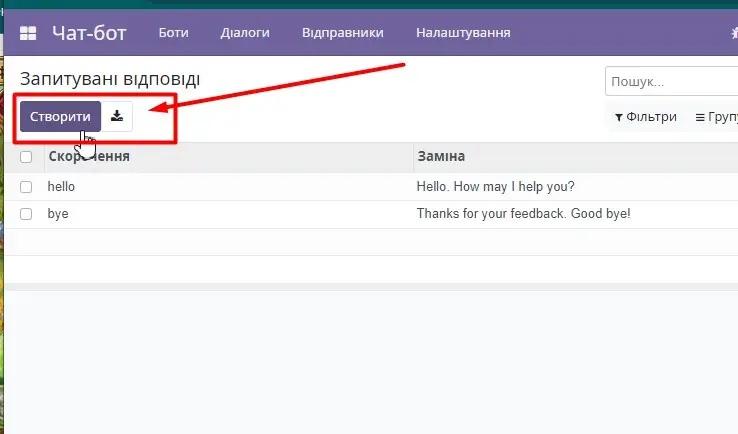
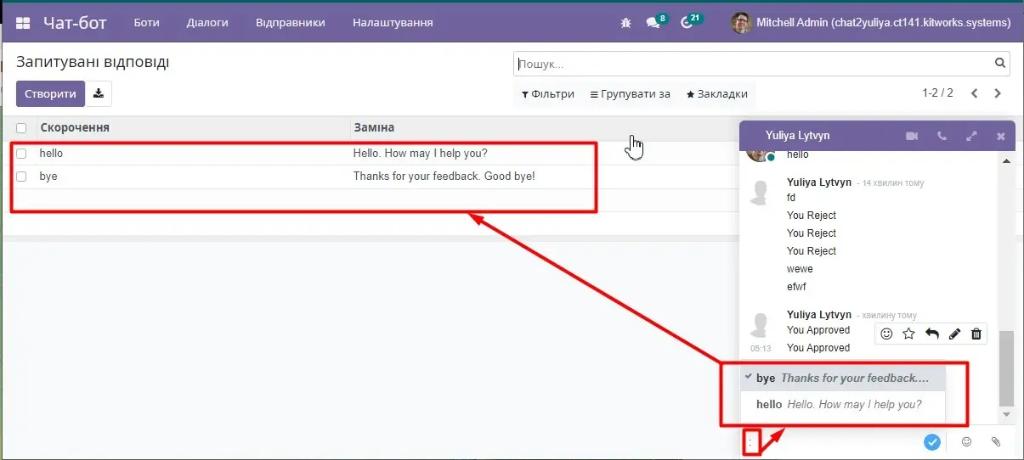
In the new line, enter the shortened name of the message. In the "Replacement" field, enter the message text.
To invoke the shortcut from the consultation chat, you need to press in the message input field ":". The operator is shown a list of all prepared responses. If you start typing the abbreviation name, only those messages that match the filter values will remain in the list.
8.7. Notifications.
Notifications are a rather extensive and important functionality of the chatbot. It allows creating and sending messages to bot subscribers when certain changes are made to the database.
The notification triggers if the following values are specified in the field trigger settings:
- On creation – the notification triggers when a new record is created in the database;
- On change - the notification triggers on record change in the database;
- Upon creation and change – the notification triggers on the creation of a new record and the change of an existing one;
- On deletion – the notification triggers when a record is deleted from the database;
- Based on time conditions – the notification triggers at the configured time intervals.
If the trigger is activated by an external event, the notification needs to be created in the "By external event" section.
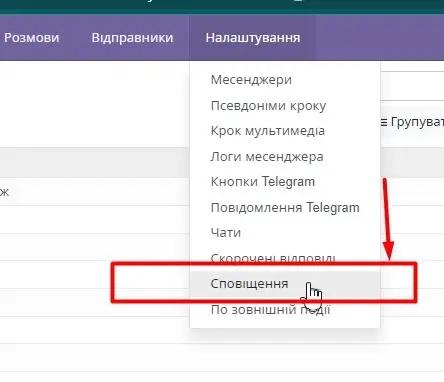
To go to the section "Notifications" need to open Chatbot – Settings – Notifications.
The mandatory fields to fill are:
- Notification title;
- Bot;
- Model;
- Trigger;
- Message.
This functionality provides the ability to create messages and also process database queries based on subscriber requests.
8.7.1. General information on creating notifications.
To create a notification, go to the chatbot settings menu in the section "Notifications":
Press the button "Create":
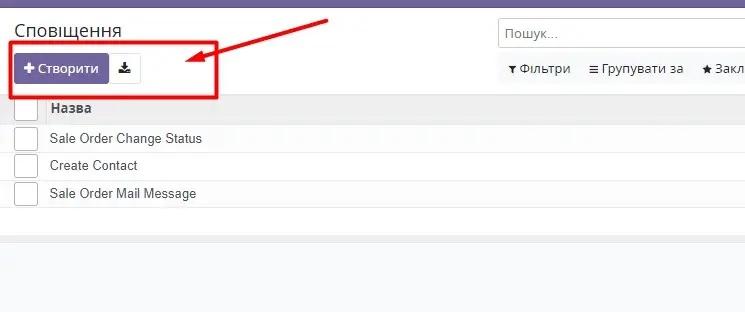
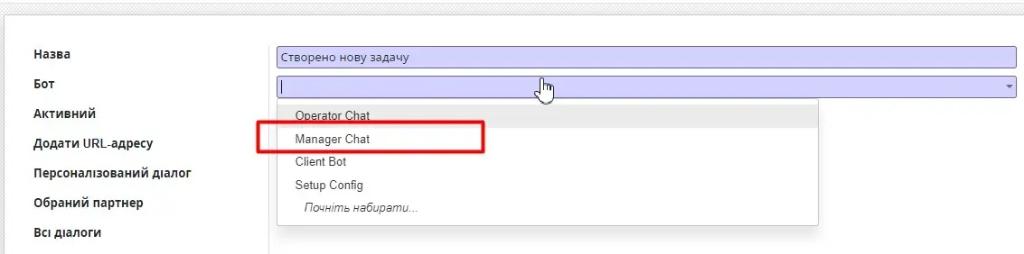
Enter into field "Name" notification name. For example, this will be a notification informing the user that a new task has been created for them. Let's name the notification "New Task Created".

Field "Bot" - a dropdown list of chatbots configured in the system. In this field, we set the value of which bot's subscribers we will send messages to. One notification works only for one chatbot. It is not possible to select multiple chatbots. You can also create a separate chatbot for notifications.
Switch "Active"- allows enabling/disabling notifications for operation. Switch "Active" switch to active position at the very last, after completing all settings.
Switch "Add URL address" allows adding a link to the notification text, which the user can use to navigate to the required website page. For example, a link to a task that was created for the bot user.
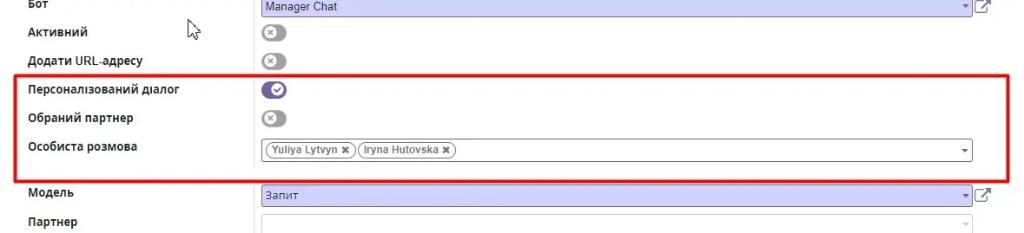
Checkbox "Personalized dialog" - we can select a specific user and send messages only to them. After switching the toggle to the active state, an additional field " appears. "Private conversation", which is available for editing. In it, you can set one or several users for whom this notification will be triggered:
Checkbox "Selected partner"- allows sending messages to partners specified in the field "Partner" notification settings window. If the switch is off, the field "Partner" not available for editing.
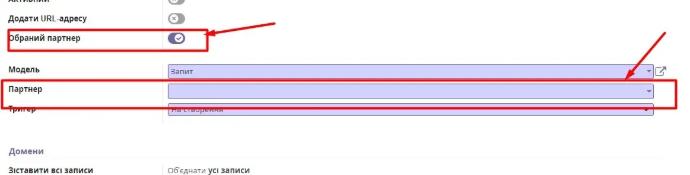
Works or the switch "Personalized dialog", or "Selected partner" If both switches are off, then in the field "All dialogs" displays a list of clients with whom communication is available in this chatbot if there are no restrictions on the list of partners or users for whom the notification is triggered.

Field "Model" allows specifying which data model this notification works with.
In the dropdown list of models, the first seven values from the directory are displayed. To continue searching, you can click the 'Search more...' button or start typing the model name, and all filter-matching values will be displayed in the list.
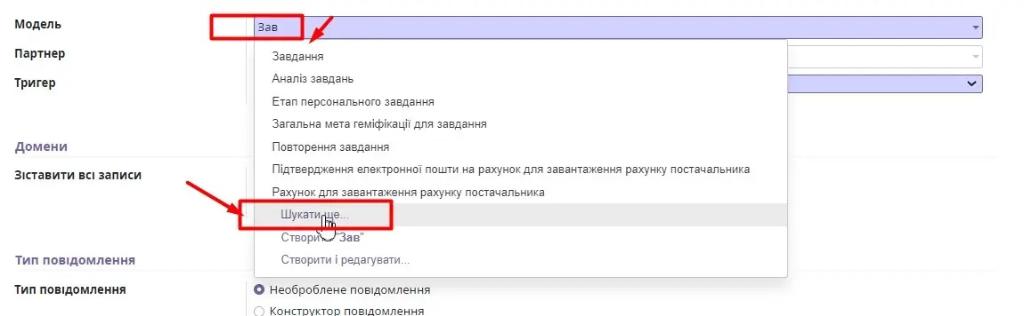
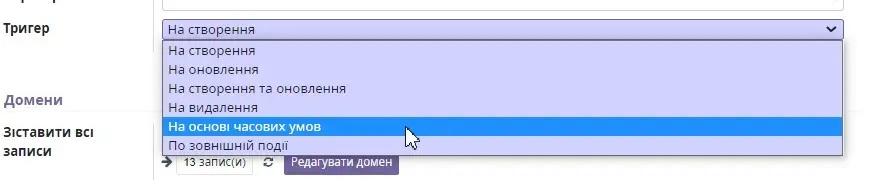
Field "Trigger" - a dropdown list that allows you to select which specific fields the user's notification reacts to and executes.
The system is configured with the following types of triggers:
- On creation – the notification triggers when a new record is created in the database;
- On change - the notification triggers on record change in the database;
- Upon creation and change – the notification triggers on the creation of a new record and the change of an existing one;
- On deletion – the notification triggers when a record is deleted from the database;
- Based on time conditions – the notification triggers at limited time intervals;
- By external event - the notification is triggered when a certain external event occurs, for example, pressing the corresponding button in the chatbot.
In this section, notifications are created for all types except 'By external event'. Depending on the trigger type, the set of fields required for completion changes. Let's consider in more detail:
When using types "On update" and "On creation and update" additional in the field needed "Trigger fields" specify the fields, changes to which trigger the event and the user receives a message in the chatbot.

When using the type "Based on time conditions" additional settings involve fields:
- "Trigger date" - specifies the field where the notification processing time is configured;
- "Delay after start date" - allows you to set how many hours after the trigger date the event will occur.

Using additional filters, you can configure the display of all model values or only those that match the selected criteria.
By default in the field "Domain Level of all records" there is a filter that returns all system records. To set up additional filters, you need to click the button "Edit domain".
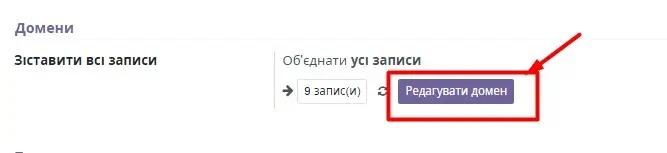
In the new domain editing window, click the button "Add filter":
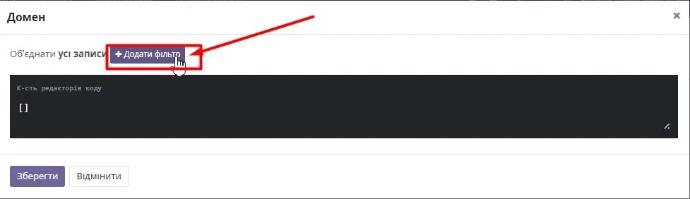
For example, we want messages to be sent for projects of a specific manager. In the first field, select the name of the model field by which we will filter. For example, this will be the field "Manager of project". The value can be found in the dropdown list by scrolling or by starting to type in the search bar and selecting from the values that will match your filter.
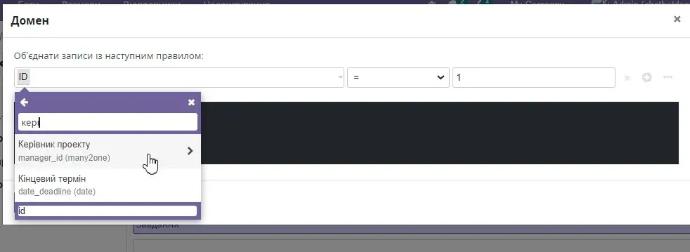
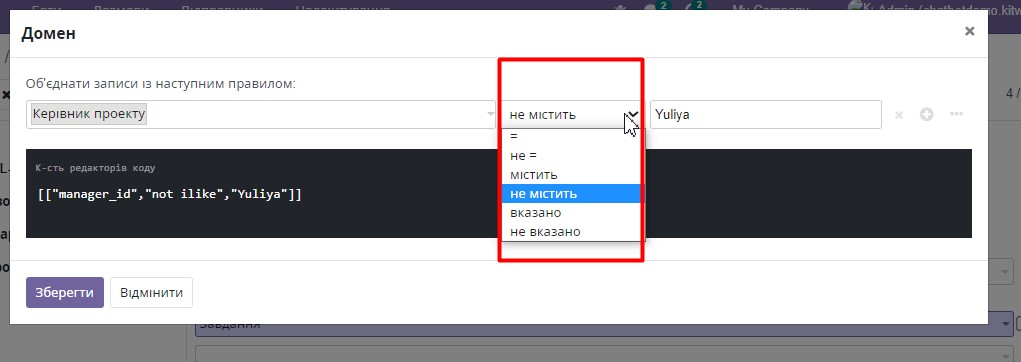
In the second field, choose the condition that will be applied to the selected model field. If chosen "Specified" or "Not specified", then no additional values need to be entered for filtering. If the selected function does not match the values "Specified" or "Not specified" then enter the value in the third field:
The editor allows configuring a multi-level filtering structure. For example, in addition to filtering by project manager, we can add a filter by project completion date. To do this, click "+", in the new line, similarly search for the necessary value, configure the filter, where, for example, the completion date is after March 16.
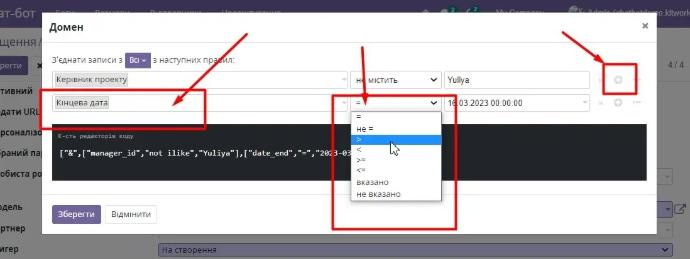
After completion, save the settings by clicking the button "Save". Our filter is immediately applied to the selected data model and displays the number of records that meet the conditions.

Field "Message type" allows you to choose how exactly the response will be constructed for the subscriber in the chatbot:
- Unprocessed message – text string;
- Message constructor – constructor of data model field values.
If we need to send an informational message to the client about the change in the status of his order with an arbitrary text structure, it makes sense to use the message type "Unprocessed message".
In field "Unprocessed message" enter our text message and model fields whose data should be displayed in the subscriber's notification. To display the correct value in the message, not the field name, it needs to be enclosed in double curly braces: {{ object.body }}.The message text will look as follows:


Tab "Template did not find records" - contains the response the user receives if, for some reason, the notification cannot be executed. By default, there is a standard response: «Sorry, I don't understand you». The response text can be changed.
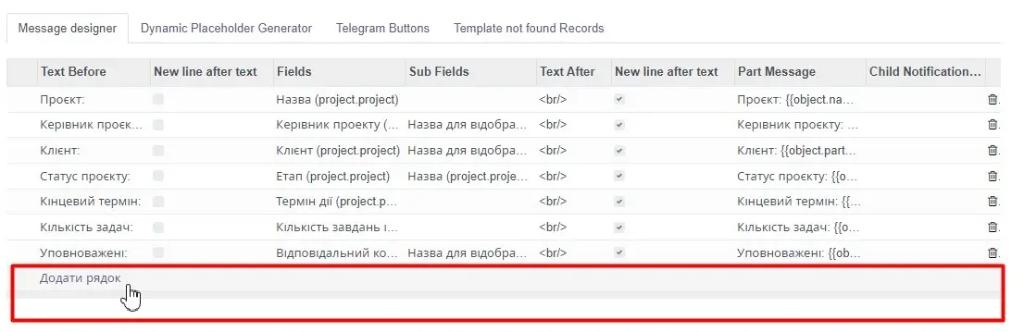
If the notification needs to display a message in a specific format, for example, the project name, task name, task text, task responsible person, and end date, then we use the message builder.
In the 'Generate number for message line' field, it is possible to enable a numbered list for response lines. If the switch is inactive, the lines are displayed without additional numbering.
The constructor contains the following fields:
Field "Text before" - text that is displayed before the specified field. For example, "Project:" before the project name;
Field "New line after text"- checkbox that allows you to set a line break if necessary;
Field "Default fields" - fields whose values should be displayed in the chatbot message. For example, project;
Field "Subfields" - outputs the value of the child field for the "Default Fields" field. For example, the project field is a code, and it is necessary to display its name by code for display;
Field "Text after" text displayed after the field value;
Field "Part of the message" - system field, filled after saving the notification. Contains a template of how the entire line will be displayed together.

How to create different types of Telegram buttons is described in the Automated Actions documentation.
After completing all settings, press the button "Save", to save and apply the settings.–Example of a notification when creating a new task.
8.7.2. Example notification when creating a new task.
It is necessary to create a notification that will be sent to all responsible for the task if the task is newly created or changes have been made to the responsible person for an already created task.
For example, we want to receive notifications in the form of:
You have been assigned a task REQ 2478-64
Created a task: Ivanov Mykyta Serafimovych
Task content: It is necessary to redirect order S000012 from Nova Poshta, Kyiv, branch №15 to branch №10.
Execution date: 13.03.2023
Performers: Sydorenko Vasyl
Enter into Chatbot - Settings – Notifications. Press the button "Create".
In the field 'Name' enter the notification name "Created a new task".
Turn on the switch "Add URL address" so that the user can quickly navigate to the desired task.

Since not all users should receive notifications, only those who are responsible for the task, it is necessary to choose a model and restrict the partner.
For this, we turn on the switch "Selected partner" and in the field "Partner" specify the field from the Task model - Authorized.

In field "Trigger" set the value "On creation and update". If it is necessary for it to trigger only on newly created tasks, then we simply choose "On creation".
In field "Trigger fields" select the Task model field – Responsible User, Authorized.

To create a final message for the user, we use the message constructor.
In field "Type message" select type "Constructor message".
In field "Designer messages" the template of the final message to the user is displayed after adding all the necessary fields.
Table "Designer messages" configure as follows:
Field "Text before" can remain empty. In our example, we enter the value 'You have been assigned a task' in the field. In the 'Default Fields' field, we select the field where the task name is stored - 'Display name (project.task)'.
If you do not know which field you need to use, you need to go to the module you are working with. Enable task editing and see what the field is called if its name is not specified, as in the project field:
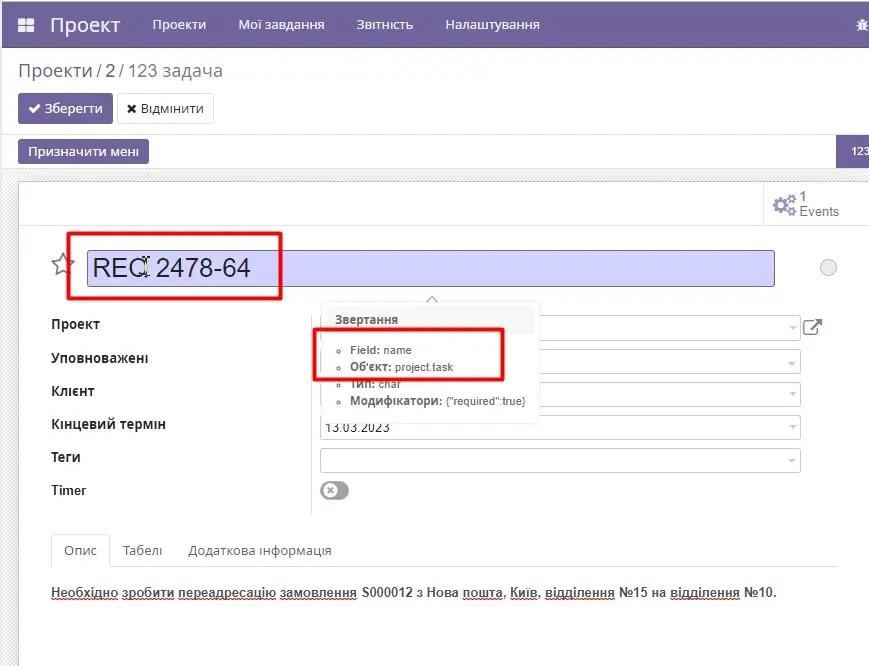
Similarly, set all the necessary fields for the message.
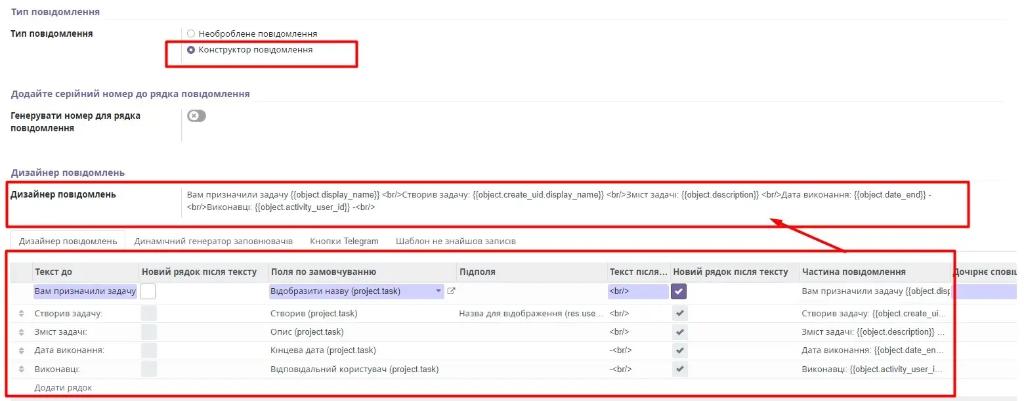
After entering all settings, enable the switch "Active":
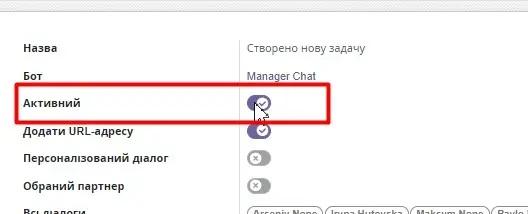
8.7.3. Example of notification when updating the sales order status.
It is necessary to create a notification that will be sent to all partners and subscribers of the task when new information is added to the task.
For example, we want to receive notifications in the form of:
A new comment has appeared in the task.
Comment text: {{object.body}}
Task: link to the task.
Enter into Chatbot - Settings – Notifications. Press the button "Create".
In the 'Name' field, enter the notification name 'New comments in task'.
Turn on the switch "Add URL address", so that the user can quickly go to the task they need. The link to the task will be added at the bottom of the message.
In field "Bot" select the chat-bot for which the notification will trigger:
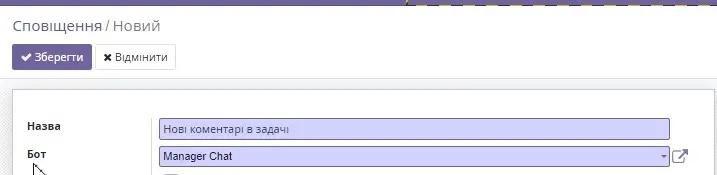
Since not all users should receive notifications, only those who are partners or subscribers to the task, it is necessary to choose a model and restrict the partner.
Since we need to track the appearance of new messages, in the field "Model" select "Message" and the trigger will activate the creation of a new message.
Turn on the switch "Selected partner" and in the field "Partner" specify the field from the model Message - Partner requiring action, for which a new message will be received.
In the field 'Trigger', set the value 'On creation'.
Since we are only interested in task messages, in the field "Mail message model" select the 'Task' model. After this, an additional 'Child Partner' field appears.
In it, we set the field from the Task model - Subscribers (Partners), to connect the distribution of messages to all subscribers of the task to which changes have been added.

To create the final message to the user, we use the message type - raw message.
In field "Unprocessed message" enter the text of our message to the user. If you need to add a field to the text, the placeholder expression can be obtained on the "Dynamic Placeholder Generator" tab.
For this, go to the 'Dynamic Placeholder Generator' tab. In the field "Field" choose the required field. In the field "Default value" enter the value that will be displayed in the message if the field is empty. A ready-made expression template will be displayed in the "Placeholder Expression" line. Press the button "and" and the field will be added to the text on the tab "Unprocessed message":
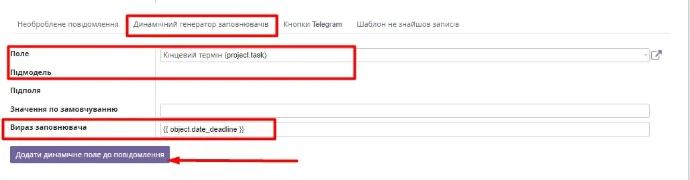
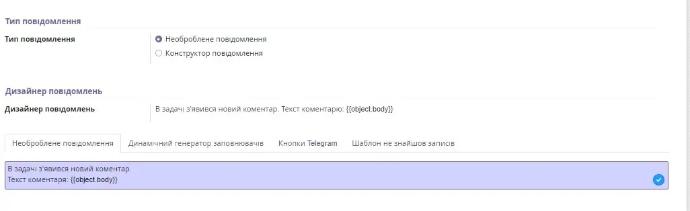
After entering all settings, enable the switch "Active":

In the chat-bot, this implementation looks as follows:
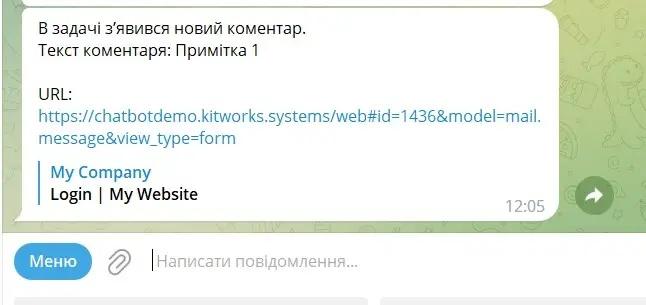
8.7.4. Example notification based on time conditions.
Let's consider an example of creating a notification where the trigger is a certain date. For example, the deadline for completing a task.
Enter into Chatbot - Settings – Notifications. Press the button "Create".
In the field 'Name' enter the notification nameOverdue tasks".
Turn on the switch "Add URL address", so that the user can quickly go to the task they need. The link to the task will be added at the bottom of the message.
In field "Bot" select the chat-bot for which the notification will trigger:

Since not all users should receive notifications, only those who are responsible for the task, it is necessary to choose a model and restrict the partner.
For this, we turn on the "Selected Partner" switch and in the "Partner" field, we specify the field from the Task model – Authorized.

In field "Trigger" set the value "Based on time conditions".
In field "Trigger date" we set a field of type date or date-time, which is the trigger for starting the notification distribution.
In the additional fields "delay after start date" there is an option to configure a delayed or warning notification.
For example, the deadline is a date format field without hours. If in the first field instead of zero we set a negative value, for example, -2, the notification will trigger two hours before the specified date 00:00:00. If a positive value is set, the trigger will activate on the specified date at 02:00:00.
In addition to hours, it is possible to set a delay in minutes, days, and months.

To create the final message to the user, we use the message type - raw message.
In field "Unprocessed message" enter the text of our message to the user. If you need to add a field to the text, the placeholder expression can be obtained on the tab "Dynamic placeholder generator".
For this, go to the 'Dynamic Placeholder Generator' tab. In the field "Field" choose the required field. In the field "Default value" enter the value that will be displayed in the message if the field is empty. A ready-made expression template will be displayed in the "Placeholder Expression" line. Press the button "Add a dynamic field to the message" and the field will be added to the text on the tab "Unprocessed message":


After entering all settings, enable the switch "Active":

In the chat-bot, this implementation looks as follows:
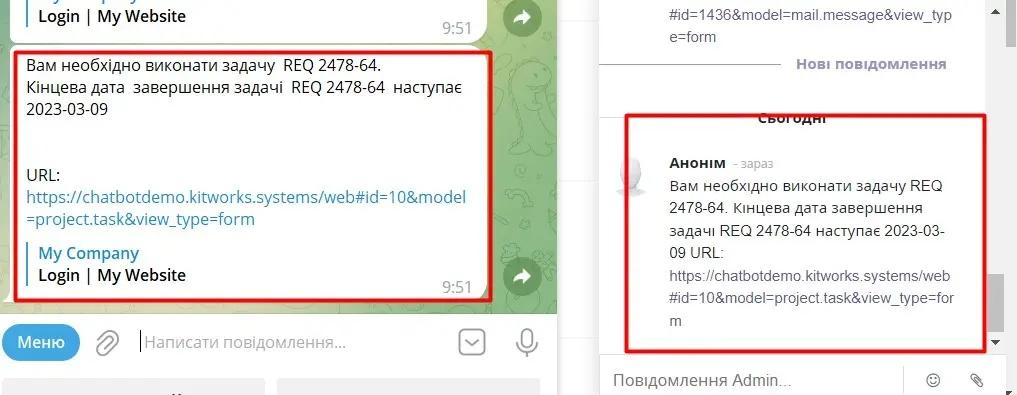
8.8. On external event
This section is dedicated to notifications that need to be displayed to users in the chatbot depending on certain external events. In particular, this concerns requests that arise after pressing buttons in the telegram bot during a dialogue in the Question-Answer format.
General information about the field entry methodology is described in the section General information on creating notifications.
Notifications come in several levels of nesting: single-level and two-level. Let's consider each type in more detail.
Single-level notification.
A single-level notification can be called a notification that provides detailed information on the current data model without referring to related additional data models for creating in-depth detailing. An example could be a notification about the list of all leads. The information is displayed only from the leads model, without referring to additional child models:
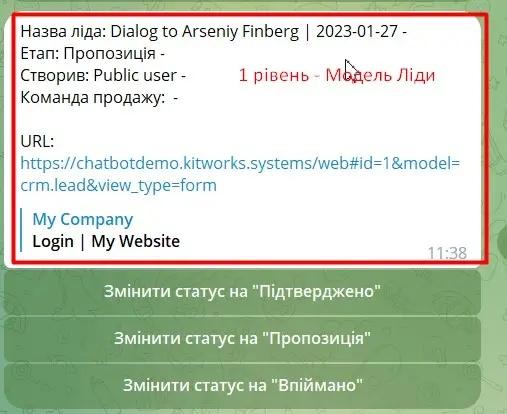
In the final message settings, only the data of the current model participate without referring to the child notification:
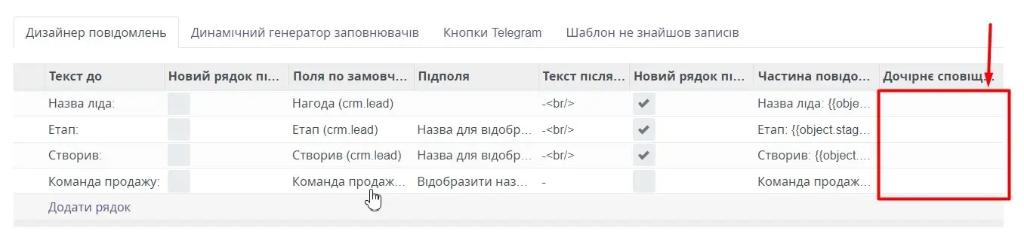
Two-level notification.
A two-level notification can be called a notification that consists of several single-level notifications attached to the parent data model. Thus, they provide more comprehensive detailed information. An example is a notification that provides information about all client orders with detailed display of order lines:
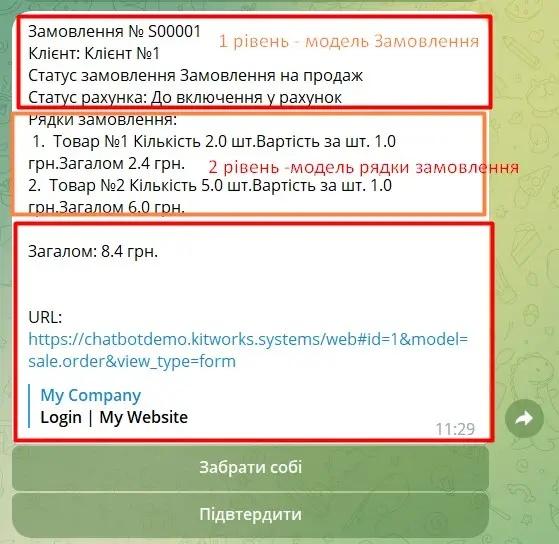
This notification consists of two models: the parent model 'Order' and the child model 'Order Lines'. A separate notification is created for each model, forming its detailed informational message:
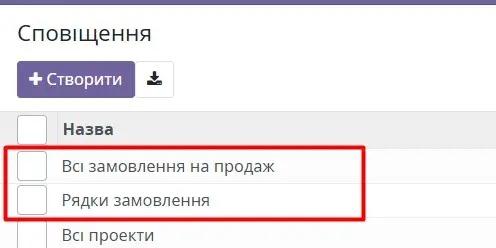
Separately built notifications are combined in the notification settings for the parent data model, "Orders", in the tab "Message designer".
For this, we select the appropriate field in the parent data model and connect a child notification for it in the column "Child notification".
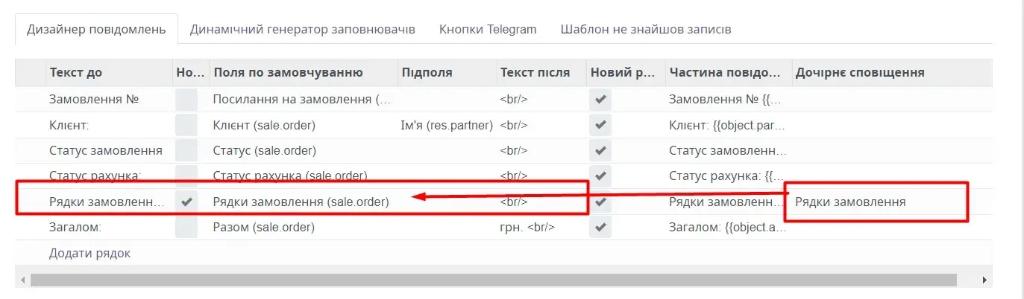
We will discuss the two-level notification settings in more detail in the sections Example Level 1. Notification All orders on sale and Example Level2. Notification 'Order Lines' for 'All Sales Orders"."
How to create different types of Telegram buttons used in notifications is described in the Automated Actions documentation.
8.8.1. Example Level 1. Notification 'All sales orders'.
Let's create a notification that, after pressing the button in the chat-bot "All sales orders" will return us a list of orders in the format:
Order № order_number
Client: Client_name
Order status Order_status
Invoice status: Invoice_status
Order lines:
Line No. Product Name Product Quantity Product Cost Total Product Amount.
...
Total: Order_amount.
URL: order_link
It is necessary to switch to the app Chatbot – Settings – By external event. Press the button "Create".
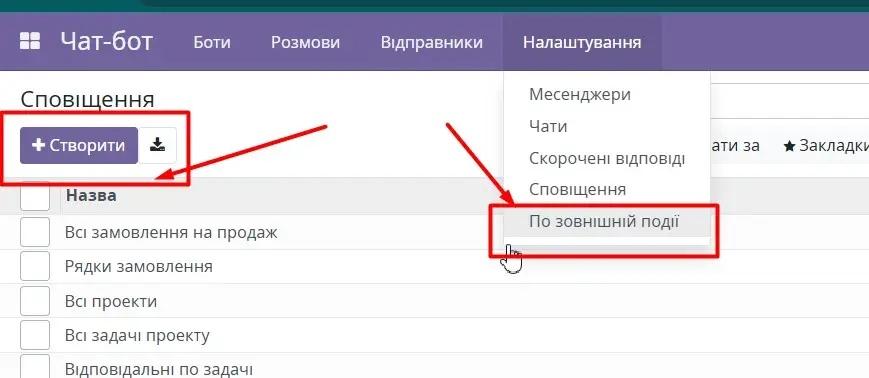
In field "Name" enter the notification name: 'All sales orders'.
If it is necessary to display a link to the page in the notification, then set the switch "Add URL address" active.
In the field Domains "Level of all records" we do not change anything, as in this example we are interested in all sales orders without exception.
The final message to the user in our case is not arbitrary but contains a certain data structure. To create it, we use the message builder. In the field "Type message" select "Message constructor".
In the message designer tab, press the button "Add" line and in turn, according to our starting template, we add all the necessary fields from the Order model:
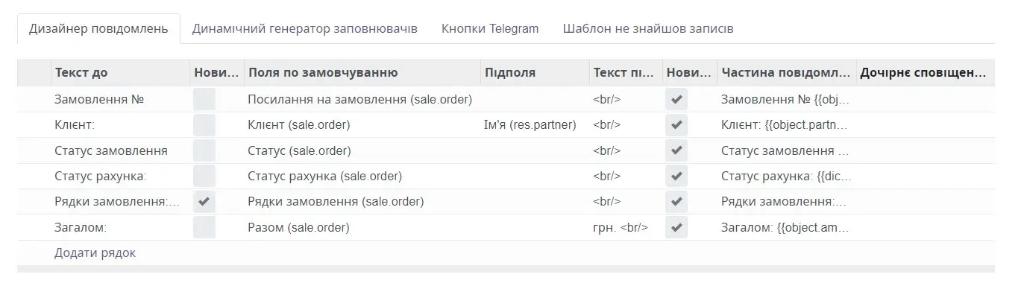
Press the button "Save" and connect the created notification in the step settings to the required button:
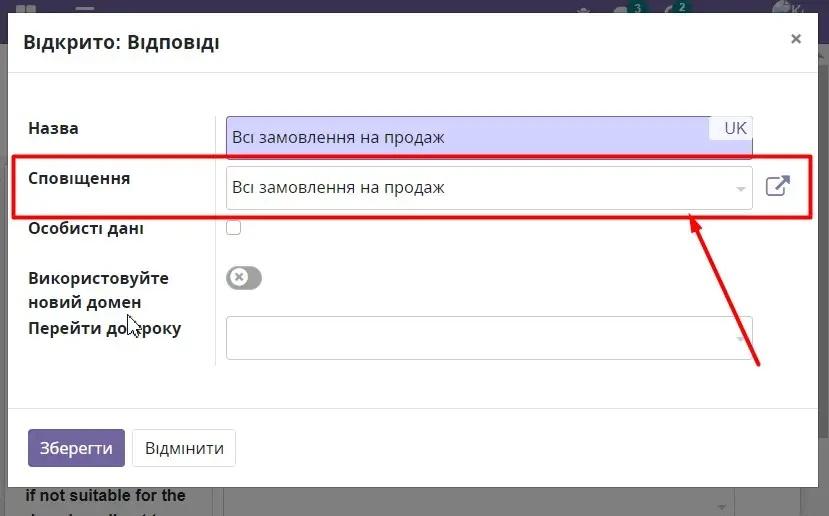
In the chatbot, after pressing the button "All orders" we receive a message in the following form:
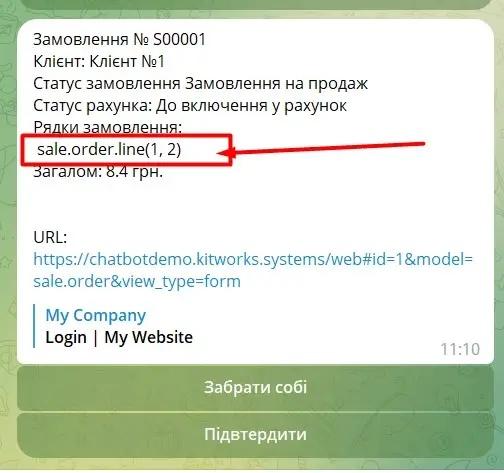
As we can notice, instead of detailed breakdown by order lines, we get the value stored in the field "Order lines". It is necessary to create a notification "Order Lines", which will return a list of lines for each order with product details. (Section 'Level2. Notification 'Order Lines' for 'All Sales Orders'.').
Open the notification settings "All Sales Orders" and add the newly created notification "Order Lines" in the "Child Notification" column:
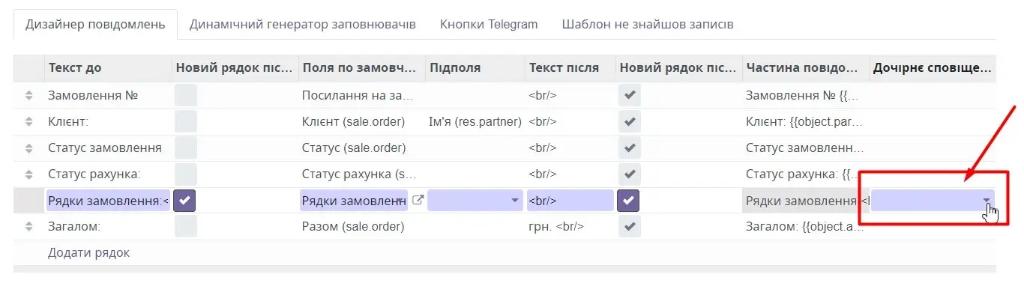
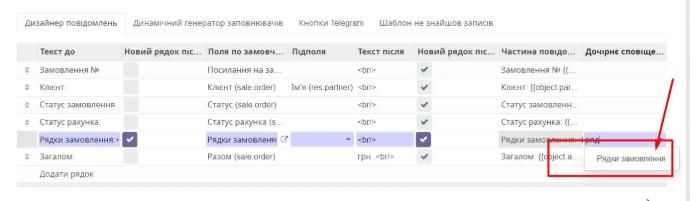
Press the button "Save" and settings and go to the bot. In the bot, press the "All Orders" button again and we will get a list of orders with detailed information on each ordered item:
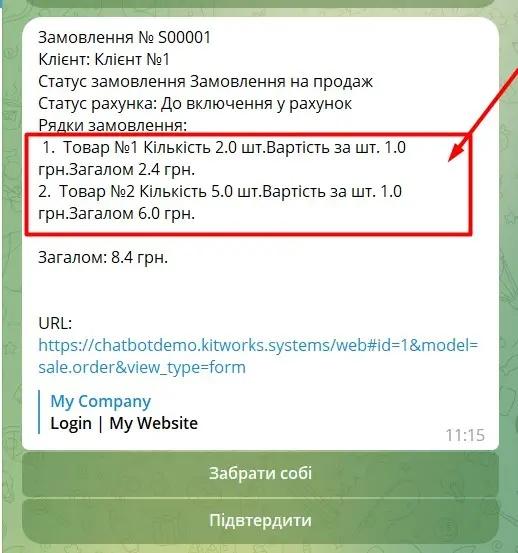
8.8.2. Example Level2. Notification 'Order Lines' for 'All Sales Orders'.
Let's consider an example of creating a child notification that is part of a first-level notification and provides detailed information about its components.
We go to Settings – By external event and press the button "Create".
In field "Name" enter «Order lines».
Switch "Add URL address" do not activate as we are not interested in the link to each individual order line.
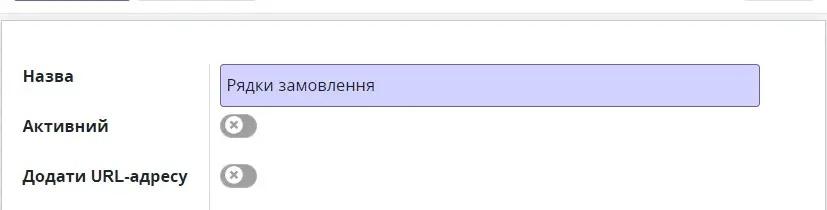
In field "Model" choose Sales Order Line.
In field "Trigger" we set "By external event", because we will request the information after pressing the button in the chatbot.
To ensure that each order line has its unique number in the message in the 'Add serial number to message line' section, we enable the 'generate number for message line' switch:
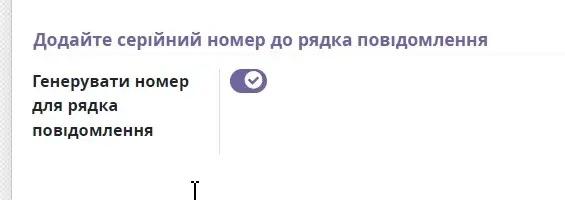
With the help of the message constructor, we form the response structure that will be displayed to the end user as follows:
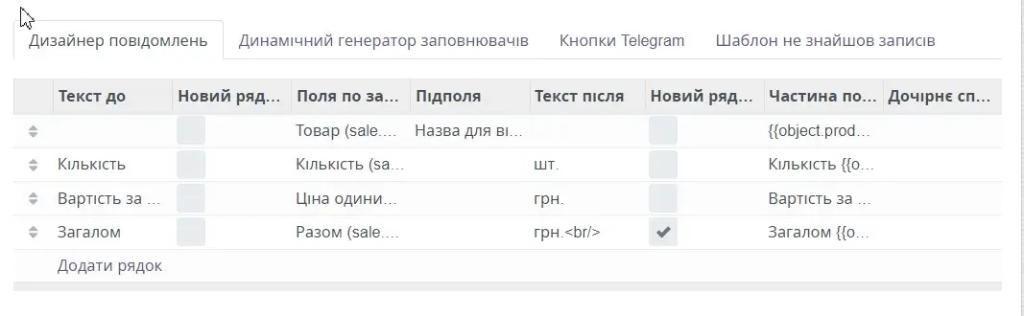
8.8.3. Notification for creating a request.
Let's consider the second option for creating a notification on request. For example, when selecting the 'All projects' button, the user needs to be shown a list of all their projects and provided with the ability to view a list of all tasks by projects.
To create a new notification, you need to press button "Create".
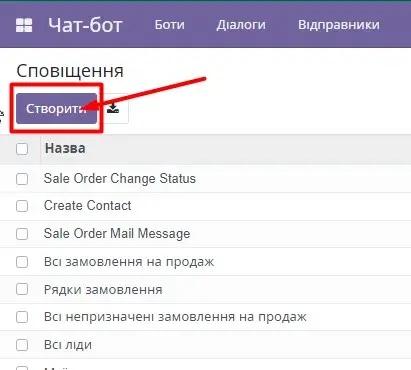
The window for creating a new notification opens.
In field "Name" enter the name of our notification, for example, 'All projects'.
Switch "Active" allows you to enable/disable notifications. The "Active" switch is switched to the active position at the very last stage, after completing all settings.
Switch "Add URL" allows adding a link to the notification text, which the user can use to navigate to the required website page. We enable the 'Add URL' switch so that a link is added for each order.
Field "Model" allows specifying which data model this notification works with.
In the dropdown list of models, the first seven values from the directory are displayed. To continue searching, you can click the 'Search more...' button or start typing the model name, and all filter-matching values will be displayed in the list.
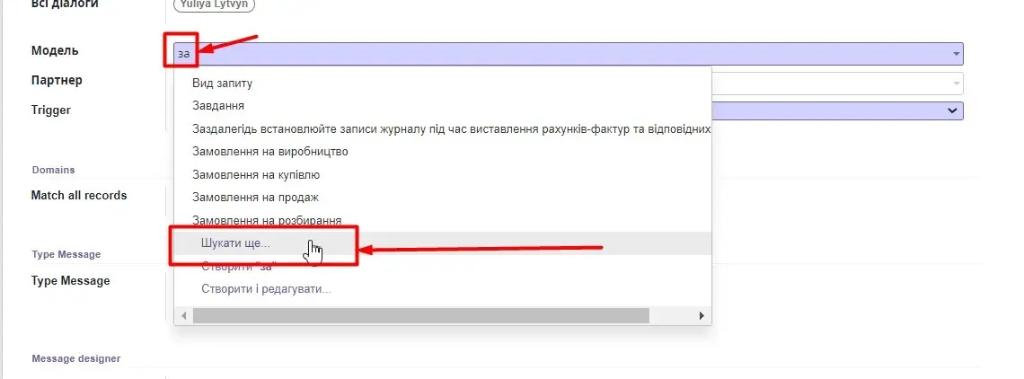
Select the value "Projects".
Field "Trigger" - a dropdown list that allows you to select which specific fields the user's notification reacts to and executes.
The system is configured with the following types of triggers:
- Upon creation;
- On change;
- Upon creation and change;
- Upon deletion;
- Based on time conditions;
- On external event.
In our example, we choose the value "By external event" because the notification should trigger only after the corresponding user request.
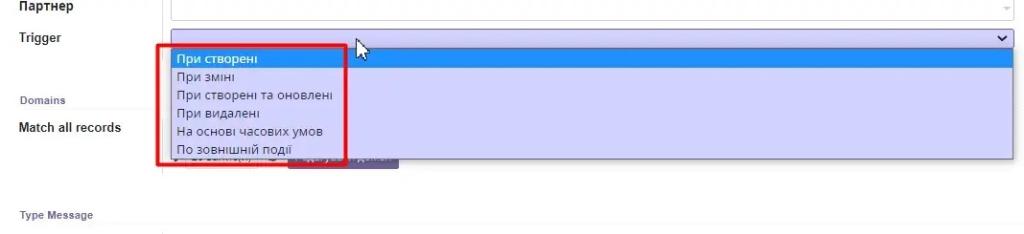
Since our notification provides a response, namely a list of projects at the client's request in the bot, then in the field "Trigger" set the value By external event.
По замовчуванню в полі "Match all records" there is a filter that returns all system records. To configure other values, you need to click the "Edit domain" button. In our example, we need to display all values, so we will not change the filter. How to configure the filter can be viewed in the section 9.10.1 Notification for creating messages.
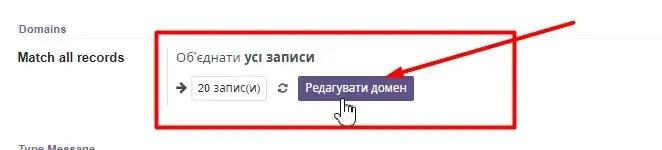
Field "Type Message" allows you to choose how exactly the response will be constructed for the subscriber in the chatbot:
- Raw Message – text line;
- Construct Message data model field value constructor.
If we need to send an informational message to the client, for example, about the change in the status of his order, it makes sense to use the message type "Raw Message".
If the client needs to be provided with a structured response for each element of the request, for example, details for each project, then the message constructor " is used. "Construct Message".
To add a new line, you need to press the button 'Add line':